Well, my ebay purchase has arrived - a big whack of Old Glory Marian Romans from a TMPer in the US. Nothing appears to be broken, and not too much is bent; the shipping was fast (and the cost very reasonable); and as an added bonus I now have enough rice crispies to open a breakfast bar!
So now it's time for the clean up. I guess a toothpick to get rid of the wedged crispies, an old brush to swipe of the surface dust and a bit of huffing and puffing for the rest will be a good start?
I'm a couple of days into the painting of my last batch of Strategia e Tattica Romans. There are 64 infantry and 19 cavalry underway, with these figures making up the numbers for the remainder of the allied legion and a 'blue shield' cavalry contingent.
Once these are done there will be enough figures for two consular armies at 48 figures per legion/ala (16 hastati and 16 principes, 8 triarii and 8 velites) or for one consular army at 96 figures per legion. There will also be 27 'red shield' cavalry, 18 'blue shield' cavalry and 21 Minifigs chaps that can be pressed into service as needed. With four command stands and 3 mounted commanders, I hope that this will have the Romans sorted for some time to come!
Here are some of the partially-completed principes, with triarii in the background.
These were undercoated gray and given a dark brown wash (mixture of Future, Tamiya black and brown). Next was a dark flesh undercoat, mixing flesh with red brown. Shield backs and pilum shafts were then painted wood brown and the mail given a coating of Tamiya smoke with a touch of black dribbled in. The tunics were blocked in in white; the hair done; the straps and belts done in burnt umber; the shoes/sandals done in red brown. Following that the helmet crests were hit with red, blue or black and the shield faces painted a darker blue. The flesh has been given a second coat, so it's time to move onto the final stages.
Next up will be the greaves, helmets and shield bosses in yellow bronze. The scabbards will be done in a red brown after that. Then will come a touch up for the pilum shafts and shield backs, a highlight for the tunics, highlights for the helmet crests (the 'pop' feature on these figures) and silver for the pilum heads. The velites will have wolf skins done, then all figures will have their bases painted grass green and the last flesh highlight added. To seal the job a coat of my own 'dip' will be applied, followed by two coats of Future and a spray of matt varnish.
After that it will be time to base them, and get a game underway!
They don't look like much now, but given another few days they will hopefully be in a more presentable condition...
As we continue to paint, we find that over time we pick up new tips, try out new methods, discover new paint combinations and otherwise improve our skills in many minor ways. This is wonderful for current projects, but there comes a point when some of our earlier armies begin to look a bit ragged by comparison to the newer paint jobs.
I'm starting to find this process is occurring for me now, and I've been trying to think up and experiment with ways that I can spruce up older figures without having to do a disproportionate amount of work on them. Of course, some really old figures (ebay purchases, etc) need to have the paint completely redone, but that's a topic for another day. For the types of figures I'm talking about here the paint has held up all right; it's simply that the original paint jobs were not very good, and that they don't match well with the newer output.
Here then are some of the ideas I've experimented with for improving old paint jobs:*
* Please be aware that these tips are for 15mm figures, so I don't know how transferable they are to other scales!
1) Washes. Giving a figure a wash can help to improve the look. I've used this for figures which originally had a flat paint job without much highlighting or shading, and have used both Future/Klear washes and my own version of 'the Dip' for this purpose. It's not a cure-all, but it's a relatively quick and painless way to add a bit of depth and consistency to a figure.
Plusses: quick; adds depth to colours. A universal wash helps to create consistency in finish, which can be helpful if different types or thicknesses of paint have been applied.
Minusses: can result in some bleeding if the wash is area-specific. Will mess up figures that were not well prepped or that did not have strong sculpt definition to begin with.
Verdict: Be cautious using washes with older figures. Make sure that the figures have decent sculpt definition to work with, and make sure that there is good initial paint coverage before you start. Don't use it on figures that have relied on paint (as opposed to the sculpt) to add detail. It works well on horses, cloaks, tunics and flesh areas that look a little flat or tired. This method is also good to add depth to hair, manes and tails, which often get short shrift in original paint jobs (or they did in mine!).
2) Highlights. Adding a highlight to areas of flat colour can quickly add life to figures. The highlights can be either painted or dry-brushed on. Highlighting is one of the best ways to bring older figures into line with newer figures.
Plusses: relatively speedy, adds oomph to a figure.
Minusses: there is opportunity for error in colour selection; it can turn to custard if the highlights are overdone or the paint off the brush is gloopy.
Verdict: Highlights are - in pretty much every case - essential to any spruce-up job. The highlights will add pop to the figure and make it compatible with your newer paint jobs (assuming you do use highlights on your newer paint jobs, of course!).
3) Repainting selected features. While the goal of this exercise is to get older paint jobs up to the mark as easily and painlessly as possible, there are times when a selective repaint might be useful to ensure consistency between older and newer figures in the same army.
Plusses: having all belts, straps, shield backs, boots, spear shafts and so on the same colour adds a sense of unity to the army. If there are different shades of brown all over the place consistency can be lost (which may not always be a bad thing, of course!), whereas the same shades used throughout bring uniformity.
Minusses: not every army needs consistency. Also, it can be a lot of work, and you may feel that the results are not likely to be worth the extra effort put in.
Verdict: uniformly repainting features that figures have in common is an excellent way to help blend newer figures in with older ones. It is probably not necessary in any other case, unless you had skimped on painting certain features in your earlier paint jobs.
4) Covering up missed areas. This is an essential. When I look back at my first paint jobs I'll often find places where I didn't properly cover up the undercoat. Typically, these areas will be between the face and the hair, or sometimes between the tunic and the arms or legs. Neck areas are also a danger spot. These definitely need to be fixed.
Plusses: gets rid of unsightly mistakes and oversights; hides poor original paint skills. Not much more needs to be said!
Minusses: it is fiddly and annoying. You need to match up the paints, and will need to repaint whole areas if you can't do so. It may require you to take figures off their original bases so that you can reach the areas that need to be touched up. It's a pain in the backside.
Verdict: it needs to be done. It's probably the worst part of the sprucing up job, but if you don't bother with this then you may as well not bother with any of it.
5) Finding a 'pop' feature and exploiting it. The idea of this is to find something on the figure or element of figures that can be painted brightly and highlighted nicely to draw the eye: headbands, a fine belt or strap, a cloak or helmet crest and similar things all qualify as potential pop features. These are the kinds of things that, if given a little more effort, can really elevate the appearance of an otherwise average figure or base.
Plusses: draws the eye and gives the appearance of universal attention to detail when the reality is that it's only partial attention to detail.
Minusses: can be time-consuming, and can be overdone. The temptation is to try and have everything pop out when at 15mm scale you only need one thing, or perhaps two on a command figure.
Verdict: an essential element, but not necessarily for every figure. We're dealing with large numbers of figures so it's the overall effect that's important. For someone of my limited painting abilities, less is more: it's best to find one thing to emphasise rather than trying to have everything on a figure 'pop' and in so doing reduce the overall impact.
6) Putting decals on shields. This is one area that is still in the 'thinking' stage. I need to get off my backside and order some shield decals, but it hasn't previously been a priority given the number of figures, rules and source books I've had - and continue to have - designs on.
Plusses: adds gravitas to a figure, not to mention a bit of historical accuracy. In my case, half-hearted attempts at shield patterns have detracted from rather than added to the figures I've painted, and to fix those up would make me feel a lot better about the armies in question (I'm looking at you, my Carthaginians!).
Minusses: fiddly; will require the figures to be removed from their bases for the decals to be attached.
Verdict: essential long term, but something I am still putting off for the moment - at least until I have to get cracking on redoing my Libyans!
Well, after nothing much doing on the painting front since January, I knuckled down the other night to finish off some partly-done figures, and touch up some others.
First up, four artillery pieces and six crew, all from Essex. I made a bit of an idiot of myself when buying the crew as I'd assumed they would come in packs of eight. Unfortunately, they didn't; so I really need to pick up another pack some time. For the meantime I decided to base the figures individually so that I can spread them around as needed.
Second, twenty-four Old Glory Greek javelinmen. I painted up the first lot some time ago (these are from the old packs of 50 figures), and had kept putting off doing the second batch. They're a bit boring to paint, but it was a good chance to experiment with a few different colour combinations for tunics, and I'm pleased to have finished them. They still need to have their shield bosses done in chrome silver, but otherwise they are ready to go onto the table.
Finally, the touch ups: some Old Glory Apulian javelinmen which were hurriedly painted some years back. They were pretty roughly done as I was in a hurry (not to mention being a pretty limited painter!), but this was compounded by my putting them in an old biscuit box that had a very flimsy bottom. After they'd fallen out twice I put them in a better box, and only pulled them when I was desperate for troops...
Anyway, a couple of years later, here they are after a touch up. They are still not very nice to look at, but by brightening up the headbands, the tunics and the flesh they look a lot better than they did. Shields are still crummy, but I didn't feel much desire to redo those right at this moment!
So, the painting tally for this year now stands at 118 Romans, 8 Balearic slingers, 24 Greek javelinmen, 4 artillery pieces and 6 crew, with another 48 Apulians touched up. Hopefully this will be a good warm up for the next bout of painting...
Richard Taylor has just sent out an email to various newsgroups outlining the contents of Slingshot 276, and there looks to be plenty of good material in there. I'm particularly keen to see Jim Webster and Stewart Hey's articles, though I'm sure I will enjoy all the others as well. Here is Richard's email again, for those who may not have seen it elsewhere:
The latest issue of Slingshot, the bi-monthly publication of the Society of Ancients, should be posted out in the next week or so.
The contents of Slingshot 276 are as follows:
The Reign of Decius, by Ike Syvanne
What Really Happened at Zama, by Stewart Hey
The Golden Age of the Franks Part 3, by Robert Heiligers
The Sdok Kok Thom Inscription, by John Walsh
The Italian Campaign of Mago, by Jim Webster
Quick Resolution for Ancient Battles, by Julian Lorriman
DBMM at Challenge, by Steve Rathgay
Double DBA, by Phil Steele
Assyrian figure review, by David Edwards
Guardroom, by Phil Barker, Mick Hession, Adrian Nayler and Alastair McBeath
Following on from my last post on a solo refight of Paraitacene using Lost Battles, I wanted to note down a few points that arose, and do so while those points are still fresh in the memory...
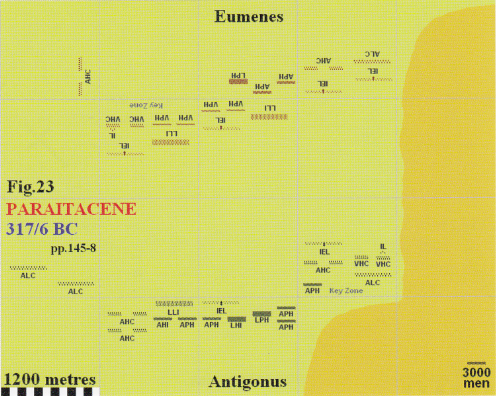
To that end, here is a screenshot of the historical deployment taken from John Acar's VASSAL module. Eumenes, who has the first move, is shown on top of the screen, and has his units designated in red.
As it stands Eumenes is outmatched on both flanks, so he is confronted with an important decision immediately - does he shore up one flank or both? If so, how?
One possibility is to use some of the central phalangite reserve to support the weak left. This is not ideal, however. If the left stays in place it will take two turns for the phalangites to get into position (one turn to about face; a second turn to double move into the zone and turn to match the facings with the current inhabitants). If the left advances, it will still take two turns to reach them, but they will also have to weather the first attack from Antigonus, which may make the sending of reinforcements pointless anyway.
Another possibility is to use Eumenes and his two units of veteran heavy cavalry to reinforce the extreme right flank, hoping thereby to expedite the destruction of the light cavalry there and then turn Antigonus' left. The problem with this is that is weakens the right centre zone, and Antigonus can conceivably withhold his own left centre and send cavalry reinforcements to support the light cavalry.
A third possibility is to weaken the left to strengthen the right, and this is the option that Eumenes took in this refight, mainly because he rolled a 6 for commands and had plenty of them to play with. He thus double moved the average light cavalry (ALC) from his left to join the advancing average heavy cavalry on the right, while also sending in one unit of veteran heavy cavalry from Eumenes' zone. At the same time he advanced his central (infantry-heavy) zones into contact.
This is what the move looked like in its entirety:
Antigonus' response was to advance on his right, leaving behind the unit of average phalangites to turn towards and outflank Eumenes' central phalanx, as is shown below.
The positions remained like this until turn four, at which time Eumenes' forces broke through on the right, and had also hit all of the units in the Antigonid left centre. Less happily from the Eumenid perspective, their own centre and left were likewise spent, as is shown below:
With it now his turn, Eumenes rolled a 1 for command. This gave him seven commands for the turn, which was not very many to deal with the tricky position he was in. When the units of one's centre are all spent and about to commence shattering, it is usual in Lost Battles to at this time think about invoking the free about turn rule to evacuate the central zone and fall back; but this move is not possible when (as in this case) the zone in question has enemy to its flank. The centre therefore has no option but to stand in place.
That is not the end of Eumenes' troubles though: Antigonus will likely break through on the left later this turn, and will then be free to send his fast-moving cavalry behind the Eumenid lines, resulting in morale boosts for his men and morale penalties for Eumenes'.
Of course, a powerful attack on the right could possibly see the Antigonid cause stutter, but the centre is very strong and with all units fresh is not very susceptible to rout.
Eumenes elected to send his victorious right to try and effect a rescue. He reinforced the central phalanx with the fresh light cavalry for 1 command; double moved the veteran cavalry to join the levy phalangites (1 command); double moved the average cavalry to the same zone (2 commands); attacked in the centre (2 commands), causing two hits; attacked with the elephant, causing no hits (1 command); and used Eumenes' command exemptions to attack from his own zone, causing one hit and shattering the lead unit of heavy cavalry.
This is how it looked:
This was the highwatermark of Eumenes' battle. As it turned out, Antigonus won the game over the next two turns, disposing neatly of all the reinforcing units to take the victory.
There were/are three critical issues for Eumenes to deal with in this battle:
1) how best to get parity or superiority on one or both flanks
2) how to get the central phalanx into contact early enough for its quality to be decisive
and later on...
3) how to shore up the flagging left once the cavalry fight had been won on the right
The biggest mistake Eumenes made here was probably that of allowing his central phalanx to be flanked from the beginning. This reduced the offensive power of the phalanx (cut out a beneficial combat modifier) and made it too command-costly an exercise to withdraw from that zone when the pressure came on.
There is plenty of room for musing on what the better options might have been at each stage of the battle...
Paraitacene took place in 316 BC. between the forces of Eumenes and Antigonus One-Eyed. Our source for the battle is Diodorus (XIX. 27-32), whose account can be found online.
According to Diodorus, Antigonus had 28,000 heavy infantry, 8500 horse (or 10-11,000 horse when using the numbers given for each individual contingent) and 65 elephants. Phil Sabin's order of battle in Lost Battles includes an additional 10,000 light infantry and uses the higher cavalry total. Translated into Lost Battles terms, Antigonus' army is made up of the following units:
1 x levy light infantry (6000 men)
5 x average phalanx (15,000 men)
1 x levy phalanx (6000 men)
1 x average heavy infantry (3000 men)
1 x levy heavy infantry (6000 men)
2 x veteran cavalry (1500 men)
3 x average heavy cavalry (4500 men)
3 x average light cavalry (4500 men)
2 x Indian elephants (60 elephants and 3000 light infantry)
Diodorus gives Eumenes a force of 35,000 infantry, 6,100 cavalry and 114 elephants. Again, the numbers are different when the individual contingents are added together. Phil Sabin's order of battle is as follows:
2 x levy light infantry (12,000 men)
4 x veteran phalanx (6000 men)
2 x average phalanx (6000 men)
1 x levy phalanx (6000 men)
2 x veteran heavy cavalry (1500 men)
2 x average heavy cavalry (3000 men)
1 x average light cavalry (1500 men)
4 x Indian elephants (120 elephants with 6000 light infantry)
Both Antigonus and Eumenes are classed as inspired leaders, and are attached to their veteran guard cavalry units.
The battlefield is a flat plane but for hills in an inverted L shape along Antigonus' right flank, with the short arm of the L extending into his right centre zone.
The deployment saw both Eumenes and Antigonus stack their right, with Eumenes refusing his left, wanting to use elephants there to blunt Antigonus' approach. Eumenes has superior quality in his phalanx, but is inferior in numbers both in real and game terms, with his seven heavy infantry units matched against the eight of Antigonus. Antigonus has eight cavalry units versus the five of Eumenes, so it is only in light infantry and elephants that Eumenes holds a pure numbers advantage.
The Battle...
So, to the refight!
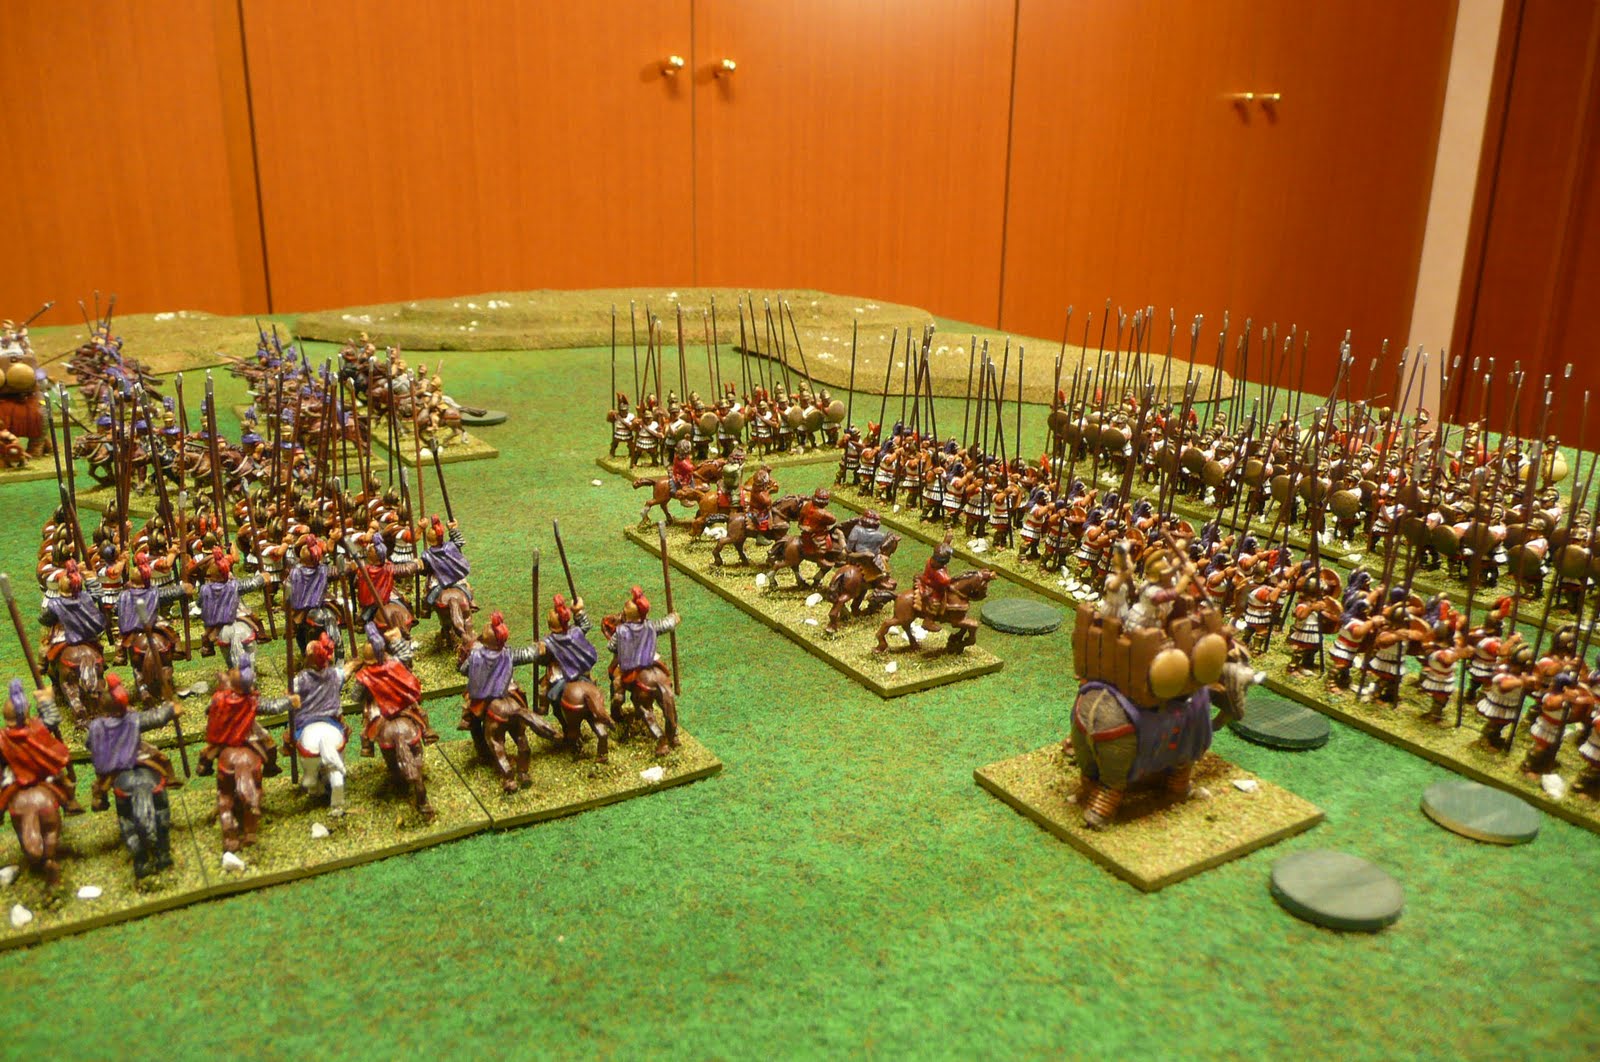
This is a shot from Antigonus' left showing the original deployments of the two armies. Antigonus' advanced right can be seen in the distance, abutting the hills. Eumenes' veteran phalangites have advanced two zones to secure the centre, along with the light infantry and several of the elephants.
To give a clearer picture of the deployment, here is a scan of the set up from the Lost Battles scenario. Note that I do not represent the zones on table - I judge the zones by eye and by the width of the stands. Each zone is 24cm (six stands) across and 20 cm (five stands) deep.
With the first move, Eumenes elects to move his phalangites forward into the Antigonid half of the battlefield, still keeping his left refused.
He leaves the unit of levy phalangites to protect his key zone and maintain a link to the left. To insure swift success on his right, he double moves the light cavalry from the left and a unit of veterans from Eumenes' command to reinforce the cavalry there.
Antigonus responds by advancing his right, also leaving a unit of phalangites to guard his key zone and outflank the advancing Eumenids.
Shot from Eumenes' left - with Antigonus and his men in the foreground - showing the stepped deployment of the phalanxes.
Antigonus' men draw first blood, scoring hits on both of the Eumenid light infantry units.
Shot of the armies at the completion of turn two, looking from Eumenes' right.
The fighting in the central zones is bitter, with both sides scoring hits on turns three and four. The Eumenids have the better of it in their right centre and flank zone, while the Antigonid success mirrors this exactly.
The Silver Shields in line.
Antigonus begins to exert some pressure...
The lines engaged early on in the fight, with Eumenes in the foreground brandishing his sword. The Antigonid elephants are having rather more success than their counterparts.
The first breakthrough occurs on Eumenes' right. The light cavalry give way, and the Antigonid left centre is now all spent.
View from the extreme right of Eumenes' battle line.
Meanwhile, on the other side of the field Antigonus is having even more success against the elephants. Three hits are inflicted by this zone in turn three, leaving all units in the opposing flank zone spent.
Antigonus' zone on the charge.
His phalanx is also making a good go of it. Eumenes' centre is getting hit from two sides and is not coping well.
The hits are mounting on Eumenes' centre.
The Antigonid phalanx doing the business.
By the end of the fourth turn the Eumenid phalanx in the centre zone is entirely spent; nearby, the Antigonid left phalanx is also entirely spent. The question is, which will break first?
Eumenes leads by example.
Antigonus has also all but broken the resistance on Eumenes' left, with just a solitary elephant unit remaining, and that spent.
A last-ditch stand on the left as Antigonus bears down on the last elephant unit.
Seeing the danger on the left and in the centre, Eumenes redeploys this victorious cavalry from his right to shore up his centre.
The Eumenid cavalry arrives...
He also fluffs a royal chance to rout the Antigonid left. His charge shatters one unit, but fails to do any more damage. It is a critical moment in the battle, because...
Eumenes launches his ineffective charge.
Antigonus' men make no mistake. The flanking phalangites shatter the first of the Eumenid phalangites, and these take the levy light infantry with them in the rout. The reinforcing light cavalry are also hit, so things are as bad as they ever were, and there are now no remaining reserves to throw into the zone.
The rot sets in. View from behind the Antigonid flanking phalanx.
Antigonus then shatters the remaining elephant unit opposing his right.
Antigonus victorious!
Eumenes is then hit as he attempts a rally. He survives the scrape, but may not rally for the rest of the game and must also spend a turn to recover. Despite this setback, the men in his zone are able to clear the enemy from their front, though again the centre fails to do much damage.
Eumenes a little dazed and confused.
In his turn, Antigonus makes a crucial attack: three attacks see four hits scored and the entire zone routs. The reinforcements have availed Eumenes nothing!
Antigonas launches the killer blow. He clears this zone in just one turn!
Now surrounded, the next hit on Eumenes centre has the zone at -2 for morale, and they all rout apart from two units of veterans, one of whom is promptly shattered to complete the victory for Antigonus.
The centre in a somewhat forlorn state...
The view from Eumenes' zone in the final stages. Antigonus can be seen behind the Eumenid centre.
The final morale roll is a 1, and the game is over!
Antigonus in his triumph!
Casualties in the makeshift field hospital...
Aftermath...
So all that was left to do was tally the points. This is how they worked out:
Eumenes' tally:
Shattered: 2 ALC, 1 AHI and 1 LLI for 22 points.
Routed: 1 AHC, 1 APH, 1 AHI for 12 points.
Spent: 2 APH, 1 IEL, 1 ALC, 1 VHC for 17 points.
Total: 51.
Paraitacene set up tonight on my little table in the hobby room. I'm off to read Diodorus' account before bed, and then into the battle itself tomorrow night. Pictures are clickable, I hope...
From Eumenes' right flank...
From Antigonus' left...
Eumenes prancing about trying to avoid the elephant droppings...
The Silver shields from the rear; they are far too terrifying to see from the front...
For one reason or another it's been a while since I've posted, but that does not mean that we have been idle here in the house of Prufrock. The gaming room has been rearranged and filled with extra shelves, as has the store room at our English school. The upshot is that I now have shelf space for all of my boardgames and an excellent gaming table surface measuring 1800 x 1350 for major battle days to complement my usual 1200 x 800 table for smaller solo or weeknight affairs.
I've also done a little purchasing, being able to pick up the fifth player expansion for GMT's Sword of Romegame, which I hope to play out (solo, of course!) during the too-bloody-muggy-for-painting season, which appears to have just started today.
In other sneaky purchases, I also received the following rule books in triple-quick time (4 days from order to arrival in Japan!) from Dennis at On Military Matters:
I was particularly pleased to be able to get a copy of Crossfire, which I've been looking for (in a somewhat desultory fashion, it must be said!) for some time, while it was good to pick up Modern Spearhead as well before stocks run out completely. Dennis provides excellent service, and I think I'll be ordering from him again in the not-too-distant future. He's a lot faster than Amazon Japan, and has more in stock too, by the looks of it!
In terms of figures, there are a few more Xyston phalangites arriving soonish courtesy of the kind folks at the Society of Ancients, and once I get a look at them I'll be placing an order with Brookhurst to grab some top-ups (oddly enough, I always seem to need more of these top-ups...).
Gaming-wise, I am enjoying an ongoing email tussle with Pat using Thunder at the Crossroads, which is proving to be an excellent game and a very fine system.
There's also an article in the works, a review of GMT's Pax Romana underway, and a promised review of the phalangites to get to, so despite the lack of posting here it has been all go!