Just one more day of work for me and then it's two weeks off to enjoy a bit of rest and relaxation. Not sure if there will be much gaming involved (the time off is actually awkwardly punctuated with 'must attend' events and activities!), but there will certainly be some drinks consumed, convivial times had, and a few tunes bashed out on the old guitar.
Anyway, compliments of the season to all, and I wish everyone a safe and joyous end to the year. See you in 2018 (if not before!).
Cheers,
Aaron
Prufrock's Wargaming Blog

Friday, December 22, 2017
Friday, December 8, 2017
The foraging party (Part III)
And so we come to part three. The previous installment of our tale saw the two Roman raiding parties experiencing contrasting fortunes. The western column has been set upon by Gauls while crossing the river, and although reinforcements have rushed to its aid the Romans have been having much the worse of the fight.
In the east all has gone more smoothly: the troops have cleared one field of wheat and ransacked a village to so far bag three loads' worth of supplies to take back to the storehouse at the camp. Two more loads and it will be a good day's work.
But the alarm has now been sounded. A band of Gauls has burst out of the forest to confront these Romans who would rob them of harvest and kin, and the distant sounding of warhorns has the Thirteenth legion a little spooked.
And so they should be, for a mighty host has gathered.
[The Gauls roll high, and seven units appear in the vicinity of the hill fort]
As yet unaware of the true danger they are in, the Romans continue loading their stolen stores into the wagons and on to the mules.
In the west the fighting carries on. Another cohort is put to flight, but a band of Gauls also gives way. A second reserve cohort hurries west to secure the ford against any opportunistic Gallic advance.
This cohort reaches the ford before the Gauls can cross and there is a moment of respite as the two bodies of troops confront each other across the river. The Roman central cohort, having driven off its enemy, is asked by its commander to steel itself for another charge. Too exhausted, it refuses to budge. [Morale test fail!]
Back east the forward cohort is starting to sense that things are getting tense. "Is it just me or does that hill over there appear to be moving? Do we stay or do we go?"
Dumnorix is faced with no such hesitancy. His Gauls will advance!
Back west once more, fortune favours the big battalions as the second reserve cohort charges across the ford and drives off the defending warband. These Gauls have already put in a heroic performance in defeating two cohorts singlehandly and they can be forgiven for at last running a little short of blood sugar.
Nevertheless, their departure means that just one band of Gauls remains, and with fully equipped, grimly determined legionaries to its front and flank, it won't last much longer.
In the east the cohorts so recently happily pillaging have finally seen the size of the force now bearing down upon them. The commander pulls them into a defensive position to cover the retreat of the wagon train. After all, he reasons, we're here for the food, not for the fight.
[Column fails a morale check and falls back. I wanted them to stand and fight, but once you commit to letting the dice decide you can't just ignore what they tell you!]
After four hours the Romans have almost seen off the challenge in the west, but it has taken five cohorts to do so. This leaves only half a legion and a squadron of cavalry to face the lately arrived Gallic force in the east and to get the supplies across the ford and back home safely to the camp.
In the west the Romans break the last batch of Gauls holding on there. One badly beaten up cohort pulls back across the ford, but the two reserve cohorts are still fairly fresh.
The stand-in commander of the Thirteenth (the infamous Aaronius Bellicus Minimus) continues to pull back. It will take him two hours to get his stolen wares and troops across the river, and the Gallic force appears determined to make things difficult for him. "If I get my men slaughtered against this river, what will Caesar say?" he thinks.
For the Gauls, there are conflicting emotions on their left as the menfolk from the recently ravaged village arrive back home. What of the women and the children? Did they survive? Do we stop and take account, or do we continue on and catch the Roman dogs?
From this elevation he can observe the true picture, and the victorious Roman cohorts across the river to his right do not escape his notice.
Dumnorix halts to consults with his druid.
With the village now back in friendly hands, its menfolk anxious to tend to kith and kin, and the Romans with an observable and unchallenged force on the Gallic flank, Dumnorix considers the possible cost of driving on against these Romans and orders a general halt.
[Dumnorix bottles it! He fails a morale check and the Gauls stop]
Even so, well done to the Gauls - especially those on their right - who by keeping the Romans to just three loads of forage have won a minor victory.
And so the game concluded. I'd almost run out of time to continue on anyway, but as it has ended in such an interesting position I'm going to play out a final fight at a later time. The Romans should get their ill-gotten provisions across the river, but the troops are faced with a dicey situation: if they all stay they are safe; if some leave, the rear guard is vulnerable. The Romans will need to scout for additional fords to cross by. If they find some, they will probably be fine; if they don't, look out!
As a solo affair this approach ( a first for me) really was a lot of fun. The twists and turns in the story were both entertaining and, to my mind, believable. Thanks to Stuart Asquith for the germ of the idea, and to Dan Mersey for the nicely adaptable Dux Bellorum combat rules.
In the east all has gone more smoothly: the troops have cleared one field of wheat and ransacked a village to so far bag three loads' worth of supplies to take back to the storehouse at the camp. Two more loads and it will be a good day's work.
But the alarm has now been sounded. A band of Gauls has burst out of the forest to confront these Romans who would rob them of harvest and kin, and the distant sounding of warhorns has the Thirteenth legion a little spooked.
And so they should be, for a mighty host has gathered.
[The Gauls roll high, and seven units appear in the vicinity of the hill fort]
 |
| Dumnorix and men appear seeking vengeance! |
As yet unaware of the true danger they are in, the Romans continue loading their stolen stores into the wagons and on to the mules.
 |
| The eastern column does not yet know quite what it is facing. |
In the west the fighting carries on. Another cohort is put to flight, but a band of Gauls also gives way. A second reserve cohort hurries west to secure the ford against any opportunistic Gallic advance.
 |
| Romans have lost 2, Gauls 1, but the Romans have reserves on the way. |
This cohort reaches the ford before the Gauls can cross and there is a moment of respite as the two bodies of troops confront each other across the river. The Roman central cohort, having driven off its enemy, is asked by its commander to steel itself for another charge. Too exhausted, it refuses to budge. [Morale test fail!]
 |
| The situation in the west. |
Back east the forward cohort is starting to sense that things are getting tense. "Is it just me or does that hill over there appear to be moving? Do we stay or do we go?"
 |
| Sorting the wheat from the chaff. |
Dumnorix is faced with no such hesitancy. His Gauls will advance!
 |
| Up and at them. |
Back west once more, fortune favours the big battalions as the second reserve cohort charges across the ford and drives off the defending warband. These Gauls have already put in a heroic performance in defeating two cohorts singlehandly and they can be forgiven for at last running a little short of blood sugar.
Nevertheless, their departure means that just one band of Gauls remains, and with fully equipped, grimly determined legionaries to its front and flank, it won't last much longer.
 |
| The ford is cleared: just one unit of Gauls remains. |
In the east the cohorts so recently happily pillaging have finally seen the size of the force now bearing down upon them. The commander pulls them into a defensive position to cover the retreat of the wagon train. After all, he reasons, we're here for the food, not for the fight.
[Column fails a morale check and falls back. I wanted them to stand and fight, but once you commit to letting the dice decide you can't just ignore what they tell you!]
 |
| Romans get the jitters (or see sense, depending on how you look at it). |
After four hours the Romans have almost seen off the challenge in the west, but it has taken five cohorts to do so. This leaves only half a legion and a squadron of cavalry to face the lately arrived Gallic force in the east and to get the supplies across the ford and back home safely to the camp.
 |
| The map after four hours. |
In the west the Romans break the last batch of Gauls holding on there. One badly beaten up cohort pulls back across the ford, but the two reserve cohorts are still fairly fresh.
 |
| Phew! Seen 'em off! |
The stand-in commander of the Thirteenth (the infamous Aaronius Bellicus Minimus) continues to pull back. It will take him two hours to get his stolen wares and troops across the river, and the Gallic force appears determined to make things difficult for him. "If I get my men slaughtered against this river, what will Caesar say?" he thinks.
 |
| Romans pull back. |
For the Gauls, there are conflicting emotions on their left as the menfolk from the recently ravaged village arrive back home. What of the women and the children? Did they survive? Do we stop and take account, or do we continue on and catch the Roman dogs?
 |
| Gauls surge forward, reclaiming the village. |
Dumnorix the Gallic chief, attaining the high point near the ancient obelisk, surveys the field.
 |
| Dumnorix. Not one to eschew manly gestures, he grasps the opportunity to flourish his sword dramatically. |
From this elevation he can observe the true picture, and the victorious Roman cohorts across the river to his right do not escape his notice.
 |
| The Roman left, now free to ford the river and turn the Gallic flank. |
Dumnorix halts to consults with his druid.
 |
| The field at the moment. |
With the village now back in friendly hands, its menfolk anxious to tend to kith and kin, and the Romans with an observable and unchallenged force on the Gallic flank, Dumnorix considers the possible cost of driving on against these Romans and orders a general halt.
[Dumnorix bottles it! He fails a morale check and the Gauls stop]
Even so, well done to the Gauls - especially those on their right - who by keeping the Romans to just three loads of forage have won a minor victory.
******************************
And so the game concluded. I'd almost run out of time to continue on anyway, but as it has ended in such an interesting position I'm going to play out a final fight at a later time. The Romans should get their ill-gotten provisions across the river, but the troops are faced with a dicey situation: if they all stay they are safe; if some leave, the rear guard is vulnerable. The Romans will need to scout for additional fords to cross by. If they find some, they will probably be fine; if they don't, look out!
As a solo affair this approach ( a first for me) really was a lot of fun. The twists and turns in the story were both entertaining and, to my mind, believable. Thanks to Stuart Asquith for the germ of the idea, and to Dan Mersey for the nicely adaptable Dux Bellorum combat rules.
Tuesday, December 5, 2017
The foraging party, or even Romans have to eat (Part II)
As detailed in the last post, our Roman foragers have run into feast in the east and a test in the west.
First to the east.
Two cohorts have moved into the wheat fields. One field is being cleared already, while the other is about to be. The Germanic cavalry and another cohort see if they can't break into the fortified village and rob it of whatever foodstuffs are in storage there.
But it's not so pleasant for the Romans in the west. Caught on the hop while crossing the river, the two leading cohorts have a mass of Gauls crash into them, and it's all the centurions can do to prevent panic. Another half hour of this and the Romans will likely break [Vicious attacks by the Gauls see 6 hits inflicted against 4 sustained]
The third cohort squeezes across the river into a support position, and in the nick of time the reserve cohort splashes across at the ford they so fortunately discovered last turn.
In the east the lone horseman seen an hour ago has arrived at the Gallic hill fort. Unbeknownst to the Romans, a muster is now underway, and the men will arrive at the fort within the hour. [A d3 roll determines how many turns it will take for the chief to organise resistance. Two is the result]
In the west the lead Roman cohort has had enough. Thrown into confusion and panic, the men pour back across the river. The victorious Gauls follow up and hit the supporting cohort before it can get out of the ford.
[The Gauls win initiative (d6 each minus attrition. Highest score strikes first) and get to deliver the first blow. They break the Romans and then catch the second cohort in the river. Again, they inflict heavy damage at the cost of just one further hit to themselves (cohort caught in the river gets half the usual number of attack dice)]
The central cohort hangs on, but only just. The reserve cohort and the last Gallic unit are strangely reluctant to close to close quarters. [Both fail their activation rolls]
And what's this? The Romans in the wheatfields are suddenly confronted by a terrifying sight - Gauls coming out of the woods! It must be the menfolk from the village.
But in an awful turn of events for the would-be Gallic saviours, the Romans succeed in finding a weak point in the village defences and break in through the wall. They commence ransacking the place for stores, and no doubt will do worse if they have time.

The fall of the village stuns the newly-arrived Gallic warband. They pause, unsure of what the best course of action might be. For the Romans, the first cohort starts loading freshly harvested wheat onto the train, while the other cohort covers for them.
Back in the west the fight goes on. The reserve cohort has now engaged the third Gallic unit, and the Gauls continue to have the advantage in the other two fights. The danger is such that another reserve cohort is hurrying to the scene. The baggage train realises that it will not get across the river, and, calling it quits for the day, hastens back to the safety of the camp.
The map after three hours of daylight.
First to the east.
Two cohorts have moved into the wheat fields. One field is being cleared already, while the other is about to be. The Germanic cavalry and another cohort see if they can't break into the fortified village and rob it of whatever foodstuffs are in storage there.
 |
| It's a tough life when there are invaders about... |
But it's not so pleasant for the Romans in the west. Caught on the hop while crossing the river, the two leading cohorts have a mass of Gauls crash into them, and it's all the centurions can do to prevent panic. Another half hour of this and the Romans will likely break [Vicious attacks by the Gauls see 6 hits inflicted against 4 sustained]
 |
| The Gauls charge in with understandable passion! |
The third cohort squeezes across the river into a support position, and in the nick of time the reserve cohort splashes across at the ford they so fortunately discovered last turn.
 |
| The numbers even up, but the Gauls' first rush has the first two cohorts badly rattled. |
In the east the lone horseman seen an hour ago has arrived at the Gallic hill fort. Unbeknownst to the Romans, a muster is now underway, and the men will arrive at the fort within the hour. [A d3 roll determines how many turns it will take for the chief to organise resistance. Two is the result]
 |
| Message delivered, our hero waits for the tribal reinforcements to arrive. Anxious moments as he contemplates the fate of his village and the desperate families within. |
In the west the lead Roman cohort has had enough. Thrown into confusion and panic, the men pour back across the river. The victorious Gauls follow up and hit the supporting cohort before it can get out of the ford.
[The Gauls win initiative (d6 each minus attrition. Highest score strikes first) and get to deliver the first blow. They break the Romans and then catch the second cohort in the river. Again, they inflict heavy damage at the cost of just one further hit to themselves (cohort caught in the river gets half the usual number of attack dice)]
The central cohort hangs on, but only just. The reserve cohort and the last Gallic unit are strangely reluctant to close to close quarters. [Both fail their activation rolls]
 |
| The first cohort has had enough. |
And what's this? The Romans in the wheatfields are suddenly confronted by a terrifying sight - Gauls coming out of the woods! It must be the menfolk from the village.
 |
| Think you can take our crops, eh? |
But in an awful turn of events for the would-be Gallic saviours, the Romans succeed in finding a weak point in the village defences and break in through the wall. They commence ransacking the place for stores, and no doubt will do worse if they have time.

The fall of the village stuns the newly-arrived Gallic warband. They pause, unsure of what the best course of action might be. For the Romans, the first cohort starts loading freshly harvested wheat onto the train, while the other cohort covers for them.
 |
| Loading wheat and ransacking the village. |
Back in the west the fight goes on. The reserve cohort has now engaged the third Gallic unit, and the Gauls continue to have the advantage in the other two fights. The danger is such that another reserve cohort is hurrying to the scene. The baggage train realises that it will not get across the river, and, calling it quits for the day, hastens back to the safety of the camp.
 |
| The Gauls still giving more than they receive. |
The map after three hours of daylight.
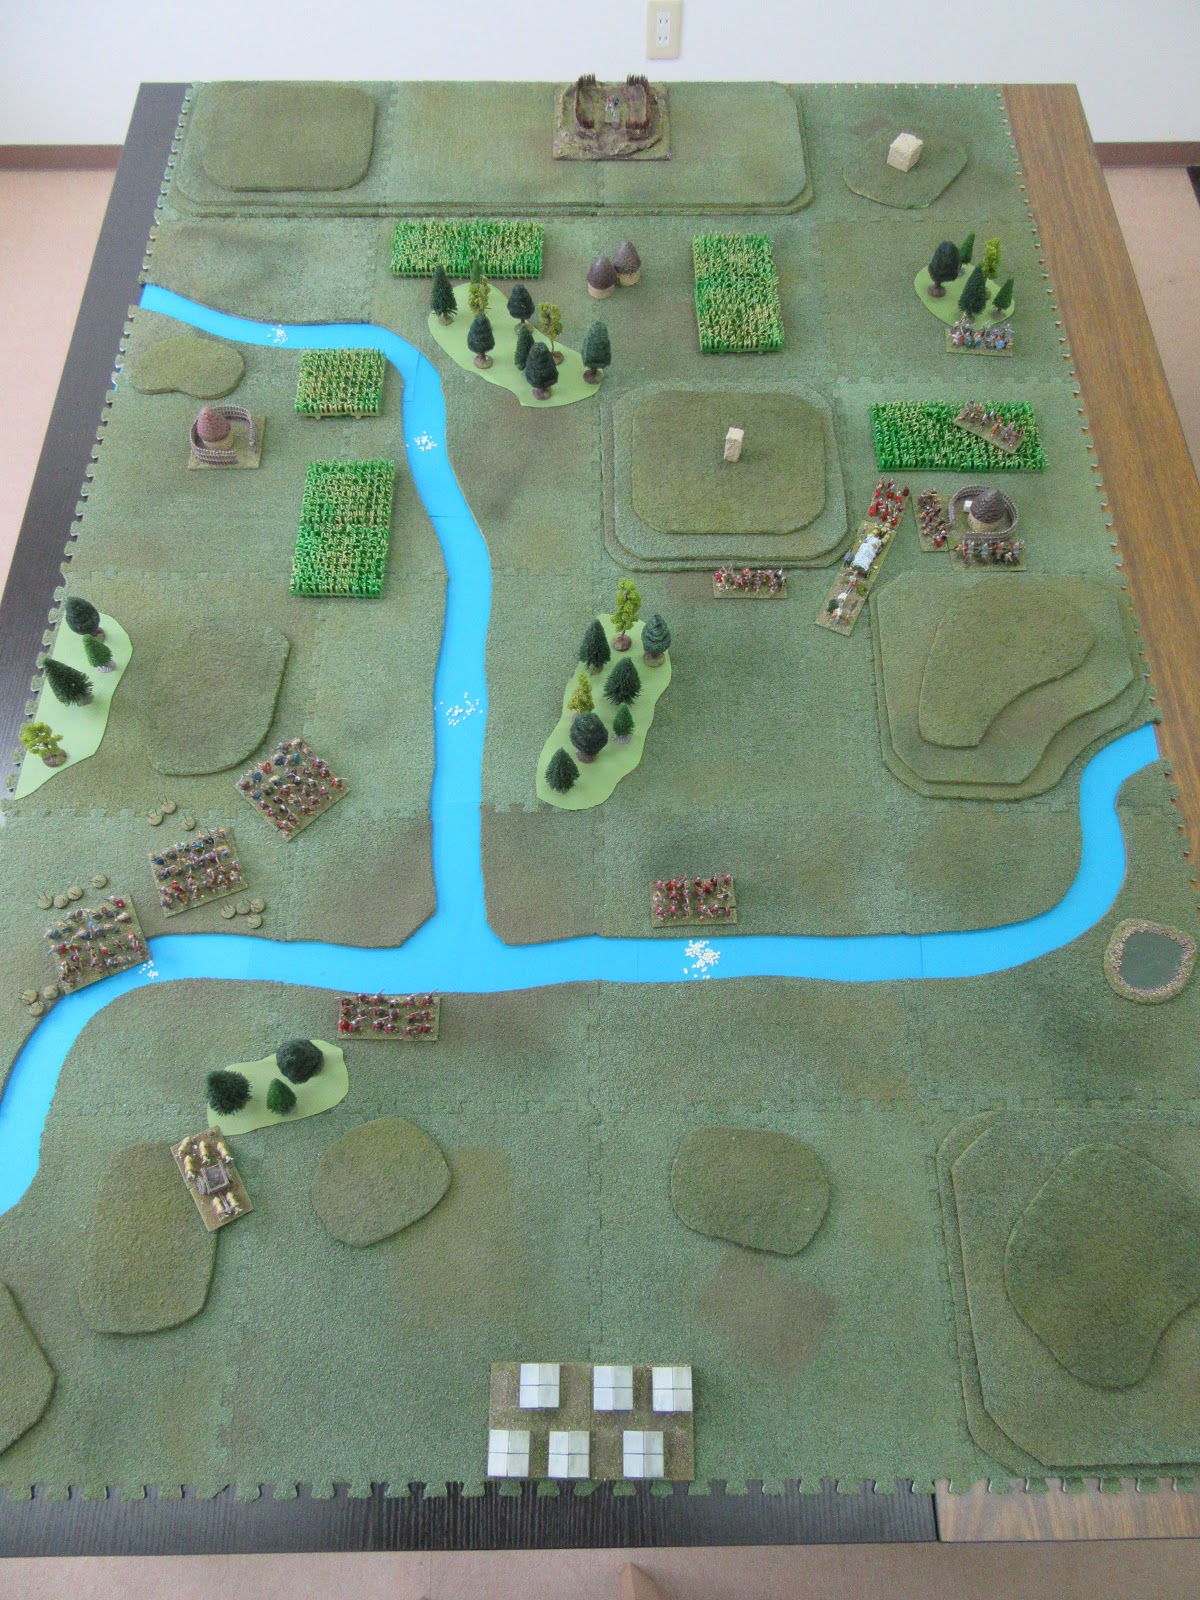 |
| Overview of the scene. |
Yet hark: what's that sound coming from the north? Not Gallic war horns, surely?
To be continued (here)....
The foraging party, or even Romans have to eat (Part I).
It's 56BC, Gaul, harvest season, and Caesar's legions are running short of food. It's time to do a little foraging. The Thirteenth legion has been instructed to go north of the river, into Gallic territory, and raid. They have eight hours to do their work, and must bring back as much forage as they can. Five loads would be a good effort, but you never know what might happen over there...
There is some delay as the troops reach and then begin to file across the fords.
The main group advances without opposition, despite the terrain offering good potential cover for roving Gauls. So far so good!
But in the west they are not so lucky - three gallic warbands suddenly spring from the woods and catch the Roman column still in the ford. Alarums blare!
Hearing the call for assistance, one of the reserve cohorts hurries west, hoping to find a crossing point closer. Fortunately, a scout discovers one just half a mile away. [A very lucky scouting roll of 6 allows them to find a new ford]
The western column has just enough time to rush a following cohort across the river before the Gallic attack hits.
The other column is having a far happier time. Wheat fields, a village, and a strange obelisk in view, but no sign of the enemy in any strength.
The forward-most cohort begins harvesting wheat while the rest come up.
But their activities are not unobserved. In the distance a lone, proudly seated horseman takes in the scene, then gallops off towards the west.

To be continued.... (see here)
[The game is a solitaire encounter scenario inspired by Stuart Asquith's book on solo wargaming. A simple dice mechanism is used to check if and where enemy forces are generated in response to the Roman moves. The fighting rules are an adapted form of Dan Mersey's Dux Bellorum]
 |
| Map of the area, with north at top. Each carpet tile is 1 mile across. |
The temporary commander of the Thirteenth - Aaronius Bellicus Minimus - sends three cohorts and a wagon train to the ford northwest of the camp. Four other cohorts, a detachment of German cavalry and two trains are to cross the northeast ford. The remaining three cohorts will be held in reserve to cover the return crossing or to advance and fight if the foragers get into trouble. Orders are that the foraging cohorts are to take light equipment only.
[For game purposes the lightly equipped cohorts have lower morale and combat strength than the reserve cohorts. This is shown here by making the reserve cohorts three ranks deep]
 |
| The cohorts leave camp. |
 |
| The western ford. |
 |
| The eastern ford. |
 |
| The way to the village seems clear! |
But in the west they are not so lucky - three gallic warbands suddenly spring from the woods and catch the Roman column still in the ford. Alarums blare!
 |
| Hi-de-hi! |
The western column has just enough time to rush a following cohort across the river before the Gallic attack hits.
 |
| A bad situation, but help is on its way. |
 |
| Happy Germans. |
 |
| Sickles out, chaps! |

To be continued.... (see here)
[The game is a solitaire encounter scenario inspired by Stuart Asquith's book on solo wargaming. A simple dice mechanism is used to check if and where enemy forces are generated in response to the Roman moves. The fighting rules are an adapted form of Dan Mersey's Dux Bellorum]
Friday, November 24, 2017
Naval Thunder in Hyogo
I was lucky enough to get an excellent day's gaming in yesterday with Luke and Pat up at Luke's new pad in Hyogo. Things though didn't start too well - I overslept, missed the train, and had to drive there to make up time. Fortunately, the car navi did what it says on the tin and helped me thread my way through the traffic hell of Osaka; less fortunately the rush to get moving meant that I completely forgot to take up my sea cloth and a book I needed to return to our host.
Anyway, I got there about 10:00, and when Pat arrived shortly afterwards we began looking at fleets for some Naval Thunder action.
We decided on early Pacific war, so Luke and I made up an augmented Force Z (Prince of Wales, Perth, Arrow and Ardent for me; Repulse, Houston, Shark and Scourge for Luke) while Pat worked out his IJN contingent. I'm not sure what the exact composition of the Japanese force was, but there were two battle cruisers (Nagato and Hiei), a couple of light cruisers (Jintsu and Furutaka) and three or four destroyers.
It began badly for us as Nagato found her mark early and pounded an outranged Repulse, taking her apart turn by turn. Prince of Wales closed to firing distance but found hits initially hard to come by.
Houston engaged the Japanese light cruisers who took damage.
Fine aggressive work by Japanese destroyers distracted Perth and Prince of Wales long enough and well enough to prevent closing of the range to concentrate fire on the Nagato while she was busy finishing off Repulse.
By the time Nagato was listing and removing herself back out to her extreme range we had lost Repulse, Houston was effectively dead in the water, and Scourge and Shark had been hunted down by secondary-battery fire. Jintsu and Furutaka were Japanese casualties, but Hiei and Nagato were together able to outgun Prince of Wales, and although she traded fire gallantly, once critical hits put two main gun turrets out of action the game was very clearly up.
So, lots of fun, some great moments of drama, and some good play by Pat to win with the Japanese. There were a few things about the rules we might want to adjust, but they gave us an excellent four hours of play. Pat and I were playing for the second time and Luke for his first, but we were running the charts like veterans within a couple of turns.
To finish the day we gave the boardgame Conquest of Paradise a go. We managed to play it to conclusion in about 90 minutes, despite Luke and Pat having to learn the rules on the fly, so it was a good way to end the day.
So, good gaming, good company and fine hospitality. A great day all round.
Anyway, I got there about 10:00, and when Pat arrived shortly afterwards we began looking at fleets for some Naval Thunder action.
We decided on early Pacific war, so Luke and I made up an augmented Force Z (Prince of Wales, Perth, Arrow and Ardent for me; Repulse, Houston, Shark and Scourge for Luke) while Pat worked out his IJN contingent. I'm not sure what the exact composition of the Japanese force was, but there were two battle cruisers (Nagato and Hiei), a couple of light cruisers (Jintsu and Furutaka) and three or four destroyers.
It began badly for us as Nagato found her mark early and pounded an outranged Repulse, taking her apart turn by turn. Prince of Wales closed to firing distance but found hits initially hard to come by.
 |
| Repulse under fire early. |
Houston engaged the Japanese light cruisers who took damage.
 |
| A menacing lot of Japanese vessels! |
Fine aggressive work by Japanese destroyers distracted Perth and Prince of Wales long enough and well enough to prevent closing of the range to concentrate fire on the Nagato while she was busy finishing off Repulse.
 |
| Japanese destroyers close in to torpedo range. They wrong-footed my destroyer screen and gave Perth and Prince of Wales a scare. |
By the time Nagato was listing and removing herself back out to her extreme range we had lost Repulse, Houston was effectively dead in the water, and Scourge and Shark had been hunted down by secondary-battery fire. Jintsu and Furutaka were Japanese casualties, but Hiei and Nagato were together able to outgun Prince of Wales, and although she traded fire gallantly, once critical hits put two main gun turrets out of action the game was very clearly up.
So, lots of fun, some great moments of drama, and some good play by Pat to win with the Japanese. There were a few things about the rules we might want to adjust, but they gave us an excellent four hours of play. Pat and I were playing for the second time and Luke for his first, but we were running the charts like veterans within a couple of turns.
To finish the day we gave the boardgame Conquest of Paradise a go. We managed to play it to conclusion in about 90 minutes, despite Luke and Pat having to learn the rules on the fly, so it was a good way to end the day.
So, good gaming, good company and fine hospitality. A great day all round.
Thursday, November 23, 2017
Game day upcoming
There's been an unexpected treat this week. A public holiday tomorrow and some hurried communication with Luke and Pat has seen a game of Naval Thunder organised up at Luke's new pad in Hyogo. In preparation I've just finished applying magnetic backing to all my recently painted ships, stowed them into a biscuit tin, rummaged through my board game collection to find d10s, and worked out the various trains I need to catch to get there at a time which will allow us a decent amount of gaming.
After all that it's 2:45am and I'm enjoying the chance to have a quiet whiskey and dry before bed.

After all that it's 2:45am and I'm enjoying the chance to have a quiet whiskey and dry before bed.

It's been a long time since I've been up to Luke's. It's probably two, even three years. I think the last time was for an epic game of Modern Spearhead, so it should be great fun. I must confess though to not particularly looking forward to 3hrs 30mins on trains and buses each way!
Once I see where he is I think in future I might drive up!
Monday, November 20, 2017
Thapsus Refight
THAPSUS II
 |
| Coin issued by Metellus Scipio. From the Roman Numismatics website. |
Last night I played through another Thapsus (46 BC) refight, this time a 'Caesar Incapacitated' scenario (check the bottom of this post if you want to see scenario details, troop numbers, etc), which follows Plutarch's report that there was a suggestion Caesar that had taken a turn before the battle, and that this had rendered him unable to command the army.
Command duties have therefore been assumed by Caesar's staff. Both sides are surprised. This means that the armies start undeployed and can bring on to the table a maximum of four units per turn, with elephants and heavy infantry counting as two units on the first turn.
Turn 1
Action begins with Metellus Scipio's men in the process of building a camp. Guarding its construction is a screen of elephants, light infantry, and Numidian light horse.Caesar's men advance with light infantry and veteran legionaries to clear the way for an assault on the half-completed fortification.
 |
| Scipio at top; Caesarians at bottom |

Turn 2
Seeing that an attack is underway, Scipio hastily musters more elephants and legionaries to support his forward troops. Caesarian legionaries arrive on the scene en masse.
Turn 3
Scipio shores up the centre and brings up more cavalry reinforcements for his left. The Caesarian slingers drive off the elephants and light infantry and the legates continue forming the legionaries into line.
Turn 4
Scipio brings on his right wing, pushes the centre forward, and advances his light cavalry into contact on the left. The Caesarians advance forward on their left and on the right bring up the cavalry to counter the Numidian horse.
Turn 5
The cavalry charges cause casualties on both sides, but the Numidian light horse break first. Although the Caesarians advance on the left, a command mix up means the centre is left behind.
 |
| The Caesarian centre lags behind. |
Turn 6
Scipio's centre takes advantage of the communication breakdown to hit the inside flank of the Caesarian left. The elephants cause tremendous damage.The Caesarian centre does advance this time, but the left is under extreme pressure.

Turn 7
The elephants continue their attack on the Caesarian left, forcing the veteran legionaries to retreat after having taken 50% casualties. On the other wing the cavalry fight continues. The horse of both sides are shaken, but the Optimates are able to feed fresh cavalry into the fight.
Turn 8
The fresh reinforcements tell, and Scipio's heavy cavalry routs Caesar's Gauls and Spanish. Everywhere Caesar's line is under pressure. Again the elephants do awful damage to the Caesarian legionaries, this time in the centre.

 |
| Scipio's cavalry drives two units of Caesar's veterans from the field in a glorious charge! |
Turn 9
The elephant attacks again prove unstoppable and with half of the Caesarian army gone, their right flank defeated and enemy cavalry in their rear, the Caesarians flee in an effort to make it back to the safety of their camp.

 |
| Those elephants were magnificent! |
And Caesar's absence is decisive: Metellus Scipio has won an incredible victory by 115 points to 36. An absolute humiliation for Caesar. His men are in a terrible way and if Scipio and Juba follow up as they should, it is probably the end of Caesar's African campaign.
Conclusion
This scenario did not turn out at all as the battle is attested to have in The African War, but it did make for a tense and interesting battle. Caesarian command rolls were abysmal, and this allied with a very strong performance from Scipio's elephants and cavalry just blew the Caesarians away.Scenario Details
(Also posted on the Lost Battles yahoo group):
The second Thapsus scenario is 'Caesar incapacitated' and mixes Plutarch's report that Caesar may have had a medical incident prior to the battle with Cassius Dio's hasty attack scenario.
The battlefield is oriented roughly west/east with Scipio coming from the west (top of the board) and Caesar from the east.
Ground scale is 600m per zone. The flank zones on both sides of the battlefield are treated as coastline (sea to the north; inland salt lake/lagoon to the south). There is a fortified camp in Scipio's left rear zone.
Scipio's key zone is left centre (in front of the camp). Caesar's is currently right centre, but I'm not 100% settled on this.
The attack limit is 3.
Both armies are surprised.
Scipio deploys first.
Armies (@ troop multiple of 6)
Metellus Scipio:
10 x average legionaries (30,000 men. Probably a mixed bag but treated as legions.
1 x levy heavy infantry (6,000 men. Numidians).
1 x levy light infantry (6,000 men. Numidians).
2 x African elephants with light infantry support (30 elephants [but treated as if 60 in the rules] and 3000 light infantry).
2 x average heavy cavalry (3,000 horse. Gauls, Germans, Spanish, possibly some more heavily equipped Numidians).
1 x average light cavalry and 2 x levy light cavalry (7,500 Numidians. Some with reins and some without. Some better / more motivated than others).
1 x timid commander (Scipio)
Total: 45,000 infantry, 10,500 cavalry and 30 elephants with a fighting value of 66.
Caesarians:
10 x veteran legionaries (15,000 long-serving troops).
3 x average legionaries (9,000 newly recruited for the campaign. There are another two legions guarding the camp which are not counted in these figures).
2 x veteran light infantry (3000 archers, slingers and assorted skirmishers).
2 x veteran heavy cavalry (1500 heavy cavalry. Gauls, Spanish, poss. some Germans, Gaetulians. Includes original cavalry, more recent reinforcements, and deserters).
1 x average commander (Caesar's staff).
Total: 27,000 infantry and 1500 cavalry with a fighting value of 74.
Scipio deploys first as follows:
Left centre: 1 x AEL, 1 x LLI [1 CP each]
Left flank: 1 x LLC (2CPs)
Caesar deploys second as follows:
Right centre: 2 x VLI, 1 x VLE, Caesar's staff [3 CPs, double moves]
Subscribe to:
Posts (Atom)
