Prufrock's Wargaming Blog

Prufrock's Wargaming Blog
Showing posts with label after action reports. Show all posts

Monday, June 30, 2025

Heraclea with Commands & Colors: Ancients

SP came over the weekend before last and it seemed like a good opportunity to test out the new 10.5cm hex mat.  

I wanted a little terrain but not too much, and the Heraclea scenario from Expansion 2 fit the bill.

From behind the Roman right at set up.

The armies are fairly evenly matched. Both sides have two leaders, one in the centre and another on the right, meaning that the lefts of both armies are, if not weak, at least vulnerable. Pyrrhus has powerful infantry, two units of elephants, a potent cavalry-plus-leader combination to strike from a distance, and light bow infantry.

Laevinus has powerful infantry caught slightly out of position, cavalry with no leader support, and standard light infantry.

Both armies have a hand of five cards.

View from behind the Epirote left.

The battle commenced with the usual jockeying for position and sniping from the missile troops. Playing Pyrrhus, I moved him into the centre left to be more influential. SP moved Laevinus up with his right, but behind the missile troops instead of with the main infantry line. 

What was this threat? I tried to change the focus to the centre.

The lines develop: Romans on the left, Epirotes on the right. Laevinus is visable behind the velites.


A wider angle at the same stage of the fight.

Somewhat afeared of the prospect of Laevinus storming forward against my left, I tried to get the centre forward and into contact as quickly as possible. 


Centres engage.

The central fight was fairly even in terms of units lost, but Pyrrhus had an advantage in positioning, with his forces better concentrated, and with more vulnerable units in range of his forces than Laevinus has in range of his.

Both centres battered after the initial clash there: three banners apiece. 

Centre cards began to run out, so it was time to engage on the right and try to push the Roman cavalry and infantry back into impossible positions. 

Advance on the right to force the Romans back against the river. 

Pyrrhus begins to build a lead as he chews up the Roman left with the help of some good cards and useful dice, 4-3 up, 5-3 up: two more banners to win.

With things at crisis point, SP decides to attack. An I am Spartacus card rejuvenates his chances. 5-4.  Another Pyrrhic turn sees the scores 6-4, with one banner to win. A leadership any section card sees SP try his luck in the centre: another Roman attack destroys one unit, kills Pyrrhus, and is one hit short of destroying another unit after the momentum advance and follow-up attack. The battle back roll kills the Roman: 7-6 to Epirus!

A fitting way the christen the mat, and a great fightback from SP.

Sunday, June 1, 2025

Battles of Heraclea Lyncestis, 219 BC and Emporiae, 218 BC (Med Campaign 9)

Reports are in of a battle in northern Macedon between the invading Illyrians and a force scrambled together to meet them:

The Illyrians invaded; the Macedonians placed gentle hills and Ralph added some rough going.  The Illyrian infantry proved surprisingly resilient even against pikes, and of course they had the numbers, but eventually their central command was worn down and broke.  A cavalry clash on the right saw casualties on both sides but the Macedonians had the edge, while on the left the Macedonians held up against vastly superior numbers. After the standard competition time (three and a quarter hours) we called the game at 6-4 to the Macedonians.  Either side could have won, given unlimited time, but Philip V had the edge.  So the Illyrian invasion has been repulsed after a very hard fight.

Macedonians to the left of this picture; Illyrians to the right.

The Illyrian centre on a gentle hill.

View from behind the Macedonian centre-right as the phalanx advances.

Macedonian right, with an Illyrian outflanking movement underway.

View from behind the Illyrian centre as the crisis approaches.

Hard fighting on the Illyrian left.

The phalanx under pressure in a fierce melee.

The Illyrian raid on Macedon is driven off, but the army has not been destroyed. 

Many thanks for John G-L and Ralph for fighting this one out and sending through the report and photographs! 

Furthermore, in Nearer Spain, Proconsul Aaronius Dubius Scipio Calvus, having landed a force near Emporiae, was engaged by an alliance of indomitable Iberian tribes under the command of one Simoniblis. 

The tribes fell upon the Roman force as it was making camp. Both forces were equal in strength. For the Romans, who deployed first, there were twelve units of average legionaries, two of levy light infantry, three of average heavy cavalry (Roman and allied) and one of levy light cavalry (Spanish allies). Scipio Calvus was classed as an unispired commander. The Roman key zone was in the centre.

The Iberians were comprised of fourteen units of average heavy infantry, one of levy light infantry, one of average light infantry, two average heavy cavalry, one average light cavalry, and one veteran heavy cavalry with average leader (Simoniblis). They had a hill to their right rear, and their key zone in the right centre.

View from the Iberian right rear.

In a cannily-fought battle the Iberians pushed forward in the centre and centre-right, later bringing Simoniblis and his veteran cavalry forward on the the right flank. The Romans were content to hold back their wings to avoid tangling with the cavalry and concentrate on the fight in the centre.


The centres engage.

Powerful Iberian attacks forced the Romans to pull back their left centre. The Romans push forward their left's cavalry to try to rescue the situation.


The Iberians have put a hole in the Roman line, but all is still in the balance.

Simoniblus defeats the cavalry opposing him. Under ever-increasing pressure, the Roman left commences to crumble. 

The Roman cavalry is defeated - Simoniblis advances.

The Romans are famously resilient, so the Iberian left now advances to engage the Roman right. The fighting is grim and bloody.

The Roman left is chewed up while on the other end of the line the forces finally meet. 

The Roman left is crushed; Simoniblis takes the camp. This plus eight units shattered means the Romans are at -3 to morale, and at the next setback the army flees. Dubius Scipio is unable to hold up the family reputation!

A famous win for SP (also giving him the Washbourn Trophy), who has overseen a good plan play out to near perfection, and pushes the Roman menace out of Nearer Spain. 

The campaign continues!

Many thanks again to John, Ralph, and SP for participating in this turn, to John, Russ, Martin and Peter for having played in the other battles so far, and to others who have also expressed interest in participating. It is wonderful to have had so many hands to the pump, as it were!

Tuesday, April 1, 2025

Raphia, with Commands and Colors: Ancients, epic version.

The battle is an impressive affair, and the account in Polybius, book 5, provides a description of the historical event. The armies met near Raphia to decide control of Palestine: Ptolemy of Egypt leading 70,000 infantry, 5000 cavalry and 73 elephants against Antiochus of the Seleucids with 62,000 infantry, 6000 cavalry and 102 elephants. 

Although fought in the same year as Lake Trasimene, Gaza in 217 BC seems a world away from northern Italy, closer to the time of Alexander than the time of Hannibal. 

The two armies are fairly even in Commands & Colors: Ancients Epic. Both sides have 31 units and three leaders. Ptolemy has a slight edge in line infantry, with twelve units to Antiochus's ten, but Antiochus has four elephant units to three and ten light infantry to nine. Cavalry numbers are equal, with Antiochus' having more oomph in the charge and Ptolemy an advantage in missiles.  

To win requires 13 banners, with banners won by destroying units or killing leaders. 

Set up has the Seleucid leaders concentrated in the centre and right zones; the Ptolemaic leaders are spread one to each zone.

Scenario from Commandsandcolors.net

According to commandsandcolors.net, Ptolemy wins 61% of the time to 39% for Antiochus. Let's see how our fight got on.

Turn 1:

Antiochus starts with an order two left and order two right. He advances lights to screen his own elephants from unwanted attention and to fire pot shots at the enemy. With one fortunate volley he inflicts a hit on Andromachus's guard unit, weakening it to three blocks. 

Ptolemy plays order light troops, activating troops on both flanks. Daring attacks cause two elephants to rampage, scoring a total of five hits on the surrounding troops. A strong start!

Translation - both sides activate units on the flanks to skirmish for local advantage, aiming particularly to harass elephant units in the hope that they rampage, or to screen them to prevent such attacks on their own forces.

Initial dispositions, looking from Ptolemy's left.

Turn 2:

Antiochus plays outflanked to activate units on each wing for more skirmishing and order medium troops in the centre to begin the slow process of advancing the infantry line.

Ptolemy shuffles units into positions on both flanks to minimise enemy options. The movements are still watchful at this point.

Translation - neither side is in a strong enough position to commit to an attack at this stage. Early manouvering focuses on creating or denying opportunities on the wings while preparing for a decisive clash in the centre. 


Early skirmishing, looking from Ptolemy's left. 

Turn 3:

Antiochus activates units in the central and left zones. 


Ptolemy advances units in the centre and right. 


Translation - both sides are trying to get their heavy and medium infantry units into line for advances into charge range.


Turn 4:


Antiochus advances units in the centre and plays darken the sky on the left. Despite bucketloads of missile dice thrown, little damage is caused - units just retreat.


Ptolemy plays order medium troops and consolidates in the centre.


Translation - both sides are still getting into position. 


The centres are edging closer to each other.


Turns 5 and 6:


Both sides continue to jab at each other on the flanks and advance in the centre.


The two lines of infantry about to meet.


Turn 7:


Antiochus plays order two right to bring an elephant into contact with the left of Ptolemy’s infantry line, line command to bring the infantry lines into contact, and order four left for missile attacks. One light unit is killed, three units of heavy infantry and Ptolemy himself are killed. Three other units are hit badly and pushed back. Antiochus's men only take one hit in total. Five banners are gained and the integrity of the line is maintained.  

The Ptolemaics play two left to attack the elephant, line command to fight back in the centre and order mounted on his right. The elephant is killed but another infantry unit is lost in the centre. 


The score is 1-6 to Antiochus.


Translation - Antiochus's attack causes monstrous damage. Ptolemy is dead and his centre is in pieces. It is hard to see how the Ptolemaics can come back from this.


The phalanx about to go in.


Ptolemy (leader top of screen) loses his unit and his own life in the initial clash.


The aftermath, looking from behind Antiochus's right centre.


Turn 8:


Antiochus orders clash of shields centre. Two more units are destroyed, giving him an 8-1 advantage.

The Ptolemaics play move-fire-move and order two in the centre and eliminate a unit of heavy unit. 2-8

Translation - Antiochus continues to apply the pressure. The Ptolemaics, now under the command of Andromachus, scramble to avoid defeat and attack where they can.


Turn 9:


Antiochus plays order three centre and order one left. An elephant unit attacks the leader and kills the heavy cavalry. 10-2


Ptolemaic remnants  attack on each flank. One skirmisher unit is killed on the left and a light cavalry on the right.  Attacks on the elephants are unsuccessful. 4-10


Translation - the end is near, and the gods favour the mighty.


Turn 10:


Antiochus plays I am Spartacus to kill two more units. 12-4


Ptolemaics play counterattack for an I am Spartacus of their own. They kill three, and miss out on two kills more. The enemy elephant is killed by bowmen! 7-12


Translation - I am Spartacus an gives additional attack dice to units activated. For a moment there was a glimmer of hope for the underdogs, but the dice are capricious. 


Death of the elephant, killed by bowmen.


Turn 11:


Antiochus plays inspired leadership left, move four centre, and inspired leadership right. Two more hits are scored and 14-7 is enough to confirm the victory. 


Summary:


In this case the initial attack in the centre by Antiochus decided the battle. After that it devolved into local clashes with the Seleucids holding the advantage in numbers, leaders, and battlefield agency. The final positions showed a chaotic scene and the photos do not present it to advantage! 


An enjoyable solo outing but it was over as a game after the first major clash, and went very much against the historical victor.


Tuesday, November 26, 2024

Playing Phil Sabin's Phalanx

It's not a secret that Phil Sabin is one of my favourite game designers. The evolution of my 15mm Ancients figure collection, for example, has been directed primarily by a desire to play Lost Battles. But sometimes it is good to try something different from the norm, and I decided to have a go at one of Phil's earlier designs, Phalanx, published in the Society of Ancients's Journal, Slingshot.

My original plan had been to combine Phalanx with the combat system from another of Phil's games, Legion II, but after setting up thought it was probably best to play Phalanx as-is first: if I'm going to muddle something, it's just as well to have a baseline to allow comparisons.

The first thing you notice is that Phalanx has quite a good selection of scenarios. I hummed and harrred a little, then settled on Heraclea. Pyrrhus would be perfect for my purposes. 

For the terrain I am using the Memoir '44 battle board, and for figures I rummaged through the collection. It looks a little cramped, but is not entirely displeasing to the eye (and certainly better than my attempt at making an offset squares mat a few weeks ago!). 

In Phalanx the armies deploy from a camp on their baseline, with the Romans moving first in this scenario.

Rome has six units of heavy infantry, two units of light infantry, two units of heavy cavalry and a leader (Publius Valerius Laevinus). Pyrrhus has himself as leader, five units of heavy infantry, two of light infantry, two of heavy cavalry, and an elephant unit.

Once an army has had four or more of its units routed (the general's unit counts as two) at the end of its turn it loses - unless it has fewer units routed than its opponent.  

The battlefield is an elongated hex (marked on my board by terrain pieces to indicate the boundary) and the only terrain in play is a river. Both armies deploy out of their camp, so it takes a little time for the armies to close. 

The battlefield from the Roman side after two turns. 

Movement is one hex per turn for most units, but cavalry get to move two. Light infantry and elephants can move two at certain times. There are rules around facing, when units change facing, and whether units can attack after performing a particular move. This all combines to give different units different limitations and give each troop type its own characteristics. 

Of course, it takes a little time to assimilate all these characteristics, and while I did not realise it at the time, there were several weaknesses in the Pyrrhic deployment

Pyrrhus's deployment is not ideal, but he hasn't realised that yet.

Enjoy the view while you may, horsemen!

As with most Phil Sabin games, the nuances of the combat system come out in modifiers. Phalanx is deceptively simple - three units versus an infantry or elephant unit will kill it, while two units versus cavalry will kill it. But there are exceptions: some circumstances add an extra attack unit equivalent; some disregard one. Again, it all takes time and experience to assimilate.

The lines clash - Rome is about to launch attacks.

In two more turns it is all over. Rome kills off a unit of cavalry on their left, exposing Pyrrhus. The Epirote army kills a Roman light infantry in its turn; Rome then has the numbers to kill the elephant and Pyrrhus's unit, taking them to four units lost. The Pyrrhus-less Epirotes can only pull back one on their own turn, so Rome wins 4 units to 2, which counts as a sweeping victory. 


Rome has cracked the Pyrrhic centre left, has superiority on the Pyrrhic right, and has killed Pyrrhus. Game over!

Phalanx is an interesting game. I played this solo, and it was very much a learning experience. The combat system is largley deterministic, which makes it difficult to solo satisfactorily, in much the same way that chess is difficult to solo satisfactorily. 

Next step will be to try it with the Legion combat system ported on. 


Monday, September 9, 2024

Tunis again with SP - a mighty clash

SP popped over today Sunday to play Tunis in our Washbourn Trophy series. An earlier post gives some information about the initial set up. 

SP took the Syracusans under Agathocles, an inspired leader. I took the Carthaginians under Bomilcar (on the left) and Hanno (on the right). We decided to play without the Favour of the Gods rule. The Carthaginians (to the right in our pictures) have first move each turn.

A high command roll gives Carthage options: they attacked on each wing but not in the centre in order to keep the levy heavy cavalry there out of the clutches of the enemy. One attack was successful, but it was rallied by Agathocles himself. 

SP then rolled a 1 for command, meaning he either could attack or reinforce, but not both everywhere. He attacked in all zones and then reinforced the centre and the right, trusting Agathocles to hold firm without further support. The attacks inflicted three hits, but two of them were all-out attacks by his hoplites (who must all-out attack given the opportunity).


After turn two. Syracuse on the left; Carthage on the right

In turn three feeble attacks from Carthage - despite another high command roll - are met with grumblings of discontent by senior leadership. They manage just one hit from thirteen attempts. 

The Syracusans roll another 1 for command. They reinforce Agathocles' wing and attack in the centre and the right. They are very successful on the right: the Carthaginian units are all left spent, but at the cost of another hoplite unit spent from an all-out attack.

At this point SP is reasonably content with his start, but is heard indicating some concerns about the centre. On my side of the table there are mutterings about being pounded.
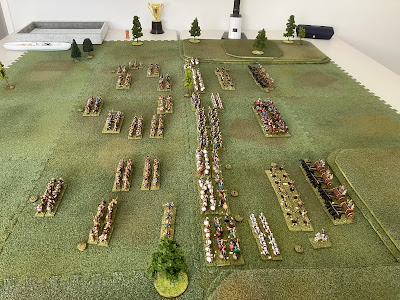

After turn three, with the Washbourn Trophy shining at the far end of the table in all its gilded glory. In the foreground the shaky Carthaginian left is visable.

Carthage rolls high for command again. I decide to pull my left back onto the hill. With spare commands, I double-move the chariots onto the hill to their left, creating a pocket. Elsewhere we manage a solitary hit.

SP is a little non-plussed by the withdrawal of the Carthaginian left. Should he advance into the pocket? To do so will put him at a morale disadvantage and the hoplites, with enemy on their flanks, will not be as effective in attack. 

Another low command roll sees him leave things on the right as they are for the moment and press on in the other zones. In a turn up for the books all of the Syracusan attacks are unsuccessful. 

It seems that when the Washbourn Trophy is on the line even the dice start to feel the pressure... 

After turn four. The Carthaginian left retreats.

Carthage attacks. Great dice see three hits scored in the centre, leaving just one fresh unit there. On the right, another flurry of hits leaves Agathocles as the only fresh unit in his zone. Those mandatory hoplite all-out attacks have weakened the Syracusans more than expected.

Syracuse decides to advance into the pocket on the right. SP needs to shatter some units. After all the movement and fighting is done, Syracuse has five fresh units across three zones; Carthage has four. 


After turn five. Carnage in the battle line.

Turn six is more grim attrition. A unit is shattered in Agathocles' zone, but the rest hold firm. Both centres still have one unit fresh each, and the Syracusan right still has two units fresh, but the rest of the units on the field are spent.

Agathocles is faced with a choice: retreat from his zone to prolong the battle and give time for his right to clean up the levies on the hill, or stand. SP chooses to stand. He will not give up his key zone.


After turn six. Still the Carthagian levies survive!

Carthage has a royal opportunity to put Agathocles, now in the lead unit position, to the sword. Heroically, he stands firm! Did we only imagine an owl or two in the air? On the right the Syracusan hoplites shatter an average heavy infantry unit. Bomilcar attempts to rally the hit, and dies. Disaster! Two morale checks needed on d3s. Fortuitously for Carthage, the scores are 3 and 3, and even the levy light infantry refuse to rout. Disaster averted.

Agathocles strikes from the lead position: two units shattered, two units routed. Only the veteran heavy infantry remain in place to hold the zone for Hanno. But the morale check results are high enough to prevent the rest of the army from routing. 

And what is the health of the battle lines at this point? Agathocles has three units against Hanno's two. All spent. The Syracusan centre has five units all spent, against Carthage's four spent heavy infantry and one levy heavy cavalry kept - wisely as it has turned out - out of the lead position, still fresh. Syracuse has one fresh and four spent units on the right facing four spent infantry units and the Chariots mucking about on the hill.


After turn seven. Both armies out on their feet.

Hanno attacks, and scores two double hits from his zone. Agathocles rallies one, but suffers a close shave with the next, is laid low, and can do nothing to stop the second double hit. They are all shattered. Hanno advances to take the key zone and Syracusan morale will now suffer accordingly.

A succession of failed attacks by Carthage in the centre is redeemed by a final attack which does enough to shatter a unit. With morale now at a -3 (general killed, four-plus units shattered, key zone lost), the army flees.


Turn eight, the moment before the Syracusans are swept away.

Well, after a great start from Agathocles things went a bit pear-shaped for the Syracusans. The longer the game went on the more the Carthaginian position improved. SP was hampered by poor command dice. 1, 1, 2, 3, 2, 4, if my memory is correct. This meant he was unable to get his army into position as quickly as he would have liked, and nor did he have commands to spare for combat bonus purposes.

For me, the command dice were extraordinary. 5, 5, 6, 4, 5, 4, 5 or similar. This allowed me the luxury to pull back on my left, and gave the ability to load up my attackers with combat bonuses. 

In the end, I think this (and my high morale rolls at crucial times) were probably the difference.

As usual, it was a gripping game. We both felt from turn four onwards that "THIS turn will decide it!" but that feeling went on for five turns. 

We will look forward to contesting the Washbourn Trophy again soon. I will have to have a think about what battle to do - it was refreshing to have hoplites and chariots on the table. Funnily enough, the battle was quite similar to the account in Diodorus, except that it was Bomilar who died, not Hanno, and the Carthaginians managed to resist the urge to rout at that point.

Final scores were Carthage's 97 to Syracuse's 60, for Carthage to register a clear victory. On the day I had 85 to 60, but forgot to include the withdrawn Agathocles in the count. 

Related Posts Plugin for WordPress, Blogger...