Turn 1
The Czechs deployed five battalions on table, with the central ones in reserve. They were a formidable looking lot. Although there was only one tank battalion, the mechanized infantry battalions - in BVP-1s - of 5th Motor Rifle Regiment each had a company of T-55s attached. 4th Motor Rifle Regiment had four battalions present, three of motorized infantry in OT-64s, and one of T-55s.
As expected, Luke had ordered a flank march. What I had not expected was that it would be scheduled to arrive on turn 1. No matter, I thought; he had to roll a 6 for it to arrive. Fat chance!
One roll of 6 later, I began to think wistfully of my original plan...
The mechanized infantry of 1/30 speeds towards its objective...
The M60A1s of 2/64 advance.
The Czech left heads for the hamlet.
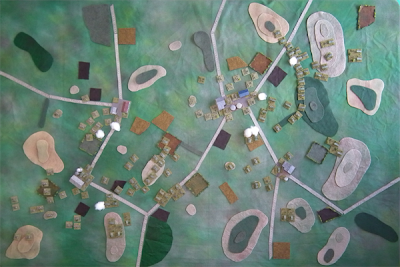
The map below shows the table at the completion of the first turn. My mechanized infantry battalion is making for the two-sector town in the centre, while 2/64 armoured battalion is advancing on my right. Luke's flank march can be seen on the top right of the picture. The rest of his forces can be seen in the lower quarter of the map...
Turn 2
The advance continued, with my infantry speeding to occupy the town before being taken in the flank by 2nd Battalion, Fourth Motor Rifle Regiment.
Something wicked this way comes. OT-64s crest the brow of the hill on my left.
The map below shows the situation at the end of turn 2. The Czechs have occupied three of the five objectives already, but recon elements of my mechanized infantry battalion have taken one of their own.
Turn 3
My mechanized infantry are now dangerously exposed on their left. Their anti-tank guided weapons systems are out-ranged and out-spotted by the OT-64s opposing them, so it is all they can do is dismount and prepare for a grim fight. In happier news the recon elements give their opponents a bloody nose.
The M60A1s skirt the rough ground as they make their way forward.
Oh dear. Under pressure on two fronts, and it's only turn 3!
The map below shows the table after the third turn. The Czechs hold three objectives; the Americans two.
Turn 4
The big question this turn is whether we will see our flank march arrive on schedule or not. It's 50/50...
Will we get to fall upon this flank?
And we will!
The cavalry arrives! Things are looking up.
The Czech left, blissfully unaware of the menace to its rear.
Add to this the arrival of 3/64 in the enemy's left rear and the Americans are feeling quietly confident.
Turn 5
Will this be the turn that the Americans win the game? The Czech right is stopped, while the Americans have the Czech left in a vice.
So near yet so far: the Czechs find it frustratingly difficult to coordinate their assault. The Americans, meanwhile, keep their heads down and call in the artillery.
The M60A1s of 3/64 about to overrun the Czech rear elements. 2/64 can be seen to the left of the picture as the pincer closes.
But the Czechs have a few tricks up their sleeves. In desperation they call down rocket fire. It arrives, and the Americans on the flank are blanketed with smoke, thwarting all attempts to fire.
The map below shows the situation after turn 5. Well-placed smoke is preventing the Americans from making good the advantage on theirr right, and is buying time for the T-55 battalion to race to the rescue of their beleaguered colleagues.
Turn 6
There is fighting on the Czech left and artillery is called in on the Czech right. American counter-battery fire continues to be devastatingly efficient.
In this sector smoke is now the Americans' friend...
The flanking troops are unable to bring much of their firepower to bear due to the smoke.
The Americans are able to force a morale test on the leftmost of the Czech battalions, but it still maintains its position.
The Americans have not made as much progress as they would have liked, and the T-55s are making their presence felt on the Czech left.
The map below shows the table after turn 6. It is in the balance.
Turn 7
The advantage swings back to the Czechs as their high command finally gets orders through to 2nd Battalion on the left. They are to coordinate with 1st Battalion and commence their assault on the American position in the town.
2nd Battalion gets its order change at last!
The men of 1/30 call down as much artillery fire and smoke as they can. Somehow they manage to beat off 1st Battalion's assault on the town, but they will not be able to hold much longer.
The M60A1s of 3/64 advance through the smoke, picking off enemy armour as they go.
The map below shows the situation at the end of turn 8. 2/64 and 3/64 are both now in firefights with the enemy on the American right. The ATGW capacity of the BVP-1s is beginning to take its toll on the Pattons, and casualties are sustained on both sides.
Turn 8
The American armour continues its assault on the Czech left, causing significant damage, but the American left is under extreme pressure of its own. Who will break first?
3/64 gets into the enemy rear areas, but BVP-1s take out two M113s with ATGW fire.
OT-64s advance on the American left. The Americans break the battalion to their front but cannot reposition themselves quickly enough to reinforce the flank.
Heavy fighting on the Czech left as the tank battalions clash. The T-55s are bringing more guns to bear, but the Americans have their best chance to inflict heavy causalties. Neither side can land a telling blow.
This is the situation at the end of turn 8. Two Czech battalions have been broken. The Americans control three objectives; the Czechs two.
Turn 9
Time is running out, so the Czechs launch an all-out assault on the American left. They successfully call in rocket fire (at last!), which causes predictable carnage. The dazed and confused Americans are now dangerously close to breaking: one more casualty will do it.
The OT-64s prepare to assault the American positions.
One American stand and two Czech stands are destroyed in the close assault. It is enough to force a break test. The Americans fail!
The armour breaks another Czech formation, and is finally in position to focus on swinging the door shut on the Czech T-55s - but it is too late.
The map below shows the situation at the end of turn 9. The Czechs have broken the American left, and the Americans have done the same to that of the Czechs. The American armour has once again failed to score hits on the T-55s, and this has decided the affair, for their presence means that the objective, despite being in American hands, is classed as contested.
Time has run out, and the forces disengage!
Conclusion
By game end the Czechs control three objectives and have broken one American battalion for 8 VPs. They lose 1 VP for having taken an 'a' option in their force.
The Americans hold two objectives and have broken three Czech battalions for a total of 10 VPs, but they lose 3 VPs for having taken a 'b' option, and another for one of their objectives having enemy close enough to contest it.
The Czechs therefore win, 8 points to 7!
Thoughts
This was an excellent game. It was in the balance throughout; one turn going one way and the next the other. The winning of the game for the Czechs came, I felt, in the middle turns, when Luke's use of smoke bought enough time for reinforcements to arrive and evened up the firefight by preventing the Pattons from being able to bring their fire to bear while allowing T-55s and BVP-1s to get into range and gang up on isolated American vehicles.
I had a good deal of luck in that the Czech left failed to coordinate its attacks until late in the game (jamming came in handy here!), and in that the M107s were magnificent in knocking out four enemy batteries with counter-battery fire. It was significant that the left fell only once the M107s had run out of ammunition.
Luke was a deserved victor, as his timing and skill was superior to mine. It also turned out that he had another flank march to come on board but forgot about it, so he was actually fighting at a further disadvantage.
For myself, I underestimated how long it would take to break the Czech left, and paid the price. It is a delicate balancing act, and I have a lot to learn yet. So, a most enjoyable game, and many congratulations to Luke for a nicely worked victory.
Luke's thoughts can be found here.


