Prufrock's Wargaming Blog

Prufrock's Wargaming Blog

Thursday, October 28, 2010

Painting techniques - the brown wash part 2

Continuing on from the last 'brown wash' post, I'll just show some examples of what happens in later stages of the painting.  To recap, the composite shot below shows a figure primed grey and then a figure with the brown wash.


Notice how the wash brings out detail in the figure, showing the folds in the clothes, the eye sockets, the lines of the fingers, hair and so on and so forth.  When block painting in the next set of colours the recesses can be left unpainted to allow the brown to show through, or a thin coat of paint can be used to still leave dark patches where the recesses are.  A thick application of paint can also be useful at times if it is not desireable to have brown shadowing in a particular area.

The second series of pictures shows three more miniatures at different stages of the painting process.  The first has had the skin blocked in with a very dark mix of flesh and brown earth (to match existing figures) which will later be given mid and highlight coats.  The tunic has also been painted a dark sandy yellow, and by leaving the brown to show through in the deeper folds the need for later, time-consuming washes to create depth is eliminated.  It can also be seen that the brown wash here was much darker than that in the preceding example. 


Our second sample figure has also had a dark flesh coat put on while the tunic has been given its mid and  highlight coats. Note how clearly the wash has delineated the different details on the figure: the tunic, the arms, belt and the sword sheath. It makes block painting very easy when the lines are this clear, and it looks neat and tidy when completed (provided that one stays within said lines of course...).  Unfortunately, it does also show up lazy prep work, like the long unfiled ridge on this poor fellow's arm!


The third figure has only had the mid coat for the tunic applied, but I'm showing it so that it's possible to see how the wash acts on armour.  The mail here is sculpted a little crudely, but it will scrub up well enough given a couple of coats of Tamiya smoke to add a black, faintly metallic sheen.  That will probably be all that's necessary to have the armour looking the part.  Again, the darker wash prevents any trace of the primer showing through, clearly marks out the different areas of the figure and its equipment and will make painting the rest of the figure significantly easier.


After the block painting and the highlighting has been done, it's time to consider whether any more washes are needed.  With a command figure I might give a coloured wash to a cloak or tunic, but I usually won't bother to do that with ordinary troops unless they are particularly nice figures or I've botched up somewhere along the line.

Mistakes are fairly easy to avoid (and easy to correct if they can't be avoided) when painting is done in a logical sequence and the old hand is reasonably steady.  To this end, experience shows that a gin and tonic is a far better aid to a steady hand than a third cup of coffee, but perhaps that says more about me than I would like!  I usually do mid coats of tunic and flesh first, followed by spear or javelin shafts, shoes/sandals, weapon sheaths and crests.  Then I do a quick black or Tamiya smoke wash on spearpoints and blades.  This is followed by highlights for the flesh areas; then I'll do the belts and the tunic highlights.  The order will change at times, but that's the basic formula.

When painting and washes are done, due consideration must also be paid to the dip.  While that is for another time, I'll just say that it works very well on pteruges and on lighter natural colours, so I tend to use it more for figures on which these items and colour schemes feature.

Finally, here are some shots of completed figures that were done using the wash technique.  You'll notice that these are all rank and file figures, as my main purpose is to paint large lots that are 'good enough' as quickly as possible.

On each side we've got Greek javelinmen and the central figure is an Illyrian light cavalryman.  These figures are not first-class jobs, but hopefully they illustrate the strengths and weaknesses of the brown wash technique.  In my opinion these look fine on the table, and they are nice and simple to paint.


Well, that's about it for the brown wash section.  I'll have a think about which technique to look at next.

Wednesday, October 27, 2010

Painting techniques - the brown wash

I've decided to start a series of posts chronicling some of my painting techniques and methods.  The reason for this is to help me remember how I've done things, as I often forget little details and find myself later thinking "how did I do that again?"  Hopefully it will also show some improvement over time so that in a few years I can look back, smugly scoff at my old self and exclaim "oh, what a fool I was then, and how wise I am now!"

Anyway, jocularity aside, the techniques I will cover are not of my own invention.  Most of them have been picked up in various places around the web, though I may have refined some to suit my own tastes and the products available here in Japan.  The miniatures page is a prime source, and I've learnt so much from browsing the painting forums there that I can't recommend it and its helpful denizens highly enough.  I would've been lost without it.  Other useful sources have been blogs.  People like BigRedBat will post pictures of their figures and from those shots one can see what is possible, what techniques are used to get those effects, and how far I personally have to go to even contemplate matching such skill and expertise.  It's a constant learning process, and hopefully it will long continue.

Anyway, here is the standard 'brown wash' technique that I use.

First up I spray prime the figures grey, using either the Tamiya or Mr. Hobby products.  I have also primed white with the wash, but the figures I'm doing now use grey, as I've had the best results with this colour.

Next, I make up the wash itself.  The proportions are roughly one part black to two or three parts brown; this then being thinned with an approximately 50/50 mixture of Klear and water and (this is essential) a touch of hand soap dripped in to help the flow.   I use these paints (click for a larger view):


or these:


depending on how brown or red-brown I want the figures to look. 

This wash is applied liberally over the whole figure so that all the crevices have colour in them.  This results in something looking like this:


The wash can of course be made darker if desired.  The purpose of the wash is to add depth to the figure, to give good clear outlines of belts, boots, beards and so on, to prevent any virgin undercoat showing through, to pick out folds in the garments, and to provide a good base that flesh tones, browns, reds, whites and blues can be painted on top of later in the process.

So, there we go: the brown washed figure, step one!

Saturday, October 23, 2010

Scythed Chariots finished at last

Finally, and after more than two weeks on the table, the scythed chariots are finished!  The models are from Magister Militum's Chariot 15mm range, and I found them very good to paint.  I don't like assembling chariots very much but I have to admit that I like the finished products.

I actually put a bit of time and thought into colours and what not for these fellows so that each chariot, driver and team could be individual while still clearly being part of a pair.  I'm quite pleased with the results, and it helped that this was the second lot of chariots I'd done.  I was able to avoid a number of the mistakes made first time around.  I did manage a new and unique muck up though; I've mounted the things and flocked their bases without having yet sprayed them with matt varnish.  I'm going to spend a fair whack of time shaking off excess flock before I pull out the spray that's for sure, and I hope that the flock doesn't go all clumpy on me from the moisture.

Oh well, what can you do.  It wouldn't be a proper hobby project without some problem of my own making :)

Anyway, here they are in all their just-finished and shiny glory:


And another shot close up so that the detail on the models can be seen.  This one's a bit dark unfortunately, but you can still get a reasonable idea of what they look like.


Next up on the table should be Normans and Saxons for DBA, but you never know, something else might slip in there first...

For reference, the code for these models is LAC007 Scythed Chariot.

Here's a link to their page on on the Magister Militum website: http://magistermilitum.com/product.asp?numRecordPosition=6&P_ID=2924&strPageHistory=cat&strKeywords=&SearchFor=&PT_ID=381

Sunday, October 17, 2010

First game of Warhammer Ancient Battles

A friend came round today for an afternoon of wargaming and we decided to give Warhammer Ancient Battles a go.  We put together two 3000 point armies with 15mm figures based for DBx and used a ruler I'd made up for an Armati conversion on which each inch was reduced to 17mm.  This seemed to work pretty well.

Here's a shot of the deployment (as usual, photos can be enlarged by clicking on them):


And another shot, this time from the Carthaginian side.


Shaune started off confidently, advancing his elephants and warband early to commence the assault.  It was a very good move.  Although here we see one of the elephants rampaging...


...it was not before they had made such an impression in their approach that all but three of  the callow Roman legionary units had fled in terror!


While the Romans attempted to rally their centre before it fled off the board, the warband and other elephant destroyed one of the few units of hastati that had decided to stand its ground.


The warband were in turn hit by the returning troops with results that were not pretty.  Out of respect for common decency the following shot shows the charge rather than the carnage that ensued:


The cavalry eventually engaged on both flanks with the Romans getting the better of it due to the presence of the rampaging elephants as these effectively prevented support from being brought up to aid the Spanish and Punic horse.  With important help from Shaune's shocking dice rolls, the enemy cavalry was beaten off.  Huzzah!


Huzzah again for the great tusked obstacles!


The hesitation induced by the great beasts allowed time for the Romans to rediscover their mettle, with the situation in the centre largely restored (barring three units which had hied off over the lip of the pool table  back towards the camp).


The centres now engaged in a whirling fight with outflankings and outflankings-of-outflankers aplenty.  The final situation saw rough parity achieved in the centre, but the damage had been considerable and we decided that the Carthaginians had done enough to carry the day.  Well done to Shaune!


It was a lot of fun, and we didn't do too badly to finish a 3000 point battle in about four hours on our first time playing, I thought.  We weren't too religious with rules interpretations and no doubt did a few things wrong here and there but it was no matter and the game was played in great spirit.

As a final note, the conversion of the rules to 15mm seemed to work fine so we'll give this a go again.

All in all it was a most successful day!

Friday, October 8, 2010

Horse archers

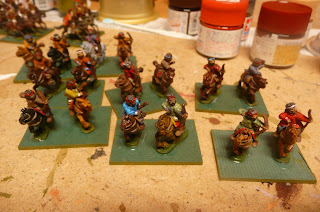
Here are some shots of some recently completed Old Glory 15mm horse archers.  I primed them with gesso, which I found obscured some of the detail.  This is particularly noticeable in the faces, so I should probably have given one or two of them an extra wash to bring out the features a bit better.  Oh well, you don't really notice until you do a close up camera shot, I suppose!

As usual with Old Glory, the figures were pretty easy to paint up.  I have another 16 of these fellows to do and 4 more reinforcements from Essex coming in so that I'll have enough to do the Lost Battles Carrhae scenario.  Hopefully I can get away with passing these fellows off as Parthians for an evening...  


Sunday, October 3, 2010

Painting update

This is a quick update from the painting table.  It's actually been a fruitful week, which makes a nice change.  Aside from prepping and priming two DBA armies, I've been working on sprucing up three lots of figures.  Firstly, these Carthaginian Poeni cavalry from Chariot I mentioned in an earlier post.  They still look pretty rough, but they're much better than they were, and should now be passable on the gaming table.  I will always cringe when I see those pteruges, but as that's the best I can get them to look we'll have to take them as they are.  Any suggestions for improved pteruge treatment would be gratefull accepted!

The main problems with these fellows were that I'd been in a rush to get them ready for a game so my prep work was a bit amateur and that I'd primed them in less than ideal weather conditions meaning that the undercoat was grainy rather than smooth.  It was a bad way to start, and the original paint job was atrocious. 


The second and third tidying-up batches were of figures I picked up from ebay about four years ago, not long after I first got into ancient wargaming.  The paint jobs were rather worn after years of use and a rocky transit from the UK, but I'd never really thought about taking a brush to them until I saw BigRedBat's posts on his ebay touch-up jobs.  These fellows were an experiment, and as they've turned out OK and there are a lot of foot figures that need the same treatment the experience should stand me in good stead.

I don't know that these figures are, but they could be minifigs (and whatever they are, they badly need to be flocked!).


Finally, I'll finish with something forward-looking: my half-finished Old Glory horse archers. I'm not very good at matching colours in these kinds of situations (I prefer painting colour schemes that are a bit more uniform!), but it's an enjoyable challenge, and while I'm not entirely happy with some of the tunics yet, I'm learning a lot about my paints and my limitations as a painter, which has got to be good.

Incidentally, I primed these chaps with gesso as another experiment, but found that the gesso is probably a little too thick for 15mm figures.  While it can be used it in an emergency, I'll stick with the spray priming as much as possible.


So, a good painting week by my (admittedly low) standards!

Next job is to finish up the horse archers and get started on some of the Normans, for whom I really must find a decent painting guide...

Friday, October 1, 2010

Prime horseflesh

Today dawned bright and fine, but I felt a little on edge.  How early would my wife want to hang the washing out?  How long should one reasonably leave superglue to dry?  Would I have time to spray some test figures, and could I get away with taking out the rubbish after lunch? These questions and more were on my mind.

I went back to sleep.

An hour later, with my wife taking one girl to preschool and the other toddling around in the living room, I got out the superglue and affixed riders to horses and shields to arms as needed.  When finished, my little beer box of goodies looked like this:


When my wife returned, I hurried outside with a few cans of spray paint before she could start pulling singlets and socks out of the washing machine. 

With test figures in the foreground (who says you don't need 24 Old Glory slingers?) and no classes until mid-afternoon, I was all set to go.


I took a little moment to reflect.  The time had finally come - a whole four months after my last spray-priming episode - to farewell the nightmare humidity of summer and welcome some perfect priming weather . 

It didn't really matter what the figures were, but just for the sake of completeness I'll include the list: horses and drivers for some Magister Militum scythed chariots, and a recently acquired Essex Norman DBA army. 

Fifteen minutes later, my beer box looked like this:


And what a beautiful sight it was.

A short while later I managed to sneak into the little hobby room for an hour to clean up another Essex DBA army which I hope to prime tomorrow.  And yes, the army was Saxons.  Who else could round out such a fine hobby morning so appropriately?
Related Posts Plugin for WordPress, Blogger...