Prufrock's Wargaming Blog

Prufrock's Wargaming Blog

Thursday, June 30, 2022

Entertainment in a time of COVID

The bell finally tolled for me on Sunday. I'd had a minor sniffle come on Friday night and thought nothing of it. It then progressed to sneezes on Saturday, so on Sunday I decided to get a test before heading out anywhere other people might be. I was sure it was just a bit of a cold, but the RAT test immediately clanged out 'COVID!'  

With the wife and kids away in Japan visiting family, I did not have to worry about passing it on to them, so I just got in touch with work, ordered some food to be delivered from the supermarket, and settled down to wait it out for a week.

In my favour was the fact that there was a cricket test on. Sadly, we were getting royally thumped, so it was a slightly blue Prufrock looking out the window on Monday who saw a package had been delivered. 

Wouldn't you know it, it was Mike Lambo's Battles of Medieval Britain, for which I'd put in an order about six weeks previously and almost despaired of ever seeing. As it turned out, its arrival couldn't have been better timed. 


The book includes ten pages of rules and solitaire game representations of twelve British battles. These being:

  • Brunanburh, 937
  • Fulford Gate, 1066
  • Stamford Bridge, 1066
  • Hastings, 1066
  • The Standard, 1138
  • Lewes, 1264
  • Evesham, 1265
  • Orewin Bridge, 1282
  • Stirling Bridge, 1297
  • Falkirk, 1298
  • Bannockburn, 1314
  • Shrewsbury, 1403

Each battle comes with a one page full colour hex map and an accompanying description of the information necessary to play out the battle. The rules are clear and simple, need only d6s, and contain nothing that could cause (or exacerbate!) any headaches.

Set up is not fixed: the defending units are positioned by dice roll, as are any reinforcements when they arrive. With only five types of units, you can retain all the unit characteristics in your head and just focus on beating the game. The order generation mechanism is quite neat, and combat is of the 'score x on 2d6, with various +/- modifiers' type.

Turns work as follows:

- mark off turn on turn track

- roll for and place any applicable defender reinforcements 

- activate each player unit one by one by rolling a number of dice to generate orders. Use (or don't) orders as desired

- when all player units have been activated, defending units attack all player units in range

And that's it. Defending units don't move (although defending reinforcements will appear during the battle), so it is up to you as the attacker to calculate the best way to defeat the enemy in the number of turns available. 

Fulford Gate using Commands & Colors terrain and 15mm figures.

The battles are essentially military-themed interactive puzzles, somewhat akin to chess problems, but with variable set up and random elements to consider. To make it easier you can give yourself an extra turn to achieve the objectives. To make it harder, give yourself one fewer.

I've played through the first two scenarios already, and they are a cool way to pass a bit of time. Simulations they are not, but if you want to spend a half hour exercising the brain and rolling a few dice, you could do a lot worse. 

And as for providing entertainment while isolating with COVID, it does the job!

Saturday, June 25, 2022

2nd Day of Gettysburg, with Table Battles

With some Civil War reading on the go at the moment I had a hankering to play an appropriate game. As most titles of that ilk on my shelf are of the 'need to stay set up for a week or so' variety, I betook myself to Table Battles from Hollandspiele for a bite-sized chunk of action, namely the 2nd day at Gettysburg. Whether that was the right call or not will be elaborated on at the end of the post. 

Table Battles owes a heavy debt to the excellent W1815 by U&P Games, and while the former has the advantage of coming with lots of scenarios, it does not have the lovely map that accompanies the latter. In fact, Table Battles does not come with any maps at all: battles are represented by unit cards placed side by side and sticks as strength markers. 

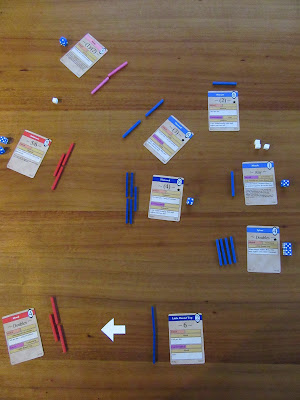
The lack of geographical setting takes away much of that 'we're playing a battle here' feeling I value in my wargames, so I decided to set out the unit cards and associated strength markers in the rough shape of the battlefield in an attempt to give more of a connection to the historical event.

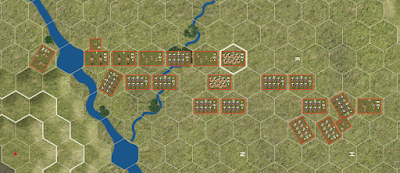
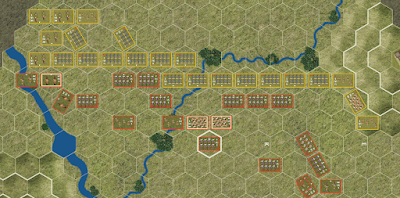
I'm sure most if not all readers will know the general picture of the dispositions of the Union and Confederate armies on July 2nd 1863, but as a reminder here is a map from wikimediacommons, and the Military History Fandom site.


The Table Battles scenario, moving from the Union left around the Union right, has two strength sticks on Little Round Top, opposed by Hood's division with four strength points. Sykes has four strength points to use to replace (absorb, in game palance) any Union losses suffered on Little Round Top. 

Moving back to the main battle line, Sickles, with six strength points, is faced by McLaws, with five. Hancock, at strength eight, is the heart of the Union line, and he is matched against Anderson at strength five. Howard with six strength holds against Early with five, and at the extreme end of the line Slocum, at a strength of just two, faces Johnson with four. 

Meade is present as well, with the ability to allow Union units from the main line (i.e., excluding Little Round Top) to absorb losses for any other unit on the main line. Two damage scored on Howard, for example, could be transferred to Hancock, who may be better able to take the losses at that particular juncture. 

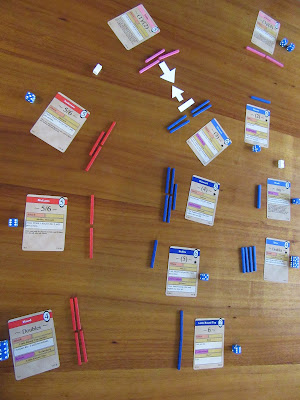
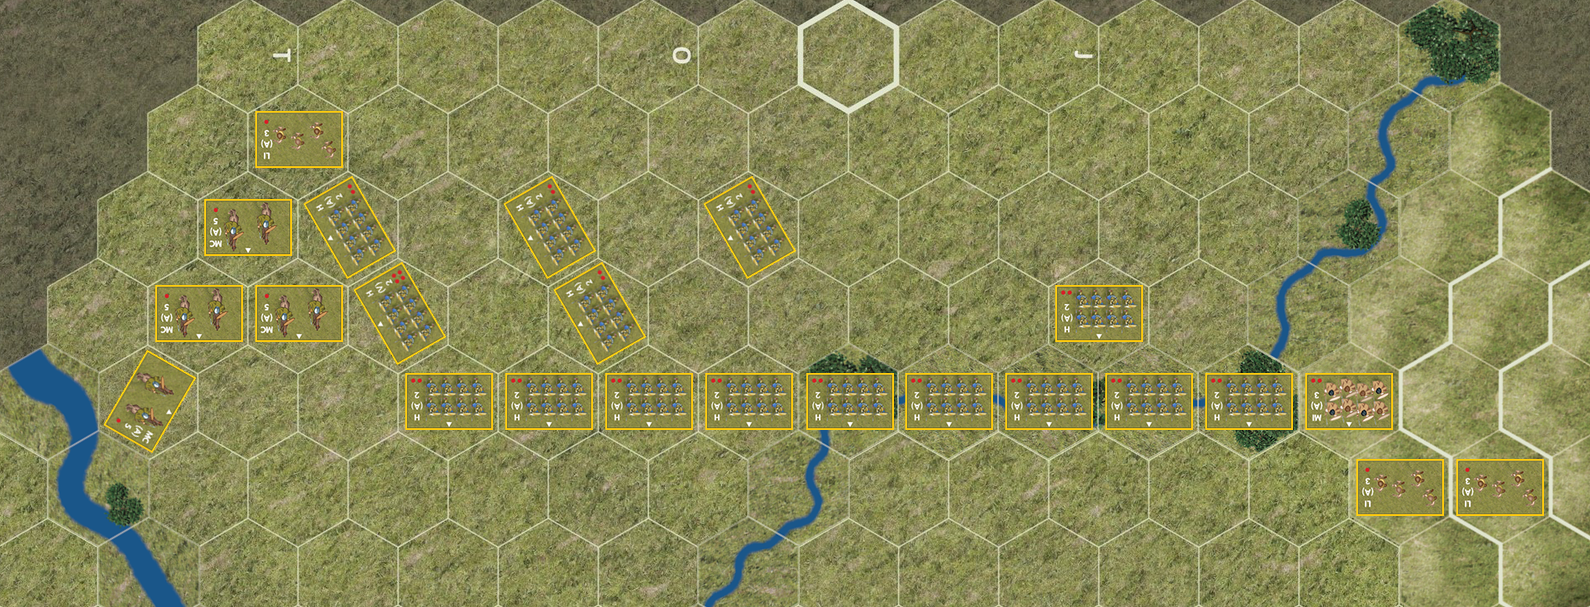
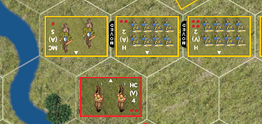
This is what my set up looks like (forgive the poor approximation of the battle map!):

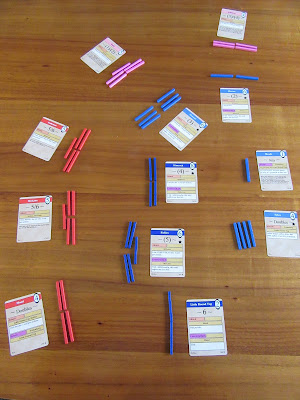
Confederate wings are red and pink; Union ones light and dark blue.

In Table Battles each side has a pool of six dice, which are rolled and assigned to unit cards to allow those cards to activate on a subsequent turn. Limitations are that dice can only be placed on one card of any particular colour per turn, and in the case of the Confederates units must wait for dice to be loaded onto first Hood then McLaws before they can be added anywhere else.

The Confederates have their best attacking opportunities with Anderson, then McLaws, then Hood. Every attack will also reduce their own strength, but the more dice per card the more damage can be inflicted on the Union troops. The Union, for their part, have the ability to counter-attack, which will increase the damage on any Confederate assault, and reduce the damage they take themselves. The trick for the Union is to load dice on the correct cards at the correct time to use the counter-attack ability, and use Meade's absorb feature to spread losses across the line so that no one unit becomes vulnerable to defeat. Union attacks, particularly against Johnson and McLaws, can help to break up the Confederate charge. 

Without further jawing, let us move to the battle itself. 

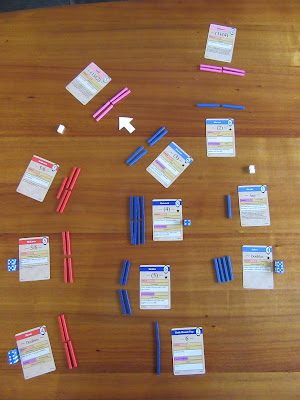
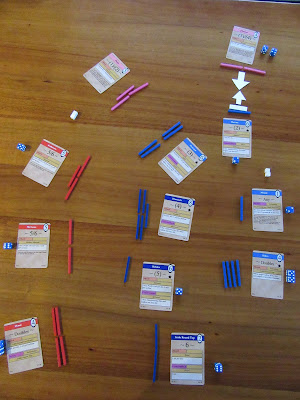
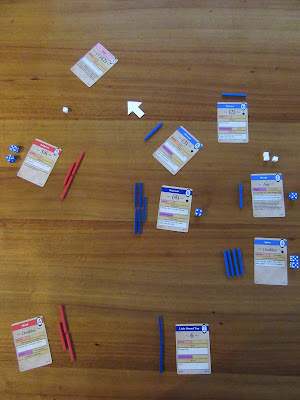
After dice build up on both sides, the action commences with McLaws attacking Sickles. McLaws does two damage and takes one himself, reducing strength to four and four.


Howard then attacks Early, for one hit to himself, two to the enemy, leaving five and three blocks respectively. Unfortunately, I can see that I made a mistake here and did the hits the wrong way round - one off the Confederates and two off the Union! 


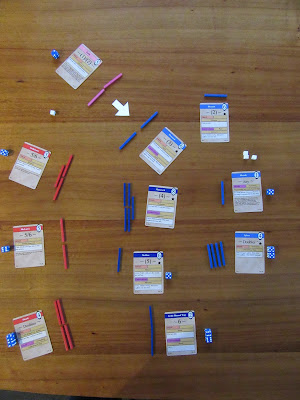
Another attack from McLaws sees Sickles in strife and down to one block. The counter-attack ability has however taken two blocks off McLaws. Any further attacks by McLaws on Sickles can be transferred to another unit by using Meade's absorb ability.


Already it is clear that the Confederates have few good attacking options: they can wear the Union down, but to do this causes so much damage to themselves that breaking the line will become almost impossible. Nevertheless, they persevere.

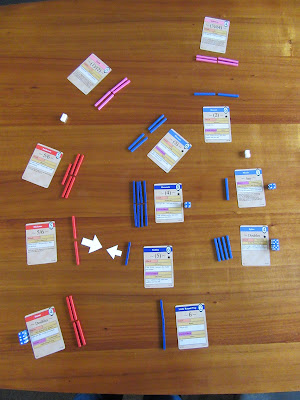
Anderson now attacks Hancock, but the counter-attack means both sides lose two strength.


 Johnson batters himself against Slocum.


Early attacks Howard, but Hancock takes the damage.


These no-advantage attacks by the Confederate are required to force the Union into counter-attacks. If the Union gets a free turn (i.e., they are not forced to counter-attack), they will be able to attack McLaws with Sickles, exhaust both units, and prevent any further dice being added to Anderson by virtue of the special rule that dice can only be placed on Anderson if there are dice on McLaws. For this reason the Confederates must keep attacking and hope against hope to get good enough rolls on their allocation phase to load up on Anderson and deliver a killer blow. The Union however need only sit tight, absorb losses, and wait for the opportunity to hit McLaws.

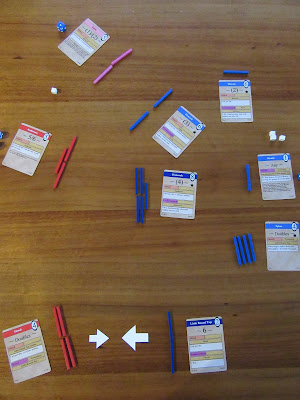
Johnson self-immolates for the cause.


Then Early attacks.


No counter-attack is forced, and the Union is now free to use Sickles to attack McLaws.


And that is effectively the battle decided. It is now over the Union to clean up as they will. The troops on Little Round Top attack Hood twice in succession.


The Confederates are no longer able to place dice anywhere but on Hood, and it is just a matter of time before the Union administers the coup-de-grace.

It comes against Early and the Union has held the high ground. 


The casualties favour the Union by one. The Confederates have expended themselves to no good end. 


And so the battle is over. 

As I am increasingly finding with Table Battles, the effort expended to play the game (much less write a report) is out of all proportion to the reward. The game only approximates the battle it purports to represent, and is more like a hand of cards than a wargame. 

The central difficulty with Table Battles is that, unlike with W1815, the dice rolls come before the decision. In W1815 you make your decision and take your chance; in Table Battles you take your chance and make your decision. Once dice are allocated to a unit they cannot be removed until an action or reaction is taken, so there is no flexibility in changing the point of attack. When an opposition card has a counter-attack die on it, you can see the situation is hopeless ahead of time but must do an attack anyway to free up dice to roll for more activations on the off chance that you might roll, say, two fives to put on a powerful unit, and then hope that the enemy will roll something less useful. 

Some scenarios such as this one are heavily skewed towards one side or another, and there is no way to assess one result against another over a series of games to find a winner. It is zero-sum win or lose. You cannot, as you can in, say, Commands and Colors, keep track of victory points scored by each side and compare after a game apiece to find a winner. You could assess casualties, but casualties themselves are not the focus of play - the focus of play is scoring casualties in the right place, so that you can break the enemy formations needed to get victory squares - so to look at inflicting casualties in total is to deviate from the path to victory. 

Playing Gettysburg with Table Battles was one way to get a Civil War game in, but it is not one that I can take any satisfaction from. The more I play this game the less I like it. I liked it more when I was playing the rules incorrectly.

Anyway, I will stop my rant there, but suffice to say I'm annoyed with myself for having bought four expansions!

Tuesday, June 21, 2022

More Undaunted Normandy - it's a winner, folks.

Well, to follow on from my previous posts on this game, I have to say that both myself and SP are sold on it. We've had, I think, three sessions playing it now, and have progressed through to scenario seven of twelve. All the bells and whistles are now in play - riflemen, scouts, snipers, machine gunners, mortars - and the mix of card play, board movement and dice rolling keeps you engaged throughout. I have not had this much fun with a boardgame since the early days of Commands & Colors: Ancients

Plenty of meat in scenario seven.

It seems simple, but as you work through the scenarios and more elements are added you start to see how well designed it is and how smoothly all the parts combine to create an immersive, easy to learn / hard to master game system. 

I have tried platoon and company level WWII wargames before and really wanted to like them, but as with most of my games, they have ended up on the shelf gathering dust. They take too long for dimishing returns, the enthusiasm wanes, the decisions pall. This one however just begs to be played. 

The mix of luck and planning is complex. The initiative comes and goes, fortunes ebb and flow, and you finish a scenario thinking about all the things you could have done differently, wondering whether they could have changed the result. There is a lovely tension between active and passive play, and because the scenarios are so tightly contested there is room for that wonderful thing 'player morale' to do its part. You can bluff your opponent and be bluffed; out-think and be out-thought; take the risk or defer it; make the play or resist it; drive for the win or deter it. 

In a part of the world where I routinely have to pay well over a hundred dollars for a boardgame, the games in this series cost about seventy. It is astoundingly good value. Not only on price but, crucially, on gameplay and enjoyment. I have gone ahead and bought both Undaunted expansions (Undaunted North Africa and Undaunted Reinforcements) and will no doubt get the upcoming Stalingrad set as well. 

Mortars are introduced in scenario five.

As I say, for me it is the best game since Commands & Colors: Ancients. As with C&C:A you can find your own style. By the time you get to the meatier scenarios you find you can switch the point of focus, find different ways to upset your opponent's play, try different ways to win. Skill is important, but it goes not guarantee victory. Undaunted sets up fast and moves fast, but packs a lot of decisionmaking into that time. It does not grind on or overstay its welcome. You do not come away thinking 'well, that was a bit pointless' or - worse - pack it up unfinished because you can't be bothered continuing. It is a light player, but a very good one, and that suits me down to the ground at the moment.  


It looks good on the table, the cards feel fine in the hand, and as you come to be able to read the board and the situation, the options become almost delicious. 

I recommend it without hesitation. 

Wednesday, June 15, 2022

Legion: Chaeronea with Phil Sabin

A couple of months ago I was fortunate enough to have Phil Sabin offer me another game using his Legion II rules. The battle was Chaeronea, and the victory was Phil's - playing the Greek coalition! 

Yes, I managed to charge Alexander into danger, get him killed almost immediately, and then attack in uncoordinated fashion with my phalanx until, being put to the sword, I was forced to retreat what I could of the army. Phil won the battle convincingly, and a rather rueful Prufrock was left to absorb the lessons of the day!

It was a great experience, and an excellent opportunity to try out Legion using the VASSAL module that has been put together to allow online and distance play.

For those interested, the module is downloadable here from the vassalengine.org site. You need the Legion rules to play, and they are available from the Society of Ancients. 

Here are some screenshots from the game.

My Macedonians, with Alex on the left, full of confidence.

Phil's Greeks, waiting for us.

My initial attack didn't look too bad to my untutored eye...

But the Greek response showed me what a mess I'd made!

The place where Alexander was killed.

And here we are, getting in our own way, while the Greeks create superior attacks.

And our battle line only degenerated from there as Phil pressed on. 

As I hope readers can see, the VASSAL module makes Legion easily playable, even for people on opposite sides of the globe.

Highly recommended. 


Sunday, June 5, 2022

Short reviews: Undaunted Normandy

I had the chance to play through the first two scenarios of Undaunted Normandy with an opponent last night and (as promised) thought I would share some observations. See here for initial thoughts. Note that we have not used all troop options yet - only scouts, riflemen, machine gunners. There are still mortars and snipers to come.

1) Deck building. When opportunites arise you can add cards to the deck. It seems like quite a good way of stacking future options in your favour. In your turn you draw a random limited number of cards out of the deck you've built and play with what you draw. Once you know what's in your drawn hand you (obviously!) can plan and play accordingly. 

2) Card activation. Both games were won against the board position by runs of cards which gave the opposition no ability to interfere with the winning outcome. With no real time 'opportunity fire' deterrent, it gives certainty to actions which perhaps real life wouldn't.

3) Card removal. An interesting way to simulate casualties by removing activation cards.

4) Bidding for initiative. As per 1, 2 and 3, you can calculate odds, decide whether it's an action or holding turn, and bid based on that.

5) Line of sight. There is always line of sight, no matter the terrain. Rolling a ten is always a hit on the enemy, no matter how skewed the shooting odds. Intervening terrain matters only for range, and cover is only for the terrain the target is in: i.e., it is not cumulative.

6) Victory points. VPs are gained by controlling certain areas on the board. Scenarios and sides have differing objectives, but winning on VPs only takes into account the territorial objectives, not casualties sustained in achieving them.

So far it is proving to be an interesting light war-game. We are both keen to play more, but the game has its problems as does every other tactical game of its type. So far the fact that both games were won against the run of play by good immediate card hands which the opposition was powerless to interfere with once initiative was determined is a potential negative (but may turn out to be a strength). 

It certainly has something. Again, I came away with an urge to pick up the expansions but am still resisting until I see whether I really like it or not. At this stage I would rate it a 7 out of 10. More to follow once we get further through the scenarios.


Related Posts Plugin for WordPress, Blogger...