Prufrock's Wargaming Blog

Prufrock's Wargaming Blog

Tuesday, February 15, 2022

Epic Commands and Colors: Ancients

It's been quite a few years since I bought the Commands & Colors epic expansion, and having been a bit of an afficionado of the standard game for a few years (though about a decade ago now, which is scary!) I decided it was probably time to actually try the epic version out.

Epic is basically two boards combined lengthways to create a board twice as wide and capable of employing up to four players per side. Obviously, as I'm playing this solo, the multiplayer aspect of it will be missing.

The scenario is Paraitacene. Who isn't a sucker for Successors?

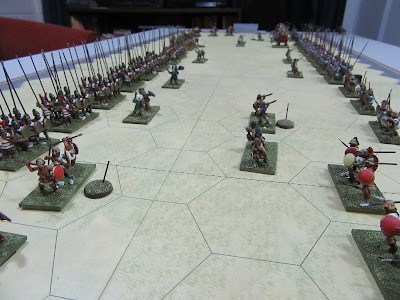
In the picture below we have Antigonus coming from the left of the board and Eumenes from the right. The armies are reasonably well matched: Eumenes has the edge in elephants, but Antigonus has a stronger medium and heavy cavalry arm, and plenty of agile light cavalry on his left. The heavy infantry numbers favour Antigonus slightly, but Eumenes has the advantage in light infantry.

The lighting is terrible, but you can get a sense of the scale compared to normal C&C (as can be seen, I made an executive decision to use figures for this scenario. Not because I think they look better, but because I don't want to have to mix different coloured blocks to have enough units to play). 
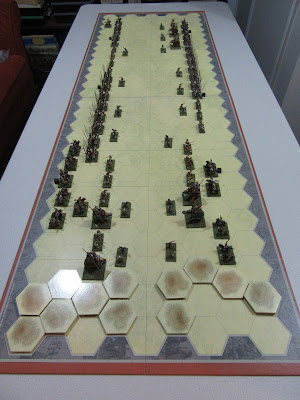
Eumenes to our right; Antigonus on our left.

The winner will be first side to 15 banners, but you must be two banners clear to win, otherwise it's a draw (as it sort of was historically). It is an interesting match up. 
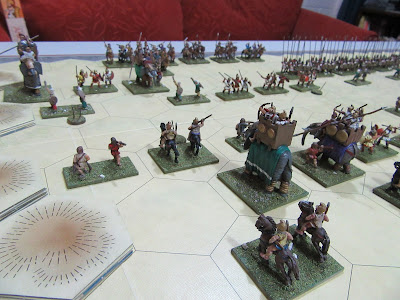
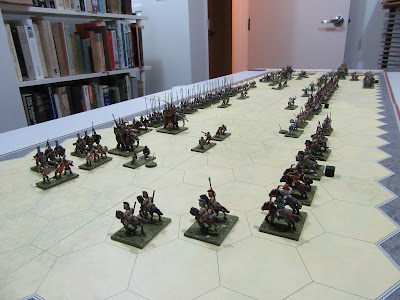
View from the Eumenid left.


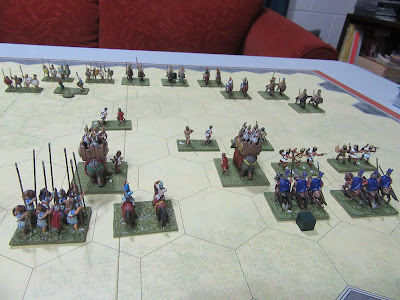
View of the centres: Antigonid to the left.


View from the Antigonid left, showing his preponderance of light cavalry

The game began with some cagey manouvering on both flanks before two line commands played by Antigonus saw his centre advance to almost within striking distance. Eumenes suffered the first losses and was mostly playing reactively across the length of the battlefield. 
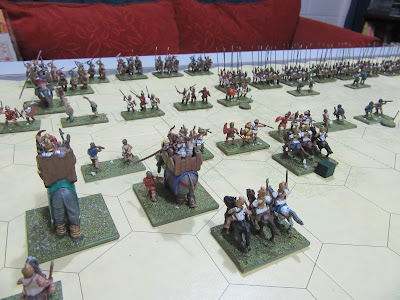
Skirmishing towards the Antigonid right...

... and towards the Antigonid left.

The armies battled tit-for-tat, with Antigonus keeping at least two banners clear of Eumenes the whole way. The infantry fight in the centre was vicious and unrelenting, but Antigonus' light cavalry also combined with his medium infantry to good effect to have Eumenes' right under pressure.  
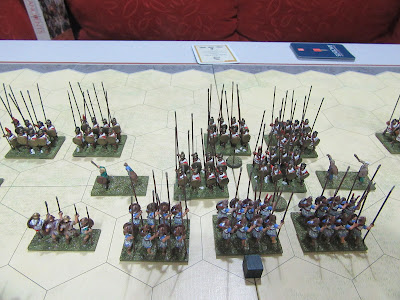
Clashes in the centre: the Silver Shields advance.

Antigonus, leading 12 banners to 9, needed only 1 more kill to ensure at least a draw. Eumenes, knowing this was his last chance, decided to make a bid for victory. He would need to take 6 banners in one turn to do it.
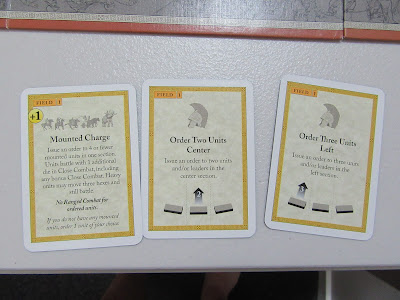

The cards played, in order (Mounted Charge was for the right zone).

On the right, charges by the elephants and the heavy cavalry net two banners.

In the centre, two banners are taken, but two more are not.

On the left, a cavalry charge kills another unit. The final attack is elephants against light infantry. 

  
Two hits needed to kill the lights.

Two hits needed.... and two hits are rolled! Eumenes wins 15-12.

********************************

It is often the case in Commands and Colors: Ancients that there are moments of extreme tension, where everything comes down to a fatal dice roll. The epic game (in this instance at least!) maintains that tradition.

I enjoyed it. Playing a game designed for multiplayer meant that the confusion that would arise from different players making their own choices was lost, but realistically I'm not going to find seven other C&C:A players in the neighbourhood, so this was the best I could do. 

Will I play it again? Probably. It's a good option for when you don't have time or space to set up a full miniatures game but would like to get a battle in. It would be perfect for a rainy Sunday when all other plans are suddenly shelved and you have an afternoon to yourself.

For single player I give it 5/10.   

If you had the right people to join you, I would say it's likely to be an 8 or 9.


Monday, February 14, 2022

Battling Phil Sabin

A couple of weeks ago Phil Sabin of (amongst other things) Lost Battles, Simulating War, and The Face of Roman Battle fame, got in touch to ask if I would be interested in trying out a battle remotely. Phil is now retired and living in Chile, which was greatly to our advantage in terms of timezones. His afternoon would be my morning, so we set up a time and date. 

The Battle would be Cannae and the rules Legion II, his revised hex-based grand tactical ancients rules published by the Society of Ancients.

Not having played Legion before, I was a little apprehensive about taking on the designer himself. Thankfully, Phil directed me to a video playthrough 


that gives a good example of the rules in action, and talked me through the main elements of the gameplay before we began.

Being a Lost Battles fan (or bore, depending on how tired people have got of my blabbing on about it!), it was interesting to compare Phil's vision of ancient battle across the two sets of rules. Legion is more granular, but there are quite a few rules that are mirrored in both sets (skirmishers requiring the support of heavier infantry to be effective; the primacy of human factors such as experience and command ability; the inclusion of rules for marching your armies onto the field, and so on). 

Legion may have been new to me but it was, in a word, recognisable. 

Generously, Phil gave me the more interesting side to play, and it was with some excitement that I poured myself a cup of coffee and watched Phil, genius of the Roman Republic, direct his legions onto the field.

He has put up a report of the action on Boardgamegeek, which can be seen here, and is titled Cannae Across the South Pacific


Friday, September 10, 2021

New Approaches

Knowing that there is no chance of my managing to paint up all of the armies in all of the eras I would like to, I have been exploring an alternative approach. While I have a decent collection of ancients armies, I have nothing for the horse and musket era, and little chance of having time or spare money in the near future to be able to remedy that.

So what is a person to do?

Well, I've decided to experiment with craft products and boardgames. 

I'm thinking of using wooden or cork sticks, circles and squares to represent various troop types, and either Battle Cry or Commands & Colors: Ancients boards and tiles for the battlefields.

To test whether the look would work I played the 1st Bull Run scenario from Battle Cry using these projected stand-ins.


Just for my own reference, here is the key to what each of the pieces represents.


I don't think it looked too bad, and it was easy enough to differentiate between the two sides. Obviously, for games which have more troop types and in which troop quality is represented, I will need to make some changes, but my initial reaction is that it seems worth pursuing. 

I have already picked up from Wargame Vault Sean Chick's first game in his Hollandspiele-published Horse and Musket series, and we'll see how it goes from there.

Wednesday, September 8, 2021

Midway by Messenger

Last week boardgamer Pat - my old mate in Japan - and I caught up for a game of the Avalon Hill classic, Midway. We played two sessions live over VASSAL, using messenger for the audio chat. We finished the game in about five hours all told.

It was most enjoyable. Not just for the game, but also to catch up with an old friend. Given I still feel like 1998 was only a couple of years ago, it had never really struck me that Pat and I have been gaming buddies for well over a decade now, but it's true.

For those who do not know Midway the game, it is a square-gridded board, hidden movement, 'battleships'-esque search mechanism, separate battleboard treat.

Pat and I had played this a few years ago with me as the Americans, so this time I took the Japanese. I was a bit of a nerd about it, and did some pre-planning. How was I going to go about the project of taking Midway and destroying the American carriers? I pondered.

All that pondering seemed it would count for nought though as Pat found my main force early on. It looked like it could be a long short game, but fortunately for me a bit of skullduggery threw Pat off the scent, and by several spots of luck, and an outlandishly good guess, next time we found each other I had superior numbers of aircraft to call on. With Enterprise and Hornet too far away to be of assistance, Yorktown was sent to the bottom. In the return strike Kaga was hit yet stayed afloat. Yorktown's surviving aviators, having nowhere left to land, were forced to ditch into the Pacific.   

Japan now massed its forces and pressed on towards Midway itself. Pat hit the invasion force's transports (symbolised on-table by the Akagi) hard, but not before we had got a strike in on Midway, destroying its planes on the ground. In the scramble thereafter, Pat attempted to ready his returning planes to finish off the transports and prevent a successful invasion, but we were able to find him first, and a raid of all the planes we had in the theatre fell upon Enterprise and Hornet, catching them with aircraft on the flight decks.

Despite the heroic efforts of the US sailors and airmen, both carriers were sunk, and the Japanese won the day.


American fleet spotted from Midway.


Final battle.


Hornet and Enterprise sunk!


The final result may have appeared decisive, but we had a lot of very good luck. It could have gone either way, and the game was tense throughout.

It was a lot of fun to play with Pat again, and we're going to give it another go soon. 


Wednesday, August 25, 2021

Sunday, August 22, 2021

Three Battles of Bosworth

Last Sunday was the Society of Ancients' battle day, and the battle they were doing was Bosworth. Although a week late, I thought it would do my own version of it on the kitchen table. The rules would be simple - I would use Table Battles by Tom Russell of Hollandspiele - and these rules, unlike the Society's, would use cards, dice, sticks and cubes.


Richard would start, having six dice to roll and assign. But first, a little explanation of the game.


As can be seen in the image above, Richard has three formations to consider. Norfolk and his own can fight right from the beginning, given the right dice. Rolls of 5 or 6 can be apportioned to Norfolk; rolls of 4 or 5 to Richard. Northumberland cannot be used at this point because he is in reserve. To bring him into the fight, Richard needs to accumulate a full house - three 4s and two 5s (or vice versa), which is quite a tall order when there are only six dice to use. 

For each attack that Norfolk or Richard make they will lose one of their formation sticks, and will remove as many formation sticks from the enemy as they use dice, so it is to their advantage to use as many as possible in each attack. Norfolk can also use a pair of 5s or 6s to screen enemy attacks (i.e., the attack fails with no loss to either side).


Henry's cards are similar. He has Oxford and himself in the front line, and the Stanleys in reserve. 3s and 4s activate Richmond; 5s and 6s Oxford. As with Northumberland, a full house of 3s and 4s will bring the Stanleys into the battle.

Oxford has eight formation sticks and Richmond two. Oxford will also lose one formation stick for each attack he makes and inflict as many hits as he uses dice. Richmond himself does not lose formation sticks when he attacks, but to launch an attack of his own he must have a pair of dice, and will only remove one formation stick from the enemy. To complete the puzzle, Oxford has a counterattack ability that allows him to use a pair of dice to remove an extra formation stick from any enemy that attacks him. 

Both sides start by stacking dice on a single formation card, as shown in the picture below.


Richard attacks first, removing three sticks from Oxford and losing two himself. He then concentrates on building up dice on his own formation again. Oxford also attacks with three dice, hitting Norfolk badly, and reducing him to one stick.


As shown above, both sides have three dice in play again, but this time it is Oxford to move. He attacks Norfolk, who is destroyed. Henry takes a morale cube off Richard. One more is needed for the victory.

The only way Richard can win now is to get four dice on his card to take out Oxford with one attack, and then turn his attention to Henry. Over several turns he saves up his dice, but can only manage three 4s. 

Oxford, with a pair, is able to play and remove Richard entirely at a cost of one formation loss to himself.


Northumberland has not entered the battle and Henry is the victor. Bosworth I to the kingslayer!


Bosworth II starts with a powerful attack by Norfolk doing three damage to Oxford for one to himself. Henry rolls poorly and is unable to populate his cards with dice. Richard has no such trouble.


With Richard to play in the sitaution above, he inflicts three more hits on Oxford. Henry is still struggling to get the dice in play.


Richard seizes the moment and attacks Oxford again. Both formations are removed at the same time, so no morale cubes are exchanged. It is now a contest between Norfolk and Richmond to collect dice for an attack.

Norfolk is first.


His two dice are enough to destroy Henry at a cost of just one formation hit to himself. Bosworth II goes to Richard. 


We go to a Bosworth III to find the winner. The third battle commences with another 3/1 attack by Norfolk


A 3/2 attack from Richard follows from the position below.


Once again Oxford is in a precarious state. Richmond stacks dice hoping to obtain the full house needed to bring the Stanleys into the line; Richard just stacks dice. Battle continues for a few turns with Norfolk successfully screening some attacks while the house of York gathers its strength.

A pair on Norfolk will be enough: Richard only needs to capture one morale cube to claim the win.


And the deed is done! Richard wins two battles to Henry's one. 


And so my battle day is over. Not quite as satisfying as a two hour game with figures, but a fun way to get into the spirit of the event, play the battle, and have hardly any clean up required.

It was an unexpected piece of serendipity to find that today was actually the anniversary of the battle. All in all, I think it worked out rather nicely!


Thursday, August 19, 2021

Wrong, wrong, and wrong again

We all of us enjoy our wargaming, our playing with toy soldiers, our board wargames, and our reading around these kinds of topics.

There is crossover between serious games and hobby games, and many of us enjoy that aspect too. Some of the blogs I follow are more towards the serious end of the spectrum, where wargaming is a job, where it is used to prep military and intelligence professionals, and - perhaps - influence real-world policy, real-world decisions. 

One of the newer, modern boardgame designers was recently asked about an expansion to his game on Afghanistan, A Distant Plain, which would take into account recent developments. I quote here part of his response:

Given the speed of events, I think if anything what we are seeing now is each faction’s game pieces being swept around on the map and scooped up prior to being put back into their ziploc bags.

Game’s over, man.

If you want to carry on, I think you will need a different game.

He linked to one of his previous blog posts, and also to an (as it turns out decidedly non-prescient) article on the then current state of affairs, entitled 'Why the Taliban isn't winning in Afghanistan' (from which I quote below): 

“We must face facts,” remarked Senator John McCain in August 2017, “we are losing in Afghanistan and time is of the essence if we intend to turn the tide.” He is not the only one who has argued that the Taliban are on the march. “The Taliban are getting stronger, the government is on the retreat, they are losing ground to the Taliban day by day,” Abdul Jabbar Qahraman, a retired Afghan general who was the Afghan government’s military envoy to Helmand Province until 2016, told the New York Times over the summer. Media outlets have likewise proclaimed that “The Taliban do look a lot like they are winning” and that this is “The war America can't win.”

Although the Taliban has demonstrated a surprising ability to survive and conduct high-profile attacks in cities like Kabul, it is weaker today than most recognize. It is hamstrung by an ideology that is too extreme for most Afghans, a leadership structure that is too closely linked to the Pashtun ethnic group, an over-reliance on brutal tactics that have killed tens of thousands of innocent Afghan civilians and alienated many more, a widespread involvement in corruption, and a dependence on unpopular foreign allies.

What am I getting at, you might ask?

Well, it is that games and game-models that are lauded for their innovation and perspicacity, whose designers are profiled in the Washington Post, whose hobby games potentially influence real-world decision-making, can still get it wrong. Why they get is wrong is not really my focus here, but it is clear that they get it wrong for reasons which include a) a reliance upon commentators who make incorrect assumptions; b) a game-induced need for simplification which means that factors that appear insignificant (but may not be in real life) are minimised; c) that formulated victory equations which may seem plausible to Western analysts who sit within the military or intelligence paradigms may well not match reality.

So what does this say about wargaming? 

That we should all be wary of it. That it may have consequences. That it is inexact for predicting future events.  

As hobbiests our first reaction to 'serious' military/intelligence-adjacent wargames on current or near-future conflicts is often likely to be "cool, we want to see more of them!" And why not? It seems to validate our hobby, encourages new designs, and perhaps adds authority or cred to what we do. 

But current events show that popular wargames on current conflicts do not necessarily lead to increased understanding or to desired outcomes. And in fact, if real-world wishful thinking is rendered in games as plausible result, may lead not to understanding but to folly. 

Related Posts Plugin for WordPress, Blogger...