I've recently been hit by the realisation that my usual hobby area has become so cluttered with family odds and ends - boxes of seasonal fruit, boxes of gifts for our students, leftover treats from Christmas that I am not allowed to throw away until at least a couple more months have passed, my wife's sewing materials, the kids' drawings and school creations, my guitar gear - that trying to maintain it as a dedicated wargaming space is almost a lost cause.
While this is on one level a little frustrating, on another it gives me a good reason to get cracking on my Neil Thomas "One Hour Wargames" project. OHW is a book of rules and scenarios for wargamers who are short of space and time, and at the moment that sounds just about me!
Therefore, I today went down to the DIY store and picked up an 82x82 tatami-mat variant (there are some advantages to living in Japan. Who knew?!) and a couple of bits of carpet.
After hacking away at the carpet with the scissors I've got something that looks like this:
I also conducted a scientifically rigorous experiment with white glue and flock...
...which has sufficed to convince me that for colour application purposes spray paint will be a better way to go!
OHW uses 6 units per side, so I think 82x82 will work well with my 15mm armies.
Next step will be to get the spray painting done and then look at creating a few other terrain items.
Prufrock's Wargaming Blog
Tuesday, February 17, 2015
Saturday, February 14, 2015
Review of free game "Second World War"
Being at a bit of a loose end last night I decided to try out Phil Sabin's free print and play Second World War grand-strategic sim [see the bottom of this page for the download].
With only twelve pages to print out - 4 of rules, 1 for the example of play, 6 of designer notes and a bibliography - it's easy on the ink. Counters and a map are also included, but I drew up my own board on a bit of spare cardboard and scrounged the wooden bits box for pieces to use as the armies, production centres and strategic unit counters needed for play.
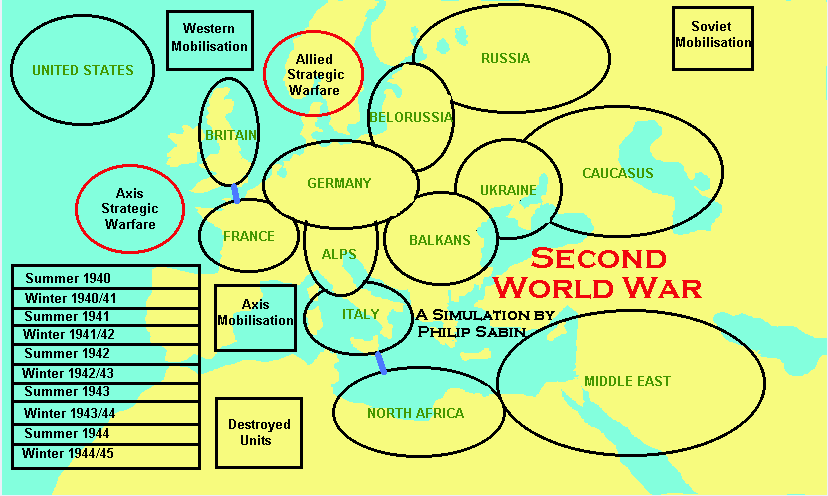
The map is pretty straightforward, so there is no need for great artistic talent to make a copy of your own. Germany is in the centre, with four territory 'strings' emanating from her. String one goes France-Britain; string two Alps-Italy-North Africa-Middle-East; string three goes Balkans-Ukraine-Caucasus; and string four Belorussia-Russia.
There are also boxes for generic strategic warfare units - representing bombing campaigns, submarine warfare and so on - mobilisation, and America.
The map below shows the board as envisaged by the game designer.
Each six month turn has four phases: movement, combat, strategic warfare, and production. Movement is from one front line space to another, and is subject to strict limitations.
Combat is by d6. Units which attack become automatically spent and have to get a modified 3+ to score a hit. There are limits to how many units can attack from one space to another and further limits when attacking across a strait.
Strategic warfare attacks allow players to put pressure on enemy production. Phil Sabin showcases his experience and skill here in devising a simple and effective way to include the war in the air and at sea in such an abstract game.
Production points are produced by fresh production units and are used to flip spent units (armies, production or strategic) to their fresh sides, or bring on new forces from the mobilisation boxes.
As is usual with Phil Sabin's games, there are a few exceptions to the normal rules, and these turn a simple system into a simulation. Be warned: players need to note down and remember these rules or else risk botching the whole thing!
Game play was quick (about an hour, including learning the rules and topping up the gin glass) but was surprisingly engaging, and I think I will be playing it again tonight. You can deduce from this that I feel it is a game worth printing out and giving a crack.
Summary - quick but interesting game filled with typical Phil Sabin touches: a broad-brush approach incorporating spent/fresh units, simple rules 'simulationified' through exceptions and combat modifiers, and all held together with a d6. Eminently soloable, it almost runs itself. The player's job is mainly to watch events unfold, but there is the occasional crucial decision to make.
With only twelve pages to print out - 4 of rules, 1 for the example of play, 6 of designer notes and a bibliography - it's easy on the ink. Counters and a map are also included, but I drew up my own board on a bit of spare cardboard and scrounged the wooden bits box for pieces to use as the armies, production centres and strategic unit counters needed for play.
The map is pretty straightforward, so there is no need for great artistic talent to make a copy of your own. Germany is in the centre, with four territory 'strings' emanating from her. String one goes France-Britain; string two Alps-Italy-North Africa-Middle-East; string three goes Balkans-Ukraine-Caucasus; and string four Belorussia-Russia.
There are also boxes for generic strategic warfare units - representing bombing campaigns, submarine warfare and so on - mobilisation, and America.
The map below shows the board as envisaged by the game designer.
Each six month turn has four phases: movement, combat, strategic warfare, and production. Movement is from one front line space to another, and is subject to strict limitations.
Combat is by d6. Units which attack become automatically spent and have to get a modified 3+ to score a hit. There are limits to how many units can attack from one space to another and further limits when attacking across a strait.
Strategic warfare attacks allow players to put pressure on enemy production. Phil Sabin showcases his experience and skill here in devising a simple and effective way to include the war in the air and at sea in such an abstract game.
Production points are produced by fresh production units and are used to flip spent units (armies, production or strategic) to their fresh sides, or bring on new forces from the mobilisation boxes.
As is usual with Phil Sabin's games, there are a few exceptions to the normal rules, and these turn a simple system into a simulation. Be warned: players need to note down and remember these rules or else risk botching the whole thing!
Game play was quick (about an hour, including learning the rules and topping up the gin glass) but was surprisingly engaging, and I think I will be playing it again tonight. You can deduce from this that I feel it is a game worth printing out and giving a crack.
Summary - quick but interesting game filled with typical Phil Sabin touches: a broad-brush approach incorporating spent/fresh units, simple rules 'simulationified' through exceptions and combat modifiers, and all held together with a d6. Eminently soloable, it almost runs itself. The player's job is mainly to watch events unfold, but there is the occasional crucial decision to make.
Thursday, February 12, 2015
Gifts from a Big Red Bat
Last week I had a lovely surprise arrive in the mail - goodies from none other than Simon Miller, the Bigredbat himself.
For those of you who may not know, Simon has recently released an innovative set of Ancient/Medieval rules called To the Strongest! The rules use multiple decks of playing cards, but Simon has organised some custom chits to use in their stead, and very kindly sent a set my way.
The photo below shows the missile markers on the left, court card chits in the centre, and pip card chits on the right. The light in the photo does not do them justice, I'm afraid; seen with the naked eye they look very fine indeed.
These are of course custom made for To the Strongest! but I already see ways that they can be used with other games as well.
Many thanks, Simon!
But as generous as this gift was, Simon did not stop there. He also included a whack of 15mm figures!
I think I will be able to find a place for these in the collection, provided that I can find a suitable reliquary!
What a top man! In my experience there are lots of good people in this hobby, but Simon must be one of the best.
For those of you who may not know, Simon has recently released an innovative set of Ancient/Medieval rules called To the Strongest! The rules use multiple decks of playing cards, but Simon has organised some custom chits to use in their stead, and very kindly sent a set my way.
The photo below shows the missile markers on the left, court card chits in the centre, and pip card chits on the right. The light in the photo does not do them justice, I'm afraid; seen with the naked eye they look very fine indeed.
These are of course custom made for To the Strongest! but I already see ways that they can be used with other games as well.
Many thanks, Simon!
But as generous as this gift was, Simon did not stop there. He also included a whack of 15mm figures!
I think I will be able to find a place for these in the collection, provided that I can find a suitable reliquary!
What a top man! In my experience there are lots of good people in this hobby, but Simon must be one of the best.
Friday, January 30, 2015
Thoughts on Colleen McCullough
The recent death of Colleen McCullough has made me think back on her excellent First Man in Rome series.
In it, over the course of something like seven books, she traces the lives of Marius, Sulla, Pompey, Caesar and the early career of Octavian.
The writing is more workmanlike than literary, but the depth of her research, the quality of her characterisations and her sure touch in weaving together sometimes conflicting sources into an even and generally believable narrative is consistently impressive and rarely unsatisfying.
There are times in the later books that her admiration for Caesar the man compelled her to stretch too far in denying his fallibility, resulting in a weakening of her authorial authority through this refusal to contemplate any personal collusion with his enemies, but at her best her historical personages present as real, with credible personalities and plausible motivations. Her best-guess solutions to gaps in the historical record are often ingeniously sensible (her Caesar-fixation providing the odd exception!) and a pleasure to read for the enthusiast of the era who knows something of the stories.
I think the first two books in the series were the strongest, but Caesar's Women was a knowing portrayal of politics in the late Republic, and the entire series is worth reading, IMHO.
So here's a glass raised to Colleen McCullough. Ancient historical fiction is much the livelier for her contribution, and her passing brings a sad finality to a wonderful series of books and, by all accounts, a full and rich life.
In it, over the course of something like seven books, she traces the lives of Marius, Sulla, Pompey, Caesar and the early career of Octavian.
The writing is more workmanlike than literary, but the depth of her research, the quality of her characterisations and her sure touch in weaving together sometimes conflicting sources into an even and generally believable narrative is consistently impressive and rarely unsatisfying.
There are times in the later books that her admiration for Caesar the man compelled her to stretch too far in denying his fallibility, resulting in a weakening of her authorial authority through this refusal to contemplate any personal collusion with his enemies, but at her best her historical personages present as real, with credible personalities and plausible motivations. Her best-guess solutions to gaps in the historical record are often ingeniously sensible (her Caesar-fixation providing the odd exception!) and a pleasure to read for the enthusiast of the era who knows something of the stories.
I think the first two books in the series were the strongest, but Caesar's Women was a knowing portrayal of politics in the late Republic, and the entire series is worth reading, IMHO.
So here's a glass raised to Colleen McCullough. Ancient historical fiction is much the livelier for her contribution, and her passing brings a sad finality to a wonderful series of books and, by all accounts, a full and rich life.
Monday, January 19, 2015
January goings-on
Well, it's been an eventful few weeks in the house of Prufrock. There is a quite exciting PBEM game of Ukraine '44 underway with Kevin from the Zhodani Commando blog which is taking up a bit of thinking time. I really like the game; it has a bit of A Victory Lost about it in that the rules are quite straightforward but they support quite a few different strategies. So far I have been outplayed by a man with a good plan (and a plan, it may be noted, that I didn't fully see the threat in until recently, which is surely a sign of surpassing goodness in said planning!), and I think we will be struggling to get out of this one.
This has really piqued my interest in boardgaming again. In an instance of particularly good timing, two old wargaming friends have recently got in touch about re-starting some PBEM action, so some games will be afoot. The corollary is that painting is likely to be going on the backburner (again) for a while as I look through rules sets, but what can you do?
Nevertheless, earlier in the month a little more progress was made on painting some Thebans and prepping a few more (no small matter where Xyston figures are concerned!) so we will have plenty on hand to do once the painting bug and the time to feed it does return.
Ironically enough considering my recent disavowal of attraction to model making, I've made up four plastic model kits over the last few weeks. Three 1/100 Spitfires for the kids, and a Space Battleship Yamato model that was also going to be for the kids, but may actually become a side project of my own. I'm being a little cautious about this as space combat is not usually my thing, but it might be nice to do for a change...
Finally, on the personal front, my wife and I celebrated out tenth wedding anniversary recently, and it was nice to look back on what has been a pretty happy time. Like every couple we have our ups and downs, but it was great to have a decent excuse to go out together for a fine dinner and some good wine. In the near future my youngest brother and his wife will be dropping by on their way back from a sojourn in Europe, so we might even have an excuse for another good night out fairly soon.
When you see how rough some people have it at the moment it's a good reminder to count one's blessings and make a point of enjoying the journey you are on rather than getting caught up in worrying about the destination.
And on that note I will take my leave for the evening and thank you for reading. Cheers!
This has really piqued my interest in boardgaming again. In an instance of particularly good timing, two old wargaming friends have recently got in touch about re-starting some PBEM action, so some games will be afoot. The corollary is that painting is likely to be going on the backburner (again) for a while as I look through rules sets, but what can you do?
Nevertheless, earlier in the month a little more progress was made on painting some Thebans and prepping a few more (no small matter where Xyston figures are concerned!) so we will have plenty on hand to do once the painting bug and the time to feed it does return.
Ironically enough considering my recent disavowal of attraction to model making, I've made up four plastic model kits over the last few weeks. Three 1/100 Spitfires for the kids, and a Space Battleship Yamato model that was also going to be for the kids, but may actually become a side project of my own. I'm being a little cautious about this as space combat is not usually my thing, but it might be nice to do for a change...
Finally, on the personal front, my wife and I celebrated out tenth wedding anniversary recently, and it was nice to look back on what has been a pretty happy time. Like every couple we have our ups and downs, but it was great to have a decent excuse to go out together for a fine dinner and some good wine. In the near future my youngest brother and his wife will be dropping by on their way back from a sojourn in Europe, so we might even have an excuse for another good night out fairly soon.
When you see how rough some people have it at the moment it's a good reminder to count one's blessings and make a point of enjoying the journey you are on rather than getting caught up in worrying about the destination.
And on that note I will take my leave for the evening and thank you for reading. Cheers!
Monday, January 5, 2015
Magnesia
I'd promised myself a holiday game of Lost Battles' Magnesia scenario over the New Year break, and - cataphracts now painted - got to it the other night.
For those who know Lost Battles and its prior incarnations, I went with the Strategos II deployments and orders of battle rather than those in the latest version. This means that there are no camps on table and the Seleucid phalangites are all average quality units. I also made a further change of my own, exchanging one unit of the 'Silver Shields' for standard heavy infantry as I felt that three units of phalangites on the right of the main phalanx gave that wing just a little too much strike power.
For appearance's sake I plunked a base of Roman cavalry on table between the river and the Roman infantry line. This flank guard is too small to register as a unit at Lost Battles' scale, but as it is mentioned so prominently in the sources I felt it needed to be on table, even if only in token form.
(SKIP THIS SECTION IF RULES GUFF IS BORING!)
Lost Battles requires activation for units to do anything, and to activate these units requires command points. The quality of an army's organisation and leadership is thus represented by the number of these points it can muster. Commands can be used anywhere across the battlefield, but named leaders also contribute 'exemptions', which act as localized command points that can be used in the general's own zone (and in his zone only!).
Generally speaking, two command points will activate a zone to fight or move (the battlefield is five zones wide by four zones deep); one point will move a single unit; two points will allow a unit to move twice as far as usual (called a double move, strangely enough!); and to give a fighting unit a +1 modifier to the attacking dice roll will also cost 2 points. Veteran units are cheaper to activate, but this is just a summary and I don't want to bore you unnecessarily with details, so we won't say anything more than that!
A bit of maths tells us that to activate a standard battleline in its entirety (two wing zones, three centre zones) will cost a minimum of 10 commands. If players want to give combat bonuses to any of the zones, these will cost a further 2 points per bonus, and any fancy redeployment or exploitation moves are usually going to cost 2 points per unit as well.
For this battle, the Romans get a base of 7 command points per turn plus 2 activation and 2 combat bonus exemptions for each of their commanders. The Seleucids have a base of 6 points, with 2 of each exemption type for Antiochus. Both sides will also get a command die roll, but because the day starts with a bit of rain about, the command die roll is halved. The number of command points will therefore be scarcer than usual until the weather clears, and both armies will need to be conservative with their approach, making the most of the points they get.
The Magnesian battlefield is more constricted than normal because of the river on one flank. The two armies therefore will usually need to activate only four zones rather than the usual five.
There are several important decisions to make in this scenario.
1) Does Eumenes charge straight in against the scythed chariot wing and risk having his cavalry hammered in the counter-attack? Does he instead hold back and have his light infantry absorb the enemy charge and make his main thrust a counter-attack?
2) Does the Seleucid phalanx advance in the centre and incur the first casualties or does it stay put and hope the Romans close with them, thereby allowing the pikemen the first strike?
3) Does Antiochus attack the Roman left frontally, or does he personally lead an outflanking party?
4) How far do the respective leaders push their luck in an attempt to rally hits? Hits scored on Antiochus' and Eumenes' zones can be rallied on a 2d6 roll of 9-12, but the leaders would themselves die should the roll come up 2 or 3. When and how often to risk all on a rally will be here - as it so often is in Lost Battles - gutbusting questions.
And there we have it!
My notes for turn 6 say:
Break in the rain. Full command dice. Cavalry gets around behind the Seleucid infantry. Antiochus tries to rally a hit on the cataphracts but is killed in the attempt. The army routs.
It was an unfortunate result, especially as the rally was not really necessary at this point. The hit could have been absorbed, but with time running out I felt that the best chance to try to win a battlefield victory was to be aggressive and attempt to take the Romans on.
Conservative may well have been the better option here: another turn spent hitting Roman units would probably have resulted in a game victory for the Seleucids.
But 'tis no great matter - the soldiers were lead, not flesh and blood!
Returning to our key decision points from earlier:
1) Eumenes did attack from the beginning. It almost cost him his wing; three successful rallies ensured that it didn't.
2) The phalanx did advance. It took a lot of hits in so doing, but the Roman line was under pressure. Holding back would have allowed the Romans to pick and choose their place of attack and reinforce where weaknesses appeared.
3) Antiochus did stay with the main line. His personal command exemptions made a huge difference: the Roman left was only a couple of hits away from taking serious damage and facing potential collapse.
4) Rally attempts were made. Eumenes' ones were necessary; Antiochus' ones were more ornamental. The first succeeded, the second cost the Seleucids the battle.
It was an exciting game, and one where the Seleucids came closer to winning than it looks.
Shattered. 1 x LCat, 1 x LHC, 1 x LHI, 1 x AHC, 1 x AL for 30 points
Routed. 3 x LLI. 2 x VCat, 1 x IEL, 3 x APH, 1 x AHI for 39 points
Withdrawn. 1 x SCH, 1 x |ALC, 4 x APH, 1 x VHC for 20 points
89 points for Rome.
Rome
Shattered. 1 x LLI for 4 points
Spent. 3 x VLE, 3 x ALE. 1 x VLI, 1 x ALI, 1 x AHC, 1 x VHC for 35 points
Handicap. 24 points
63 points for the Seleucids.
For those who know Lost Battles and its prior incarnations, I went with the Strategos II deployments and orders of battle rather than those in the latest version. This means that there are no camps on table and the Seleucid phalangites are all average quality units. I also made a further change of my own, exchanging one unit of the 'Silver Shields' for standard heavy infantry as I felt that three units of phalangites on the right of the main phalanx gave that wing just a little too much strike power.
For appearance's sake I plunked a base of Roman cavalry on table between the river and the Roman infantry line. This flank guard is too small to register as a unit at Lost Battles' scale, but as it is mentioned so prominently in the sources I felt it needed to be on table, even if only in token form.
A quick word about the Lost Battles system
Lost Battles requires activation for units to do anything, and to activate these units requires command points. The quality of an army's organisation and leadership is thus represented by the number of these points it can muster. Commands can be used anywhere across the battlefield, but named leaders also contribute 'exemptions', which act as localized command points that can be used in the general's own zone (and in his zone only!).
Generally speaking, two command points will activate a zone to fight or move (the battlefield is five zones wide by four zones deep); one point will move a single unit; two points will allow a unit to move twice as far as usual (called a double move, strangely enough!); and to give a fighting unit a +1 modifier to the attacking dice roll will also cost 2 points. Veteran units are cheaper to activate, but this is just a summary and I don't want to bore you unnecessarily with details, so we won't say anything more than that!
A bit of maths tells us that to activate a standard battleline in its entirety (two wing zones, three centre zones) will cost a minimum of 10 commands. If players want to give combat bonuses to any of the zones, these will cost a further 2 points per bonus, and any fancy redeployment or exploitation moves are usually going to cost 2 points per unit as well.
For this battle, the Romans get a base of 7 command points per turn plus 2 activation and 2 combat bonus exemptions for each of their commanders. The Seleucids have a base of 6 points, with 2 of each exemption type for Antiochus. Both sides will also get a command die roll, but because the day starts with a bit of rain about, the command die roll is halved. The number of command points will therefore be scarcer than usual until the weather clears, and both armies will need to be conservative with their approach, making the most of the points they get.
The Magnesian battlefield is more constricted than normal because of the river on one flank. The two armies therefore will usually need to activate only four zones rather than the usual five.
Turn 1: deployment
| From the Seleucid right. Dahae, Silver shields, cataphracts, heavy infantry, main phalanx line. Antiochus is forward of the line behind the levy light infantry. |
| From the Roman left on the river. The left ala, the Roman legions, the right ala, the Pergamenes and the cavalry. Velites are advanced to skirmish. |
| The legions again. |
| Antiochus. Scythed chariots in the distance oppose Eumenes and the Pergamene cavalry. |
There are several important decisions to make in this scenario.
1) Does Eumenes charge straight in against the scythed chariot wing and risk having his cavalry hammered in the counter-attack? Does he instead hold back and have his light infantry absorb the enemy charge and make his main thrust a counter-attack?
2) Does the Seleucid phalanx advance in the centre and incur the first casualties or does it stay put and hope the Romans close with them, thereby allowing the pikemen the first strike?
3) Does Antiochus attack the Roman left frontally, or does he personally lead an outflanking party?
4) How far do the respective leaders push their luck in an attempt to rally hits? Hits scored on Antiochus' and Eumenes' zones can be rallied on a 2d6 roll of 9-12, but the leaders would themselves die should the roll come up 2 or 3. When and how often to risk all on a rally will be here - as it so often is in Lost Battles - gutbusting questions.
Turn 2: Openings
| Eumenes elects to advance immediately. The scythed chariots withdraw; another hit is scored. Further to the right the Roman cavalry presses the Galatians hard. |
| The light infantry in Antiochus' zone are hit. |
| The Seleucids outflank the Roman left with the light cavalry. |
| They advance the phalanx in the centre. On the right, Antiochus chooses to delay the attack, resolving instead to bring up the second line. |
| The cataphracts on the left damage the Italian cavalry. |
Turn 3: The Lines Clash
| Eumenes presses the attack. |
| Two of the Seleucid cavalry units are destroyed as a double hits sees off the cataphracts and the Roman cavalry cuts down the Galatians on the far end of the line. |
| The Seleucid centre loses its skirmish screen to enemy attack. The elephants rampage, causing further disorder. |
| A strong response on the right sees the Roman advance shaken. |
| The remnants on the left score three hits against Eumenes' zone, but he rallies two of them to prevent catastrophe. |
Turn 4: Advantage Antiochus
| The infantry clash becomes general; Seleucid cataphracts lead the charge on the right. |
| Eumenes fails to break through. Antiochus holds his veteran cataphracts together and Eumenes rallies yet another hit on the Roman right. |
Turn 5: Breathrough
| Eumenes engenders the collapse the Romans need. The Seleucid left vanishes! |
| The Seleucid right has caused massive damage to the Roman left. Any more hits and the line will begin to shatter. |
Turn 6: Decision
| Surrounded, and with army morale suffering a -3 modifier for Antiochus' death, for having had four units shattered and for having enemy units in front and rear, the Seleucids break. |
| This ala heaves a sight of relief... |
| Is he really dead? |
| What? He tried to rally? |
Conclusion
And there we have it!
My notes for turn 6 say:
Break in the rain. Full command dice. Cavalry gets around behind the Seleucid infantry. Antiochus tries to rally a hit on the cataphracts but is killed in the attempt. The army routs.
It was an unfortunate result, especially as the rally was not really necessary at this point. The hit could have been absorbed, but with time running out I felt that the best chance to try to win a battlefield victory was to be aggressive and attempt to take the Romans on.
Conservative may well have been the better option here: another turn spent hitting Roman units would probably have resulted in a game victory for the Seleucids.
But 'tis no great matter - the soldiers were lead, not flesh and blood!
Returning to our key decision points from earlier:
1) Eumenes did attack from the beginning. It almost cost him his wing; three successful rallies ensured that it didn't.
2) The phalanx did advance. It took a lot of hits in so doing, but the Roman line was under pressure. Holding back would have allowed the Romans to pick and choose their place of attack and reinforce where weaknesses appeared.
3) Antiochus did stay with the main line. His personal command exemptions made a huge difference: the Roman left was only a couple of hits away from taking serious damage and facing potential collapse.
4) Rally attempts were made. Eumenes' ones were necessary; Antiochus' ones were more ornamental. The first succeeded, the second cost the Seleucids the battle.
It was an exciting game, and one where the Seleucids came closer to winning than it looks.
Aftermath: points tallies
Seleucids.Shattered. 1 x LCat, 1 x LHC, 1 x LHI, 1 x AHC, 1 x AL for 30 points
Routed. 3 x LLI. 2 x VCat, 1 x IEL, 3 x APH, 1 x AHI for 39 points
Withdrawn. 1 x SCH, 1 x |ALC, 4 x APH, 1 x VHC for 20 points
89 points for Rome.
Rome
Shattered. 1 x LLI for 4 points
Spent. 3 x VLE, 3 x ALE. 1 x VLI, 1 x ALI, 1 x AHC, 1 x VHC for 35 points
Handicap. 24 points
63 points for the Seleucids.
Friday, January 2, 2015
Mulled Newbury
Today I was lucky enough to be able to jump on a train and head north for a few hours of gaming with Pat, whom I had not seen for a twelvemonth.
Amidst the odd snowflake, some mulled wine and around a picturesque table, we refought 2nd Newbury with the boardgame This Accursed Civil War from GMT's Musket and Pike series.
I took the side of Parliament and deployed on both flanks, as if to trap the king in a vise. I outnumbered him and was under charge orders. What could possibly go wrong?
Well, as has been telegraphed, quite a lot. Firstly,my own intrepid self Skippen bungled his attack on the Royalist position at Speen.
As a consequence, Waller, being overall commander, was forced to get involved rallying and reforming the troops thrown back during the somewhat over-hasty assault against a prepared position.
But Balfour's and Cromwell's cavalry wings would surely do their best and save the day.
And so they did: Balfour's horse destroyed Maurice's flank defence, but so weakened themselves in the act that they were in turn overwhelmed by a devastating counter-attack, prosecuted under the very eyes of the king himself.
Cromwell's wing then also got into prancing difficulties. Hedge crossings disrupted their formation and unimpressive thinking condemned them to the indignity of being reaction-charged in a constricted space. Consequently, they were unable to bring any force to bear against the brave (and superbly led!) Royalist horse. Touche, Patrick!
Skippen's foot eventually got back into the action and pushed the Royalists from their position at Speen.
Sadly, our casualties were mounting, and like an idiot, Skippen stayed in the front line with his wobbling brigade instead of sensibly retiring to join the next line. He dies bloodily, and with him lie our chances of winning the day.
But what of the other flank, you may ask?
There too it was a sorry sight. We got across the river but disordered ourselves so terribly we failed to get any momentum against the stalwart men of the king.
With night (and snow) falling, it was time for Waller tocatch his train back home call his men together in conference and have a good go at them.
****
Despite the awfulness of the defeat, it was an excellent game to play. A real tactical puzzle, and it was a thrill to re-learn this solid system. It can get a bit fiddly for fat-fingered Kiwis with all the markers about, but it has a lot of to-and-fro action that makes for a great day's gaming and provides some moments of high drama.
As an added bonus, I won a copy of the game on the Japanese version of ebay the other night, so I can study my many mistakes in the comfort of my own private dungeon!
Many thanks to Pat for a most enjoyable day and some most palatable beverages.
Amidst the odd snowflake, some mulled wine and around a picturesque table, we refought 2nd Newbury with the boardgame This Accursed Civil War from GMT's Musket and Pike series.
I took the side of Parliament and deployed on both flanks, as if to trap the king in a vise. I outnumbered him and was under charge orders. What could possibly go wrong?
| King Charles awaits. |
Well, as has been telegraphed, quite a lot. Firstly,
| Bungle bungle bungle... |
But Balfour's and Cromwell's cavalry wings would surely do their best and save the day.
| Onwards, gentlemen! |
Cromwell's wing then also got into prancing difficulties. Hedge crossings disrupted their formation and unimpressive thinking condemned them to the indignity of being reaction-charged in a constricted space. Consequently, they were unable to bring any force to bear against the brave (and superbly led!) Royalist horse. Touche, Patrick!
| OLIVER! WHAT HAVE YOU GONE AND DONE? |
Skippen's foot eventually got back into the action and pushed the Royalists from their position at Speen.
| Looking a little more promising as we punish Maurice with musketry. |
But what of the other flank, you may ask?
There too it was a sorry sight. We got across the river but disordered ourselves so terribly we failed to get any momentum against the stalwart men of the king.
With night (and snow) falling, it was time for Waller to
****
Despite the awfulness of the defeat, it was an excellent game to play. A real tactical puzzle, and it was a thrill to re-learn this solid system. It can get a bit fiddly for fat-fingered Kiwis with all the markers about, but it has a lot of to-and-fro action that makes for a great day's gaming and provides some moments of high drama.
As an added bonus, I won a copy of the game on the Japanese version of ebay the other night, so I can study my many mistakes in the comfort of my own private dungeon!
Many thanks to Pat for a most enjoyable day and some most palatable beverages.
Subscribe to:
Posts (Atom)