Prufrock's Wargaming Blog

Prufrock's Wargaming Blog

Thursday, August 6, 2015

A dip test

I've been getting a little frustrated with my failure to make much of an indentation in the lead mountain, so I thought I would try something different from my usual painting method to see if I like the results. Yes, the dip.

I have a mass of Essex late Dark Age / early medieval 15mm DBA armies picked up in a 3 for 2 sale some years ago, and they seem like good candidates for a block paint and dip approach. Not to mention that with Dux Bellorum on the shelf it seems criminal not to try to get them tableworthy.

So here we are then. Block paint dullish colours.


Add acrylic stain. Used as-is, and applied with a wet brush.


And voila.


Hmm. Not spectacular, but probably comparable to other more expensive products. With a highlight here and there and a coat of matt varnish these might look OK.

Wednesday, August 5, 2015

Phil Sabin's 'Phalanx' game available for free download

Phil Sabin has recently revised his Society of Ancients game 'Phalanx' and made it available for download from the files section of the Lost Battles yahoo group. An enterprising member has since made up a VASSAL module for the game so that it can be played live over the internet, by email, or solitaire on your computer.

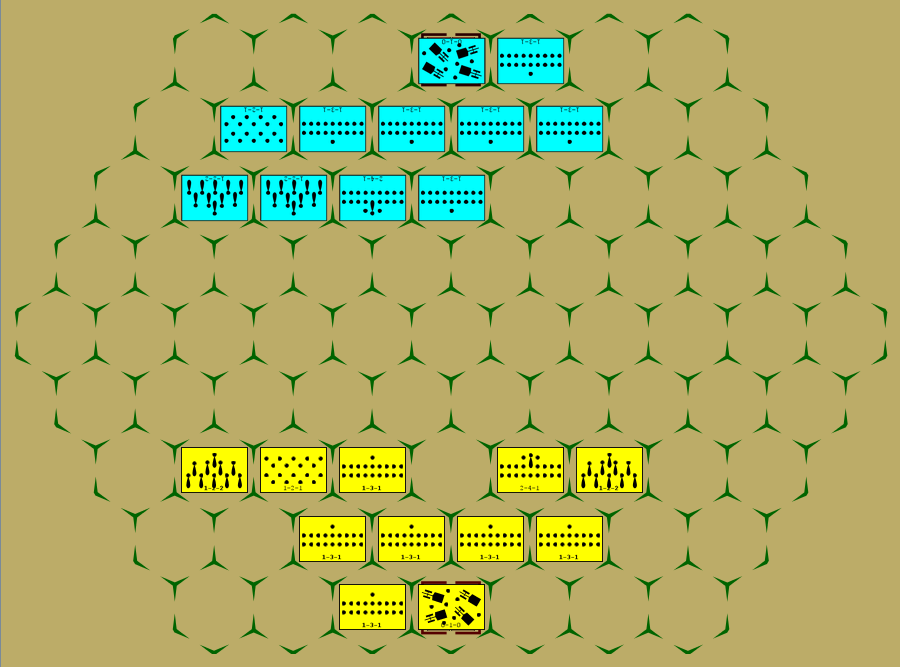
The game itself is diceless and relatively simple, using only 1 page of rules. Two armies of equal size - 10 units and a baggage piece each - and strength face off across a hex board (a Commands & Colors: Ancients board does nicely), with a neat method of combat resolution (3 attacking units will rout a hoplite unit, 2 a peltast or cavalry unit, 1 the baggage unit, 4 the commander and his guard).

The object of the game is to rout four units and there is a simple victory point system so that players can play a series of games to determine an overall victor.

If you are interested, follow the link above to see more.

Note that the game can be played as a board game or with miniatures.

Phalanx game board, taken from the VASSAL module by Slava.
Sample deployment, again from the VASSAL module.


Tuesday, August 4, 2015

A work interlude

It's been a pretty busy couple of weeks here but things are settling down now for a short spell so I hope to be able to get some painting done.

The rushed state of affairs was brought about by my having been asked, about two months ago, to do a 'teach the teachers' seminar on behalf of the local Board of Education. Its purpose was to give Japanese elementary school teachers a few tools to make them a little more confident teaching English, either in their own classes or in a team-teaching environment with a native English speaker.

As Japan will be increasing its focus on English language learning at elementary school level over the next couple of years, there is a bit of a push on to get teachers up to speed.

Anyway, the seminar seemed to go over quite well, which was pleasing. There were a couple of areas I could have improved on, but on the whole it was worth the time and effort.

And now that it's done, I might just have a short window of time to catch up on some painting (if the motivation holds!) before I need to start preparing for the next thing I have to do!

Saturday, July 25, 2015

The Mighty Endeavour

 Allied forces land in Normandy... (Game is MMP's 'The Mighty Endeavor')


Thursday, July 9, 2015

Quick update...

Things have been quiet in blog land lately thanks to work. Although the home has not been entirely devoid of gaming and related activities, finding the time to write them up has been beyond me.

Here though is a quick selection of recent activities.

W1815 - A couple of friends came over the other week for a crack at W1815, the new Waterloo game. They seemed to enjoy it and while Wellington won both games, he was a good deal more successful in one than the other.


Munda, with Strategos II.


Well, that's about all that I've got time and energy for at the moment. Cheerio!

Sunday, June 21, 2015

First foray into 1/700 plastic

I have a secret shame. The last few months I've been amassing boxes of 1/700 aircraft and buildings. I don't really know why, but every time I see a kit in a local hobby shot I've felt compelled to purchase it. I suppose I have vague notions of using them for some kind of WWII or Moderns air-warfare game, but it's all very hazy indeed.

Anyway, I opened up the the box of 1/700 buildings and decided to make them up as a tester.

It is a Pit-Road Skywave kit, and for about US$7 you get a total of nine buildings. They are very small but superbly detailed.

The thing is, how do you paint the blighters? Do you undercoat and risk covering up the detail, or just paint straight on and risk poor coverage? Any thoughts?


Thursday, May 28, 2015

Pharsalus

Now that my second Late Republican era Roman army is painted up thoughts have naturally turned to getting them to table, so last night I set up Pharsalus, using the Strategos II scenario for Lost Battles.

Caesarians in foreground. Pompeians have the red shields.

The battle started dramatically as the Pompeian cavalry charged their Caesarian opponents and immediately crushed them. The attack was so swift Caesar's carefully selected 'fourth line' of legionaries could not come to the support of the cavalry in time.

(Pompey took a risk in charging from distance and using almost all the army commands in paying for three combat bonuses. On this occasion it came off splendidly).

Pompey advanced his left centre and centre off the hill to link up with the victorious cavalry while keeping his right in place to see if he could tempt Mark Antony to advance and so break up the solidity of the Caesarian line.

(If Antony advances out of the line Pompey will gain two significant advantages: a) Caesar's veteran legions will not be able to use their ability to slide across the field to relieve one another, and b) Antony will be attacking uphill.)

Situation after Pompey's left sweeps all before it.

Caesar's men were left with no choice but to make the best of the situation. The Caesarian 'fourth line' swung into action and began to drive into the victorious (but now disorganised) cavalry. Who could blame the horsemen for feeling that they had done enough fighting already?

(By using commands judiciously and giving combat bonuses to the key attackers wherever possible, Caesar was able to begin wearing down the Pompeian forces).


The battle of attrition commences.


For the next while the infantry lines engaged each other while Caesar's fourth line veterans slowly forced back the Pompeian cavalry.

The fighting was attritional, with both sides taking casualties and exhaustion beginning to take its toll.

The Pompeian cavalry eventually broke, and with his own position becoming increasingly precarious, Caesar ordered the victorious troops forward at the double to relieve pressure on the main infantry line.

(Caesar used the once-per-game perk of a brilliant general to reverse the turn order and get his fourth line into action again immediately, this time against the light troops harassing Caesar's exposed flank).


Caesar's fourth line breaks the Pompeian cavalry and advances to attack the light infantry.
Gaius Julius has plenty to ponder.

As the infantry units began to break, Pompey's position on the left became increasingly exposed. But with Mark Antony shuffling troops away from his own section of the line to reinforce the centre, the great man sees an opportunity to move to the right and advance his fresh troops down off the hill.

As if the gods approved this move, Caesar was wounded trying to steady the line just after Pompey's departure.

(As a result of this wound Caesar will not able to contribute any further command resources to the battle - note that the way I have done this is not strictly as written in the rules!).

Pompey moves to the right, hoping to destroy a weakened Antony. Shortly afterwards, Caesar is wounded.

Caesar's centre and right wing. Ascendant, just.

Pompey is now outflanked and his left is soon in full retreat. His legionaries in the centre and right have not yet given up, however. The Caesarians in front of them are wavering: Antony desperately tries to muster his strength, but the reinforcements he sent right earlier are nowhere to be seen.

Pompey's left is gone, but the Caesarian left is under severe pressure.
Antony in strife as fresh legionaries pour down off the hill.


The Pompeian centre crumbles under pressure from three sides, but in the time this takes Pompey destroys Antony's command. There is no one left to oppose him, and with a third of his force still intact Pompey marches towards Caesar's camp.

The Caesarians are in disarray; Pompey marches from the field unmolested.
The battle is inconclusive. As for whose cause is most damaged, much will depend on the severity of Caesar's wound...

Pompey catching 40 winks.


Results.

Pompey:

lost shattered, 7 x average legionaries, 1 x average heavy cavalry, 2 x levy heavy cavalry.
lost routed, 4 x average legionaries, 1 x average light infantry.
spent, 3 x average legionaries.

Total: 56 + 22.5 + 9 = 87.5 points for Caesar

Caesar:

lost shattered, 5 x veteran legionaries, 2 x veteran heavy cavalry,
lost withdrawn, 1 x average commander.
spent, 9 x veteran legionaries.

Total: 56 + 6 + 36 + handicap (24) 122 points for Pompey

It is a clear victory (in game terms) for Pompey.

Related Posts Plugin for WordPress, Blogger...