Prufrock's Wargaming Blog

Prufrock's Wargaming Blog

Wednesday, June 25, 2025

War reaches northern Italy, 215 BC

News in from Ian P about the result of a battle between Hannibal Barca and Tiberius Sempronius Gracchus. Hannibal has come over the Alps, bringing with him a mixture of troops including Carthaginian citizes, Numidan cavalry and elephants, Spanish cavalry and foot. How much attrition the elephants and horses have suffered on the march is hard to say. At any rate, there are plenty of Gauls willing to support a man who will lead them against the Romans.

Report from Ian (posted on the Society of Ancients forum): 

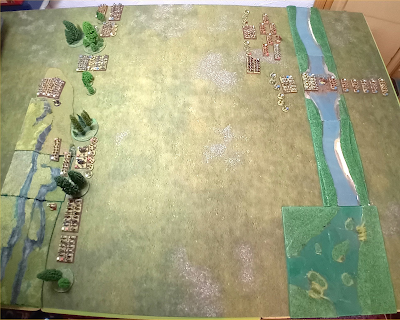
So my approach was a little different. I decided on a Roman Army and thought how could they be disadvantaged – not quite the Trebia but they are crossing a ford and not appreciated how close Hannibal is. Tiberius Sempronius Gracchus is of course leading the right wing and has crossed the ford and deployed his troops in a pretty pattern sorry effective Battle formation …


The left wing, being lead by Silanus Punctilious is still crossing the river. At this point I decided to throw an average dice to see how many elephant units Hannibal had got across the Alps and rolled a 2 and wrote up an Army list to equal the Romans. I decided that Hannibal knew where the Romans were and enough about their deployment methods to risk a gamble. He has three divisions and plans to attack at speed. He has stacked the right wing in an attempt to block off the Romans entry / exit point from the Battleground and entrusted this to Maharbal the Numidian and conveniently it will contain the Numidian Cavalry and Elephants as well as two units of Iberian Scutari. Knowing he needs to keep the Roman right busy he has persuaded his Celtic Allies (ever disposable!) to attack Gracchus head on, knowing that, even if defeated, they will do a lot of damage to their opponents. He places a Hasdrubal to oversee this with his Punic cavalry. That leaves Hannibal following up with his main line of Battle hardened Libyans to deliver the coup de grâce if all goes well. 

To return to the Battle

Suddenly the Romans see figures appearing from the treeline in front of them…


(Sorry for distortion but this gives an idea of the overall battleground.)

The Romans win the first move and mostly freeze. Gracchus clearly spluttering in disbelief fails to get his troops actually moving (too busy drying their feet off?) Sempronius, having given orders that washed over the stunned troops has to bellow his orders again to get his wing moving to dry ground but not in any sort of good formation. The Numidians as expected sweep in to box up the Roman Cavalry crashing into the Velites en route who die valiantly but fail to stop the Numidians continuing into the Roman horsemen. The rest of the right wing and Hannibal in the centre advance. On the left wing both Cavalry units get stuck in breaking one opponent and forcing the other back. However the rest of the Celts have clearly had a heavy night of drinking and fail to follow up. However they will do so and well in following turns managing to get the drop on charging the Romans.

However the die is now cast. On the right the Romans struggle against the Celts but slowly dispose of Cavalry and one Waband but lose some units and are left out of position with two of the three warbands now effectively behind their main lines. On the left wing, having seen off the Numidians, the Romans [u]almost[/u] get their line together - The Campanian Legionaries are the unit in limbo at the back. The elephants are the beasts of the Battle as they finish off the Roman Cavalry in front of them and then take two Roman units away from the centre to hold them up leaving the centre far too weak to withstand the hammer blow about to land as Hannibal marches his Libyans into the centre of the Battle.


This is the situation at the end of turn 3 Hannibal has a solid battle line of mostly heavy infantry (light blue) where the Roman line is broken up (red) (In both cases double lines represent two units). The Romans are in real danger of being enveloped so the result from here is inevitable – a victory to Hannibal. 

Many thanks to Ian for another great report for the campaign.

We turn now to the campaign map after the latest actions of Turn 4:

Situation at 215 - 213 BC - Cisalpine Gaul and Greece disputed.

Actions to follow: there will likely be return battles in both areas as Rome and the Achaean League respond to the attacks on their respective territories. 

More to come!

Campaign history


Monday, June 23, 2025

Battle at Megara 213 BC (Med Campaign 12)

A report is in on the Macedonian excursion into Greece. Macedon under Philip V has waded into the confusing mix of political alliances and enmities in Greece proper by supporting the Aetolians against the Achaean League in a bitter struggle for influence. After a demand that Megara demilitarise and accept a Macedonian garrison is rejected, the Macedonians with Aetolian support attempt to bring this about by force. 

The Acheaan League musters troops in response to the threat and the armies meet north of Megara.  

Image attribution: https://commons.wikimedia.org/wiki/File:Achaean_League_192_BC.png

News from the front from John GL:

Hi Aaron


Fought today against Duncan Thompson (DBM).  The dice decided that I would command the Achaians and would be the attacker - bad news, as this pre-emptive strike against the invading Macedonians limited my terrain options.  Duncan placed only gentle hills; I added some rough going but only one patch was on my side of the table.  I would have to attack in the open.

At this date the Achaians are allowed a few pikes (only four elements) and have to rely on thureophoroi and Thracian/Illyrian mercenaries (all Superior Auxilia).  The Macedonians had more cavalry and of course lots more pikes.  The only important terrain was a hill opposite my left flank, and I planned to take this and turn the Macedonians' flank while my cavalry demonstrated on the other wing and my thureophoroi kept the pikes busy in the centre.  


Photo 1 shows the initial moves; the hill at the top of the picture was occupied by Macedonian light troops and then attacked by large numbers of Achaian and Thracian Ax(S).

Picture 5 shows the battle on that hill.  


Eventually the Macedonian forces there were worn down and a general intervened; he was outflanked, attacked by an Achaian general and slain.  His command broke.

In the centre it was a different story; the crisis is shown in Picture 6.  


Macedonian pikemen drove through lines of auxilia and their cavalry slew some more.  The central Achaian command broke, and losses to the other two commands made exactly half their army gone.  So a 9-1 win to the Macedonians.  

I've played Duncan dozens of times at DBM and that's my first outright defeat... good game, anyway.

And so Philip is victorious! Will the Lacedaemonians need to be roused from their slumbers to meet the invader? More to come. 

Campaign History

Thursday, June 12, 2025

Attack on Sinope 216 BC (Med Campaign 11)

Jim Webster and friends have enlightened us on the reasons for the sudden appearance of the Kingdom of Pontus as an active player in our campaign. Here is the story:

Campaign Battle
We know from Polybius book 4 that Mithridates II of Pontus had got designs on Sinope.
56 1 Such was the state of affairs in Crete. At the same period Mithridates too went to war with Sinope, and this proved as it were the beginning and first occasion of the misfortunes which finally befell this city. 2 The Sinopeans sent an embassy to Rhodes begging for assistance towards this war and the Rhodians passed a decree to appoint three commissioners and to place in their hands a sum of 140,000 drachmae on receiving which they were to supply the requirements of the Sinopeans. 3 The commissioners got ready ten thousand jars of wine, three hundred talents of prepared hair, a hundred talents of prepared bow-string, a thousand complete suits of armour, three thousand gold pieces, and four catapults with their artillerymen, 4 on receiving which the Sinopean envoys returned home. These things were sent because the Sinopeans were in great dread of Mithridates undertaking the siege of the city by land and sea, and they therefore were making all their preparations with this view. 5 Sinope lies  p435 on the southern shore of the Pontus on the route to the Phasis and is situated on a peninsula running out to the open sea. The neck of this peninsula connecting it with Asia is not more than two stades in width and is absolutely closed by the city which is situated upon it; 6 the rest of the peninsula runs out to the open sea and is flat and affords an easy approach to the town, but on its sea face it is very steep, difficult to anchor off, and with very few approaches from the sea. 7 The Sinopeans were fearful lest Mithridates should lay siege to them by throwing up works on the side of the city next Asia, while at the same time effecting a disembarkation on the opposite side and occupying the flat ground over­looking the city; 8 and consequently they busied themselves with strengthening all round that part of the peninsula which was washed by the sea, blocking up the approaches from the sea by means of stakes and stockades and pla­cing soldiers and stores of missiles at suitable spots, the whole peninsula being of no great size but quite easily defensible by a moderate force.
So the game worked on the following.
It was obvious that landing on the plateau was possible. (Looking at google maps, it wasn’t going to be easy)
Mithridates obviously had access to ships to do it. Pontus controlled the city of Amastris (Its tyrant Eumenes presented the city of Amastris to Ariobarzanes of Pontus in c. 265–260 BC rather than submit it to domination by Heraclea.)
This time Mithridates decided to attack more rapidly before Sinope had started doing defensive works.
I had two maps, one was a plan from ‘Development of the city plan of ancient Sinope: Infrastructure as ideology.’ By Owen Doonan. The plan is credited to Bryer, A. and Winfield, D. 1985: The Byzantine Monuments and Topography of the Pontos.
Bryer, A. and Winfield, D. 1985: The Byzantine Monuments and Topography of the Pontos.

The other is a screen shot from google maps.


Over the last few months, at our club we’ve introduced people to DBA. They’re not ‘ancient’ players but are enjoying the rules. So I would do this battle as a multiplayer DBA game with each player having a DBA army. Actually some had more than one.
The defenders were divided into three watches.
1) Miscellaneous Anatolian Mercenaries. 4 Sp, 6 Auxilia, 1 Cv, 1 Ps
2) The Greek mercenaries. 8 Sp, 1 Cav, 1 LH, 2 Ps
3) The citizens. 8 Sp, 2 Cav, 1 LH, 1 Ps.
I counted Mercenary Thureophoroi as Sp in this game as I think it better represented what was going on.
The attackers were divided into three landing sites.
1) North landing. The Galatian mercenaries. 11 warband, 1 Ps
2) East landing. The Greek Mercenaries. 6 Sp, 2 Ax, 3 Bw, 1 Ps
3) South Landing. The other mercenaries. 4Sp, 3Ax, 3Bw, 2 Ps
The Bow were because Pontus always seems to have had them. The Ax were probably dismounted cavalry.
The game started with one base for each landing party appear on the table edge. The Watch on duty was rolled for at random, and this one was queuing at the city gate.
The Sinopean forces were to drive the enemy back into the sea. The Pontic forces wanted to get into the city.
Each move each Pontic player rolled a d6, that was the number of bases who’d scrambled up onto the plateau that move. Each move the Sinopean player rolled a d6 for each watch unmustered to see how many bases arrived at the muster point (the main gate). When a watch left the gate it could move up to 6” in column. But once it deployed, it used Pip dice as normal.
The battle lasted a couple of hours. The first action happened when the troops from the South landing came into contact with the Miscellaneous Anatolian mercenaries. 

The Galatians advancing: three Sinopean commands have the centre ground; the third Pontic command is still plodding towards the fighting.


Mainly due to dice luck, the Pontic forces triumphed comparatively quickly. But we used the rule where you can use pips to hold the demoralised remnants. So whilst the mercenaries broke, they managed to hold the line and slow pursuit. 
Then the Galatians hit the Greek mercenaries whilst on the Sinopean side, the Citizens deployed to face the South landing force. The fighting was tougher but the arrival of the Greek mercenaries from the East Landing meant the Sinopean Greek mercenaries broke.

All three Pontic commands are closing in. One Sinopean command has just broken and the Sinopean citizens are being turned round to cover that flank


Finally the Citizens, trying to withdraw to the city gate were hit by Galatians. Whilst they managed to fend them off, it meant that the troops from the South Landing finally hit them from the other side. The Citizen’s general was pulled from his horse by Pontic psiloi in the city gateway and the now demoralised Citizen contingent surrendered. The city had fallen. 

Many thanks to Jim for this account of how Mithridates II made a name for himself by conquering Sinope and turning his kingdom into a regional power!
The campaign continues.

Sunday, June 8, 2025

Mediterranean Campaign, Turn 4, 216 BC (Med Campaign 10)

 With last turn's aggressors driven off, the map has not changed.

Turn 4, however, sees Some unexpected activity - the Kingdom of Pontus has become active, and is now shown on the board by an orange diamond.

216 - Carthage at last moves, no doubt troubled by Rome's venture into Carthage's sphere of influence. Led by a young-go getter called Hannibal, the Carthaginans are welcomed by the Iberians and urged to continue on to attack the Romans, which they cross the Alps to do. Some of the Gauls pledge to support the Carthaginians and Rome must ready itself for another campaign.

215 - Carthage vs Rome in Cisalpine Gaul. Carthage can use Numidians, Iberians, and Gauls to supplement its citizen army.

213 - Macedon attacks Greece after one demand and one arrogant response too many. Will Rome support Greece? Not at this time - they are occupied with their own wars. 

Map of the fourth turn, 216-213 BC.


Campaign History


Friday, June 6, 2025

How to make a Commands and Colors hex mat (New Zealand version)


Many moons ago I posted a piece here on how to make a hex mat

Unfortunately, I was not able to bring that mat with me to New Zealand, and for six years I have been without a suitable sward on which to play the glorious game Commands & Colors: Ancients. Attempts to obtain a mat here have produced mixed results. I ordered a commercial version which never arrived; I tried making a dodgy off-set squares mat of my own. 

It seemed fate had dealt me a lousy hand. Would I ever play Commands & Colors: Ancients in the proper way again?

Well, last weekend I got notification through my phone of a sale at a store called Spotlight. It's where New Zealanders go when they want to get a relatively affordable set of curtains, a duvet cover, bits and pieces for sewing. Who could resist a 60% off sale on such potentially useful household items? So in I wandered to have a look at their tasteful net curtains and fabrics. Lo and behold: they had some lovely off-green felt, 90cm deep. 

There was a stirring in my soul. 

I asked for a piece 160cm long, and another 10cm long. This would allow hexes c.10cm from flat to flat 13 wide and 9 deep, as in the classic Commands and Colors configuration, as well as a scrap piece for experimentation.

Tools:

Cutting board, leather hole punch (or similar), straight-edge rulers, tape measure, marking dots, marker pen. 


Method:

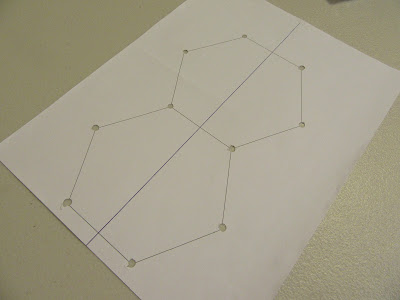
Print off a template on A4 paper using a hex map generator. With this particular one the 'hexagon size' is the length of each hexside. 6cm gave me two hexes on a sheet of A4 with 10.4cm flat-to-flat, 12cm point-to-point. 

Mine printed too small initially - I had to increase the PDF size to 110% to be able to print the correct dimensions on paper. 

Use the leather punch to make a guide hole at each point of the two hexes.


With this initial template, mark out a larger template on cardboard, punch out the points, and on two of the hexes punch out the centre point as well. I used an opened out artist's wallet as I could get 4.5/5 x 5 hexes on it with the cardboard being easy to punch out but still being sturdy enough to do the job.  


Lay out the felt. 


Using tape measure and rulers, find the centre point of the fabric. Mark it with a dot sticker. Line up this sticker with the centre dot from your hex template and align the template with the fabric edge. 


Before you commence marking the dots on the fabric with your permanent marker, use a scrap piece of the fabric to test for sharpness, smudges, optimal pen size, etc. Better to do this now than risk it on the actual sheet. 


I tried a couple of colours, pen thicknesses and hex designs until I found the ones I liked best.

Returning to the mat, start marking the dots, being careful to make sure everything aligns as well as possible. 

I found out that perfection here is the enemy of the good. The fabric I had was 88cm deep in the centre and 90cm deep at one end. It looks terrible to our wargamerly OCD eyes at this stage when we are dot marking, but if you have fabric bunch or stretch it is better to have the hexes consistent with one another and excess fabric at the edges than to try to keep all the edges consistent and end up with misshapen hexes.

If the hexes are neat and even it will look good, even if the alignment with the edges turns out to have a bit of a slope to it. 

Once you have marked out the hex points, get your straight rule and start drawing the lines, being careful not to smudge them or lose concentration and draw a dud line. This is where you need to be accurate, but be accurate to your marked hex points, not to overall alignments. You will have some distortion and the lines will not be perfect. Accept that: just make sure that you are connecting your points as perfectly as you can and the effect will be good.

If, like me, you often enjoy a tipple while pursuing wargamerly ends, this is not the time to be working your way through half a bottle of vodka. You do not want to be having accidents with your permanent marker!


Stage one hex sides drawn. The lines are horribly out of alignment with one another, but you only notice this as you are marking it, not when you step back and look at the whole effect. Trust the process!

Continue marking the hex sides. Again, be accurate at the hex points so that the connections are clean. This is more important than getting geometric proportions exact. 


Stage two underway.

Once you get to the third stage, you will get a surge of joy.


Now it all comes together!

Keep going and you end up with something like this:


And then you can start playing! 

Including markers, this cost the princely sum of $15.00.


Sunday, June 1, 2025

Battles of Heraclea Lyncestis, 219 BC and Emporiae, 218 BC (Med Campaign 9)

Reports are in of a battle in northern Macedon between the invading Illyrians and a force scrambled together to meet them:

The Illyrians invaded; the Macedonians placed gentle hills and Ralph added some rough going.  The Illyrian infantry proved surprisingly resilient even against pikes, and of course they had the numbers, but eventually their central command was worn down and broke.  A cavalry clash on the right saw casualties on both sides but the Macedonians had the edge, while on the left the Macedonians held up against vastly superior numbers. After the standard competition time (three and a quarter hours) we called the game at 6-4 to the Macedonians.  Either side could have won, given unlimited time, but Philip V had the edge.  So the Illyrian invasion has been repulsed after a very hard fight.

Macedonians to the left of this picture; Illyrians to the right.

The Illyrian centre on a gentle hill.

View from behind the Macedonian centre-right as the phalanx advances.

Macedonian right, with an Illyrian outflanking movement underway.

View from behind the Illyrian centre as the crisis approaches.

Hard fighting on the Illyrian left.

The phalanx under pressure in a fierce melee.

The Illyrian raid on Macedon is driven off, but the army has not been destroyed. 

Many thanks for John G-L and Ralph for fighting this one out and sending through the report and photographs! 

Furthermore, in Nearer Spain, Proconsul Aaronius Dubius Scipio Calvus, having landed a force near Emporiae, was engaged by an alliance of indomitable Iberian tribes under the command of one Simoniblis. 

The tribes fell upon the Roman force as it was making camp. Both forces were equal in strength. For the Romans, who deployed first, there were twelve units of average legionaries, two of levy light infantry, three of average heavy cavalry (Roman and allied) and one of levy light cavalry (Spanish allies). Scipio Calvus was classed as an unispired commander. The Roman key zone was in the centre.

The Iberians were comprised of fourteen units of average heavy infantry, one of levy light infantry, one of average light infantry, two average heavy cavalry, one average light cavalry, and one veteran heavy cavalry with average leader (Simoniblis). They had a hill to their right rear, and their key zone in the right centre.

View from the Iberian right rear.

In a cannily-fought battle the Iberians pushed forward in the centre and centre-right, later bringing Simoniblis and his veteran cavalry forward on the the right flank. The Romans were content to hold back their wings to avoid tangling with the cavalry and concentrate on the fight in the centre.


The centres engage.

Powerful Iberian attacks forced the Romans to pull back their left centre. The Romans push forward their left's cavalry to try to rescue the situation.


The Iberians have put a hole in the Roman line, but all is still in the balance.

Simoniblus defeats the cavalry opposing him. Under ever-increasing pressure, the Roman left commences to crumble. 

The Roman cavalry is defeated - Simoniblis advances.

The Romans are famously resilient, so the Iberian left now advances to engage the Roman right. The fighting is grim and bloody.

The Roman left is chewed up while on the other end of the line the forces finally meet. 

The Roman left is crushed; Simoniblis takes the camp. This plus eight units shattered means the Romans are at -3 to morale, and at the next setback the army flees. Dubius Scipio is unable to hold up the family reputation!

A famous win for SP (also giving him the Washbourn Trophy), who has overseen a good plan play out to near perfection, and pushes the Roman menace out of Nearer Spain. 

The campaign continues!

Many thanks again to John, Ralph, and SP for participating in this turn, to John, Russ, Martin and Peter for having played in the other battles so far, and to others who have also expressed interest in participating. It is wonderful to have had so many hands to the pump, as it were!

Related Posts Plugin for WordPress, Blogger...