Prufrock's Wargaming Blog

Prufrock's Wargaming Blog

Sunday, July 25, 2021

Revisiting Commands & Colors: Ancients

C&C:A was one of my favourite games in the oughties through to the birth of our second child. Following the arrival of young R, the lack of time to play C&C:A online over VASSAL meant that it was gradually displaced by Lost Battles, because Lost Battles is a superior solo experience.

You can certainly enjoy C&C:A solo however, so I set up a game the other night to reacquaint myself with the game.


The scenario played was Arausio.The early play was all made by the Romans. A line command and double time card got them into contact early, and they quickly went out to a 2-0 lead. 


A darken the sky missile attack failed to halt the Roman attacks, and so it came down to local, small-scale counter-attacks to pull the initiative back. This continued for another six or seven turns.


With two banners needed for victory Caepio and his accompanying unit took a chance, but it did not pay off. Left exposed, Caepio was then fallen upon by Boiorix and killed to win the day for the Germans, 7-6. 

Caepio's unit destroyed, and then himself.

While still an enjoyable game, times have changed, and C&C:A is not usually going to be the first game I pull out when I want to play ancients. Its main strengths are:

1) Once learned, it's hard to forget

2) It's a great two-player contest when both players are experienced

3) It has tonnes of scenarios

4) It is a nice game to look at and play

5) The card play system lends itself well to solo play, provided you take out the First Strike card

6) It is an excellent introduction to the era

Its main weaknesses are:

1) As much as I might have tried to convince myself otherwise (and I have!), it has deficiencies as a model of ancient warfare, and

2) It's just not quite as engaging solo as Lost Battles is. 


That said, it's still a very fine game.

Thursday, July 22, 2021

Eyeless in Gaza (312 BC)

SP came over last night for the second iteration of our Washbourn Trophy Lost Battles series. I had set the battle as Gaza 312 BC, for its ease of set up (only a flat plain to fight over) when time was short, and for its own sake.

I don't recall having fought it before - though surely I must have - so we were both going in without too many preconceived ideas of how to play the scenario. Being on holiday this week, SP had the day to come up with a strategy, while I would rely upon my knowledge of the rules and 'general tactical nous' to breeze through. 

The first point of interest is the armies. Both are successor forces led by fighting generals - Ptolemy/Seleucus (combined into a single on-table commander) the one and Demetrius the other - with the usual mix of phalangites and cavalry heavy and light. In addition Demetrius had three units of elephants, and Ptolemy a dedicated anti-elephant corps of light infantry, in four units.

Essentially, it was to be a battle of elephants vs light infantry, phalanx vs phalanx, cavalry vs cavalry, and inspired commander (Ptolemy) vs average commander (Demetrius).

In fighting value Ptolemy had the edge 79 points to 67, but it was still close enough to be challenging for both sides. 

We used the historical deployments outlined in Phil Sabin's Lost Battles book, so the action began for us in turn two.

As Demetrius, and with the first move, I attacked on my left with Demetrius himself and his two units of veteran heavy cavalry. I then reinforced this zone with light cavalry from my right flank, bringing them around behind my army to give some extra numbers in what was bound to be a tough fight on the left. My centre left attacked with elephants in the lead, and I advanced in the centre to allow the light cavalry to scoot around behind them in the aforementioned reinforcement move. My right - now my weakest zone - I refused. 

As Ptolemy, SP fought fire with fire on his right. He attacked with bravado with his two veteran heavy cavalry units and light cavalry, and then also reinforced this zone with cavalry from elsewhere in his army. His light infantry hit my elephants hard, and rather than advance his centre and left he merely redeployed his leftmost unit of light cavalry so that they could reinforce Ptolemy next turn if needed.

Turn four saw Demetrius shatter a unit of light cavalry in Ptolemy's zone, but the rest of his army held firm. There was little success elsewhere.

The view from Demetrius's zone after his second attack. Note his position in the lead with his guard cavalry in an attempt to shatter the enemy zone before it can be reinforced. It was not to be!

Ptolemy reinforced his own zone again with more light cavalry, and fought back with determination. He scored two hits with the cavalry in his zone, and then three hits against Demetrius's centre left as the elephants panicked in the face of the light infantry assault. 

Again from Demetrius's zone: a violence of horses, and some reinforcements. 

Two more turns went by with some thrilling exchanges as both sides fought desperately to win the cavalry fight between the two opposed generals. The full complement of Lost Battles's tactical tricks was employed, to our delight: manipulation of  lead units to maximise attack and best defend; command bonuses artfully issued; Favour of the Gods re-rolls demanded; generals rallying what could have been battle-defining strikes. 

Elsewhere the elephants continue to panic, and the phalanxes engaged in the centre. My men all-out-attacked in an effort to make the enemy army as vulnerable as possible to mass rout once the moment came. 

The moment, however, did not come. A shatter, a double shatter, a successful rout test, a shatter, a failed rout test, and Demetrius was alone with his guard cavalry.

The grim reality: Demetrius about to be permanently displaced.

Demetrius's guard was destroyed, and the man himself fled the field. He took the centre left with him in a trumpeting of panicked elephants and a cacaphony of hooves. 

In the centre, the phalanx turned and pulled back, marching off table to escape with what they could.

Battle over, and Ptolemy was victorious 93 points to 74. The result did not show how closely fought it was. In the aftermath, we were pleased to announce that SP had won the Washbourn Trophy. It would change hands and go home with him.

We still had time for a second battle, so we set up again. This one was also a tough fight in which we put hard-learned lessons from the first battle to good use. 

The action on my left played out much as before, with our cavalry wing and elephant-led left-centre eventually losing against Ptolemy, but this time we were a lot more active with our centre and right wing. Even after our left routed, our right fought on, up until the tenth turn, shattering enemy before eventually, just a moment before darkness fell, being shattered ourselves.

Game two, three turns in.

The final result was 100-99, with SP as Ptolemy again emerging the victor! We were both a little surprised with this result. I thought I had done enough to win on points under the Lost Battles handicap system, but not quite.

Again Lost Battles delivered. Two exciting games which could have gone to either side, with two very plausable results which did no injustice to history.

Thanks to SP - worthy winner of the Washbourn Trophy - and to Phil Sabin, master rules designer!

And if you ask for Demetrius now?  You will find him eyeless in Gaza at the mill among slaves.


Sunday, July 18, 2021

History of the World (part 2).

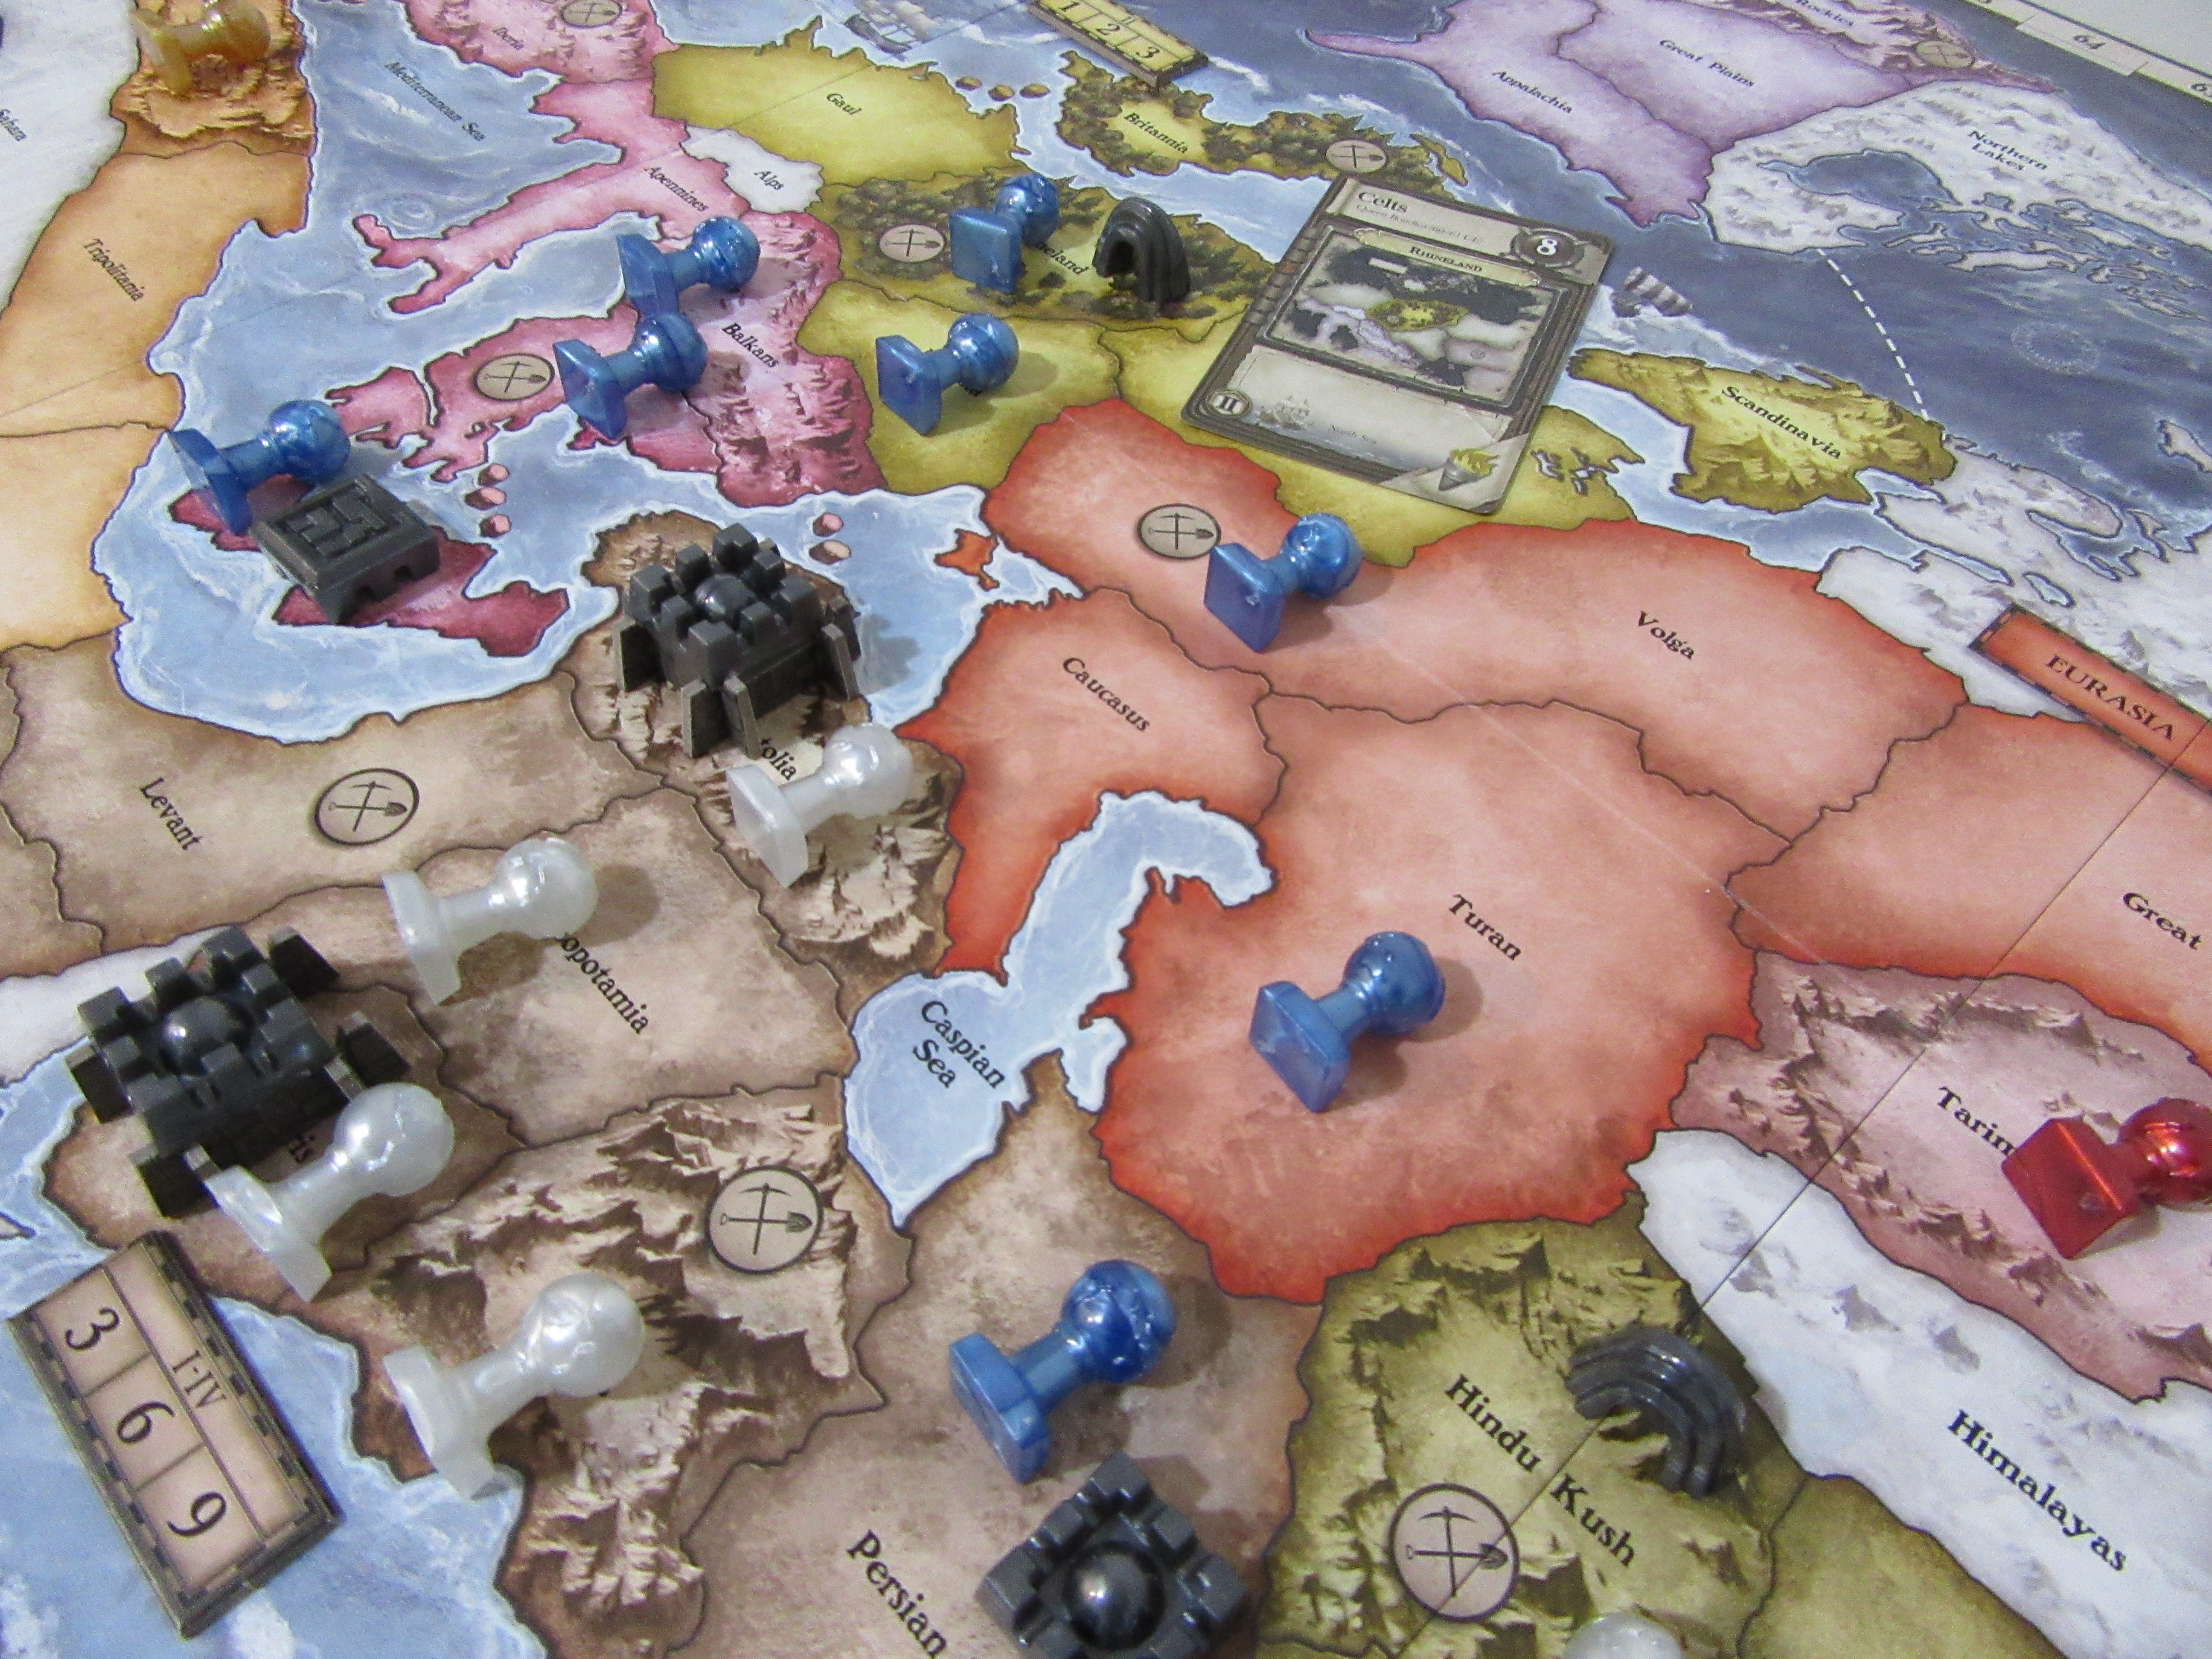
Carrying on from part 1 of my solo, game-learning play of the 'History of the World' boardgame, and with the world still reeling from the Pax Romana (who made a desert and called it peace?), the third epoch of human history began.

The Guptas, appearing in Deccan, claimed the entire Indian subcontinent from its previous inhabitants the Mauryans, but not without some hard fighting. Sculpture, painting and architecture flourished!

But the red team could not be held for long: the indignant steppe Huns rose and bore down upon China, Eurasia and Southern Europe, to seemingly alter the landscape forever. 


The Byzantines however had a story of their own to write. They gained almost total mastery of Europe North and South, and with their legacy peoples still in Africa and the Middle East, the future was looking, um, golden.


History then gave herself over to the Arabians, who repopulated the Middle East, as was only meet. Despite their great numbers, they were unable to proceed much farther, as the descendants of the Guptans resisted the invaders strongly. 


At the close of the third epoch, Red led Gold, with White and Blue fighting for third place. 

Era four commenced with the establishment of a satellite kingdom in Japan and a Viking charge into what would later be known as the New World. More points for Red, who dominate the northern hemisphere.


At that a great khan appeared to unite a hardy people of the plains, but he must have REALLY displeased the gods, because almost half of his attacks were unsuccessful. Behold the blue horde grouping!


The Ottomans came, saw and conquered, but were unable to extend their influence into Europe or Eurasia.


Next the age of discovery dawned. If the tall ships of the Portuguese failed to land in the New World, they did however have the satisfaction of opening a trade route into Eurasia. Spicy!


Going into the fifth and final epoch, Red led Gold, and Blue led White.

The board at the end of the fourth epoch.

The fifth era started with courtly grace as the Qing expanded their influence with spectacular success, establishing dominance in Southeast Asia and even reaching Australia. A good haul of points resulted, but not enough to catch the leaders.  


North America, Africa and the Middle East then fell to the British, who bestrode the world like Colossi from their island fastness (didn't get to Australia, but).


On cue came the proud Americans. Freedom this, freedom that; supremacy in North and South America; a foothold in both Europes. To add insult to grevious injury, they captured Britannia!


The last empire of the game was the Germans. Predictably, they put northern Europe in thrall. What was not in the script was that they then liberated Britain from her American masters. They had no truck with Russia. A golden German finish it may have been, but it was not enough to take victory from the Red team.


At the end of it all, the final scores were as follows:

Red: 151 

Gold: 126 

White: 119 

Blue: 118

And the final board looked like this:


Playing History of the World solo was a heap of fun. Having had this run-through, I was consequently able to teach the game to three Risk playing buddies the following week, and they enjoyed it as much as I did.

It takes a good three or four hours, which is time enough to get involved without being quite long enough to get bored. The only issue I can see is that players who fall behind early may find their interest waning. It is possible to score big later in the game, but it is harder to do this if you don't have legacy pieces still on table, so with a bit more player experience and some developing tabletalk, it may turn into an experiment in diplomacy as well.

To conclude, I think we've found a good one here! 

New Phil Sabin Website


Since Phil Sabin (of Lost Battles and Simulating War fame) retired from Kings College, he has not had a web presence to disseminate his games. He has however just announced one now: the page, Philip Sabin's Wargame Designs, is here. Interestingly, Phil states that he has been "designing ‘total conversions’ which build on the components and data from existing games to give owners of those games a different dimension to explore."

More information is on the website of course, so please check it out if you are interested in accessing Phil's designs. It is good to see him back with a web presence again. 

Tuesday, June 8, 2021

History of the World (part 1).

The other week I saw advertised a new edition of the classic boardgame 'History of the World' made famous by Avalon Hill. I snuck it into the house like a seventeen year old returning from a night on the beers and let it blend into its surroundings until the time was right to unwrap it and get it to table.

Sunday last was that night. 

With the den to myself and the cricket on, I decided to give it a try.

The Sumerians were the first empire to establish themselves. Getting on their asses they spread from Tigris into Zagros and the Levant. Dominance of the Middle East along with a capital and a monument entered twelve points into the ledger for the blue team. History had begun!


The second empire to emerge was that of the Minoans. Avoiding conflict, these hardy seafarers settled Mauretania and Anatolia. At home they built a palace at Knossos. Some chroniclers considered this to have been a minor tear, but others thought it was bull. At any rate, the gold team had points on the board.


The Hittites then arose, pouring forth with their iron weapons to wipe the Sumerians from the face of the earth and they almost succeeded.

Hittites get to build forts! Cool (unless you're not a Hittite).

In China the Zhou asserted their supremacy and cultivated a satellite kingdom on the banks of the Indus.


And so ended the first epoch of recorded history, and in a neat touch of verisimilitude, I forgot to record the scores. 

Era the second commenced with the rise of the Persians. Alongside their white team legacy Hittites, they dominated India, Southeast Asia and the Middle East to win masses of points. Sadly for the Zhou, their erstwhile satellite kingdom became just another satrapy. 


Next it was the turn of the Celts to rampage their way across Europe, Eurasia and Persia. It looked impressive, but with Eurasia terra incognita at this stage of the History, they did not get as impressive a pay-off in points.


The Mauryans subdued India and ventured into Southeast Asia. Two crucial battles were lost, but team red have control of the east.


But then came the Romans, and they smashed everyone - almost as if it was destiny! Northern Europe, Southern Europe, North Africa and the Middle East all trembled before the tramp of the Roman caligulae. A few indomitable regions held firm, however. 


And with team gold in ascendancy (IIRC) epoch two concluded. 


Monday, May 24, 2021

Slingshot 336

The other day I received the May/June issue of Slingshot, the journal of the Society of Ancients. I joined the Society in about 2007, if I recall correctly, and am glad to say that Slingshot is still in excellent health. 

It has survived the challenges of online culture, the rise (and fall, if recent pronouncements are to be believed!) of blogging, various changings of the guard, the odd ruction amongst the membership, and the sad toll that time inevitably takes on everyone, no matter how unpainted the lead mountain remains.

The current editor, Justin Swanton, has done a wonderful job of bringing a genuinely professional look to the graphics, layout, and typesetting. Justin is a published author himself, having written a historical novel and a book on ancient battle formations, and has a day job within the print industry, so he knows what he is about. 

Funnily enough, I actually disagree with a lot of Justin's ideas on such things as battle formations (I haven't read his book, but do follow conversations on these sorts of topics on the Society forum), and that is part of the charm of a society such as the SoA. People can have different views but still get along. All credit to Justin though: the quality of Slingshot under his stewardship has been extremely high, and he is indefatigable in promoting interest in ancient warfare. As an example, he also runs, and produces the content for, a youtube channel here.

Anyway, to return to topic, the thing I like most about Slingshot is that it is put together from the writings of the membership. That means you get a whole range of themes, interests, topics, and a wide variety of articles. Inevitably, some of these will appeal and some of these won't, but the idiosyncracies of Slingshot are the idiosyncracies of the membership, not those of an editor in a capricious publishing landscape desperately trying to hold on to dwindling market share.

The low level grumbling that occasionally attends the efforts of the wargame glossies is undercut in Slingshot. It is written by members for members: if you don't like the content, write something yourself! 

I guess what I really want to say with this post is that - despite its current professional appearance - Slingshot still holds true to its original amateur, collective ideals. Now into its 336th edition, long may that continue!


Tuesday, May 11, 2021

Heraclea with Lost Battles

Some free time on Saturday and a quick message to old mate SP saw us convening for a game of Lost Battles and a couple of beers. The scenario was to be Heraclea (see here for the armies involved), which would be our third game in a row on the theme of Pyrrhus, following on from two games of Asculum a few weeks ago.

SP has got the hang of the system now, and he needed to have, as Heraclea is a tricky battle to fight. It starts with both sides surprised, meaning that each commander can only deploy four units per turn. This puts a premium on making good decisions. Use of command points is key, particularly around deploying the right units into the right zones at the right time. Getting these things wrong can seriously hamper one's cause. 

Fortunately, he is a quick learner, and has internalised the system so well that picking up the unique features of the battle and the special rules around deployment was not a problem.

To the battle.

First turn, the uninspired Laevinus rolls a 5 for command points, with which he deploys light infantry and heavy cavalry into the centre, centre right and right wing. The inspired Pyrrhus rolls 4, matches the Romans with light infantry in the centre, with two units of heavy cavalry in his left centre, and then challenges Laevinus by advancing light cavalry into the centre right zone.

Second turn Laevinus rolls a 4. He brings his four units of legionaries on in the centre rear, and makes attacks out of his centre and centre right zones, scoring two hits. Pyrrhus rolls 5. He attacks in both zones in contact, scoring two hits of his own on the Roman centre right. He marches up two units of veteran cavalry to overmatch the Roman right wing, and double-moves veteran and average phalanxes to support his centre and centre left.


The field after turn two.


Third turn Laevinus finds himself out of his depth. Rolling a 3, he is forced to either reinforce or attack. He chooses to reinforce. Four more legionary units come on in his right rear, and the others from last turn advance into the centre. Pyrrhus rolls a 5, and attacks along the line. Two shatters are scored against the Roman centre right, and a fierce charge clears the cavalry opposing the Greek left wing. The Romans have lost velites and two units of cavalry in the one turn. It is very close to a triumph for Pyrrhus. He elects to advance the left wing cavalry forward into the zone vacated by the cavalry, but does not advance his centre left. He reinforces his centre and centre left with three units of phalangites, and moves himself and his guard cavalry to the centre.

Fourth turn Laevinus rolls a 3 and is again obliged to choose between reinforcement and attack. Once more he chooses reinforcement: his legionaries in the right rear move forward into the zone recently cleared by Pyrrhus' attacks and four of the remaining units are brought on in the left rear. Again, there are no hits scored against the Greeks, who have scored six hits all told versus two by the Romans. 

Pyrrhus rolls 5 and brings elephants and phalangites up into his left centre. He turns the cavalry on his left wing and forms them up to attack the flank of the newly-advanced Roman infantry next turn. Attacks in the centre succeed, scoring two more hits.


The centre at the end of the fourth turn. 


The Greek cavalry break their opposites and outflank the infantry line.


Fifth turn Laevinus rolls a 1. He attacks centre and centre right, scoring two hits, and surprises the Greek cavalry by advancing three units of equites into his right rear wing to outflank the outflankers. A 4 from Pyrrhus sees him press on with attacks, scoring two hits - both on the Roman right centre - and brings up elephants, phalanx and levy phalanx to join the light cavalry that has been commanding the right centre since turn one. 


Some serious fighting in the central zones.

The Roman cavalry reserve arrives on table, and is about to wheel to the attack,


Sixth turn Laevinus rolls a 2. He attacks all along the line: his newly-deployed cavalry complete the trap, wheel in and score a hit against their opponents, but it is an all out attack, and they suffer a hit of their own in prosecuting it. Three other hits are scored in the infantry fight, and Rome begins to make some headway at last. Laevinus leaves his left centre refused, inviting Pyrrhus to advance. 

Pyrrhus rolls a 1, and does not move his right centre forward.  His attacks in the centre and centre right continue to bear bloody fruit. Three more hits are scored. 

The field after turn 7.

Seventh turn Laevinus rolls a 2 for command, but despite this scores a scarcely credible six hits. The cavalry attack shatters a unit - though the other survives the rout test - and four more hits are scored in the centre. 

Pyrrhus rolls a 3 and pulls the cavalry of his left back further to trade space for time.  He scores a hit in the centre, shattering a unit and causing the velites and a unit of demoralised cavalry to rout. With four units now shattered, Rome's morale incurs a permanent minus, making it more difficult to survive future morale tests. 

A stocktake shows Rome has to this point scored 14 hits with one shatter to the Greeks' 16 hits, four shatters and two routs. Both sides' centres are close to fully spent. The Greeks are still ahead, but Rome is clawing its way back into the contest.

Eighth turn Laevinus rolls a 6.  With both sides desperately trying to feed fresh units into the exhausted central zones, Laevinus scores three more hits. A shatter is saved by Pyrrhus rallying his troops. Roman hearts sink; Greek ones soar.  

Pyrrhus rolls a 2, scores three hits in the central zones and forces a fifth Roman unit to shatter. The Greeks soar some more!

Ninth turn Laevinus rolls a 2. He directs all his efforts into attacking with the infantry. Two hits are scored on Pyrrhus' zone, but the indefatigable Epirote king rallies them both. Two hits are scored on the Greek left centre, and with no one there to rally them, there are two shatters. Morale rolls are fine, and the Greek army holds.

Pyrrhus now rolls a 4. He also throws everything into the infantry fight, but at the key moment fails to score any hits, in some part due to a Favour of the Gods re-roll requested by Laevinus.

Tenth and last turn Laevinus rolls a 3. He presses the attack, two shatters are scored, and with Greek morale now also at -1, the Greek centre left routs. Pyrrhus still stands, and rolls a 3 for commands. He attacks the centre, and causes double hits. Laevinus attempts to rally the shatter, but dies in the attempt! Miraculously, despite being at -2, the Roman morale holds. 

With the tenth turn completed, the day is over, and the battle is a bloody draw, with both sides still having troops on the field.

In the aftermath, it is determined that Rome has managed a narrow victory by virtue of the Lost Battles handicap system. Pyrrhus has inflicted 71 points of damage to Laevinus' 70, but the handicap gives the game win to Rome.


******


This was a tremendous fight, and the brief description given here cannot do justice to the tension attending it. It seemed as if all was lost for Rome on more than one occasion, but the tenacity of the legions was something to see. 

So too the heroism of Pyrrhus - his rallying three shatters in two turns kept his army in the hunt for victory.

It was fitting in the end that the game came down to the last roll. Rome passing its final morale test at that juncture allowed the Roman player to take home the Washbourn Trophy (the piece of plasticware over which we shall henceforth fight!) on points.

It was a real thriller, and SP showed his mettle as a commander. He will be pressing hard again at our next battle. 


Related Posts Plugin for WordPress, Blogger...