Prufrock's Wargaming Blog

Prufrock's Wargaming Blog

Friday, April 6, 2012

Book Review - Scipio Africanus: Greater Than Napoleon


(Image taken from Amazon.com)

Basil Liddell Hart, the somewhat controversial British military theorist, published this biography of Scipio Africanus in 1926.  In it he narrates and celebrates Scipio's many achievements and, as the subtitle "Greater than Napoleon" intimates, argues that the Roman deserves a place in the foremost rank of the great generals of history.

"Scipio's battles are richer in stratagems and ruses - many still feasible to-day - than those of any other commander in history", he writes.  Study of Scipio's campaigns, he continues, is still relevant, "because the moral objective was the aim of all his plans, whether political, strategical or tactical".

As the above quotations are taken from the preface, it can be seen that Liddell Hart states his position early, and from it he does not budge.

The book covers the whole of Scipio's career, from his heroic intervention at the Ticinus through to his retirement from public life.  The author makes frequent use of anecdotes from Livy and Polybius - often quoting long sections verbatim - to tell the story of Scipio's rise.  All of the battles and campaigns are covered in some depth, as are his motivations, so far as they are known.  His actions, exploits and stratagems are explained, interpreted, analysed - and in some cases rehabilitated - in a engaging manner.

One of the interesting things about Liddell Hart's treatment of his subject is that it is not composed in isolation. Scipio's career is portrayed not just as an example of great generalship but also as an illustration of twin themes: that heroic failure is more celebrated that unleavened success, and that successful prosecution of war requires a keen understanding of the relationship between mental, physical and moral elements.

These are themes to which he returns elsewhere.

But if we put aside our reservations about didacticism, the narrative is clear and interesting.  Aided by helpful geographical and battle maps, the wargamer is able to clearly envisage the events described, and I found it gave me a better understanding of the events, particularly those in Spain, than I received from either Lazenby or Goldsworthy.  As mentioned before, he uses a lot of direct quotation from Livy and Polybius, so a more learned (or more cynical) man than me might say "you may as well just read the original texts"; but as an interested amateur I appreciated the way in which he weaves his own commentary into the narrative, giving a good sense of the strategic significance of the events described and providing a welcome overview of the course each campaign took.

I found the book complements other sources on the era, and as long as the author's biases and didactic purpose is taken into account it provides a useful and readable account of Scipio's career.  While a lot is made of Scipio's character, there is enough focus on the military exploits to give the wargamer plenty of material to work with.

In short, if you are interested in the man and the era and can find a cheap copy I would recommend it, but I do caution against taking Liddell Hart's conclusions wholly at their face value.

Basil Liddell Hart online: 

The Strategy of Indirect Approach

Why Don't We Learn From History?

Monday, April 2, 2012

Pyrrhic campaign: Asculum, 279BC

This is the second part of the Pyrrhic campaign that Luke and I fought out today.  Pyrrhus had died at Heraclea (see here  for the report), but we sailed blithely on, conveniently ignoring the fact that his army would've broken up and gone home...

Greeks, with a fighting value of 74:

5 units of average and 2 units of levy phalangites (18,000 men)
7 units of average and 1 unit of levy heavy infantry (18,000 men)
1 unit of elephants, and one of light infantry (20 elephants and 3000 men)
2 units of average light cavalry (2000 horse)
1 unit of veteran and 3 units of average heavy cavalry (3500 horse)
Average leader, a precocious Alexander perhaps?

Romans, with a fighting value of 80:

13 units of average legionaries (26,000 men)
2 units of levy light infantry (8000 men)
5 units of average heavy cavalry (5000 horse)
Average commander (Publius Decius Mus), uninspired leader (Sulpicius)


The Greeks deploy their main cavalry force on the right and have strong infantry centres.  Rome looks to win the cavalry fight on their own right and hold on the left.  The Romans err in not activating the cavalry of the left separately and securing their left wing. 


Elephants and light infantry in advance of the Greek centre left.


Equites deploy with the infantry of the left centre.


(Very!) Young Alexander of Epirus out for revenge.


The lines engage.  The Roman left is weaker than the opponents they face, so a speedy win on their own right is required.


Alexander double moves his men forward to trap the equites behind the Roman infantry line and reduce their room to manoeuvre.


The Greek right exerts tremendous pressure.


The Roman right shatters the enemy cavalry, but at a cost of some disorder to their own ranks.


Both sides' lefts are beset by superior forces, but the Greek attacks have more sting.


The legionaries begin to succumb to the spears of the enemy...


The last line on the left.


Charge and...


The Roman left breaks!  They rout, but the centre holds firm.


The Roman right tries to emulate that of the enemy, but without the same degree of success.


It's now the turn of Decius and the Roman centre to take the brunt of the Greek attack as the phalangites look to roll up the line.


Sulpicius breaks the Greek left in turn!  Again, the Greek centre refuses to panic.


The Roman centre with enemies on three sides.


The elephants show no mercy.


The Roman right turns its attention to the Greek centre in a classic 'revolving door' clash.  Both centres finally give way, but without the respective right flanks hold.


The victorious rights cross as darkness falls.


Sulpicius tries one last attack, but without success.   The remnants of both armies return to camp, having fought each other to a standstill.

__________________________________________________________________________________


Well, after ten turns of carnage both sides still had forces on the field, so a draw was declared.  The victory points told a different story however - a narrow victory to the Epirote prince, 102 to 90.  A fine battle, and a thoroughly deserved victory to Luke and his Greeks.  Sadly, due to my work commitments in the morning, we did not have enough time to fit in the third of our trinity, Beneventum.  We may save that for another time.

All in all, it was a fantastic day's gaming.  Lots of laughs and plenty of moments of high tension as fortunes ebbed and flowed.  Many thanks to Luke for making the trip down, and will look forward to doing it again as soon as possible.

Pyrrhic campaign: Heraclea, 280BC

Here are some shots from the Pyrrhic campaign Luke and I played today.  The plan was to play Heraclea, dice for force changes based upon the battle, then play Asculum, dice again, and finish with Beneventum.

Reported here is Heraclea (280 BC), which sees four legions and allies under Laevinus challenge Pyrrhus and his men.

The Roman army, with a fighting value of 74, is comprised of:

13 units of average legionaries (26,000 men)
2 units of levy light infantry (8000 men)
5 units of average heavy cavalry (5000 horse)
Uninspired commander, Publius Valerius Laevinus.

Pyrrhus' army has an FV of 81, and is comprised of:

1 unit of veteran, 9 units of average, and 1 unit of levy phalangites (23,000 men)
1 unit of average heavy infantry (2000 men)
1 unit of average light infantry (2000 men)
2 units of elephants (20 elephants and 2000 men)
4 units of veteran and 1 unit of average heavy cavalry (3000 horse)
1 unit of average light cavalry (1000 horse)
Inspired leader, Pyrrhus of Epirus.

Both armies are surprised, meaning that they can only deploy four units per turn, and Rome moves first.


The Roman advance guard and their Greek counterparts in the middle distance.


Elephants and cavalry find themselves facing legions.  Where's that phalanx!


Pyrrhus himself.


Ah, here they come...


The legions advance in a solid mass.


The lines solidify.


Engagement of the centres, but both wings are still out of contact.


Pyrrhus' novel tactic of leading off with light cavalry in the centre pays dividends: they skirmish with irritating effectiveness!


By turn 5 the Roman centre is entirely spent, with one unit shattered, as the light cavalry, elephants and phalanx combine to inflict hit after hit.


Despite the furious fight in the centre, elsewhere the engagement is still tentative.


The Roman centre withdraws to buy time and get the trairii into the line.


The Greeks advance in the centre and on the right.


The Romans attack on the right, but the battle is Pyrrhus' to lose...


Oh oh - look out!  The Epirote adventurer dies in an ill-advised rally attempt (ill-advised only because it didn't succeed!) and then Luke rolls a 1 for morale, which sees most of his army flee the field, including the hitherto victorious centre.  Perhaps Pyrrhus should have exchanged cloaks with someone?


Fortuna takes a hand, and the Romans breathe again!


The Greek right escapes to fight another day, but the phalanx of the centre left is trapped, and butchery is about to begin.


Steady boys, steady!


And from an almost certain defeat comes Roman victory, proving that the enemy scoring three ones in a row at the right time can rescue even the most dire of situations!

The end result was major victory to Rome, even though they only shattered one unit!  Pyrrhus' death undid a formidible position, and it was a very lucky break for me.

It was said that Pyrrhus did not defeat Rome, but that Pyrrhus defeated Pyrrhus...

As a result of this battle, the forces for Asculum were slightly changed - the Roman commander was promoted to average, and he was given an uninspired sidekick to lead the cavalry.   The Greeks lost Pyrrhus of course, had two of their Macedonians phalanx units replaced with levy Italians, lost an elephant unit, and had two units of veteran cavalry downgraded to average quality.

(Go here to see Asculum)


Saturday, March 31, 2012

Pyrrhic campaign battle maps: Heraclea and Beneventum

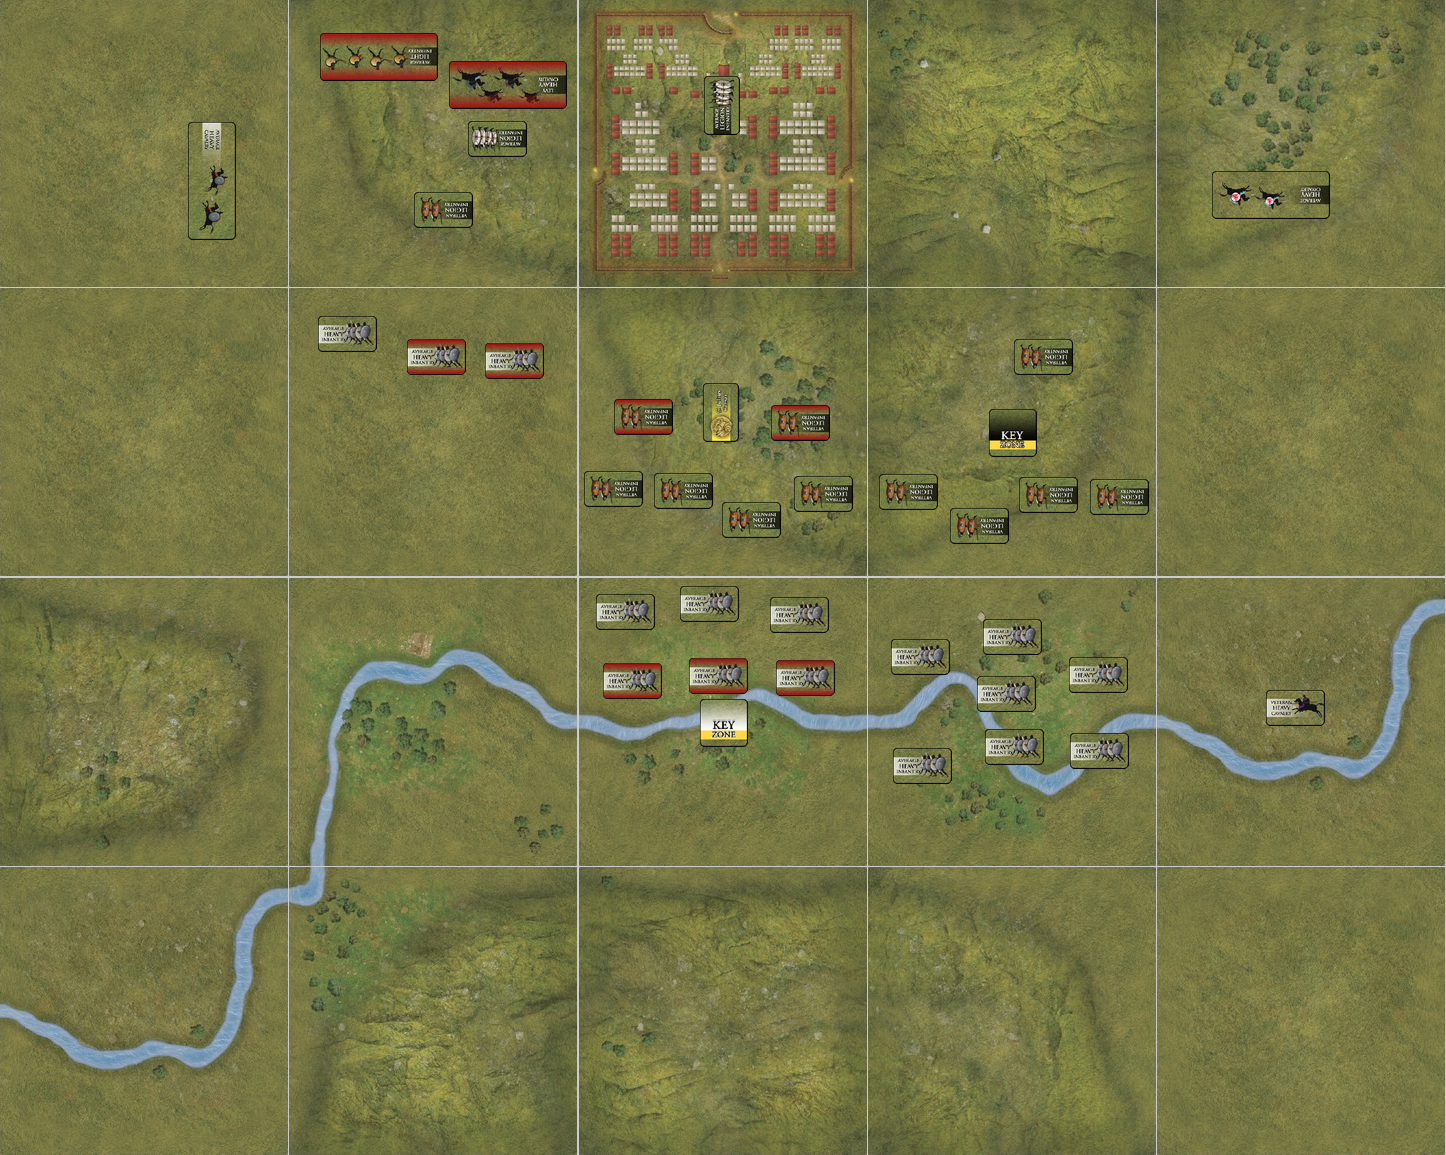
Here are two battle maps I've put together for a Pyrrhic campaign that Luke is coming down for on Sunday (images are taken from the Lost Battles VASSAL module).

This is Heraclea, with the Romans entering from the bottom of the board:


And this is Beneventum, with the Romans beginning in their camp: 


These battles will bookend Asculum, which will take place on a flat plain.  In both cases the terrain is of course highly speculative, but a wargamer has to be prepared to make the odd executive decision at times!

Wednesday, March 28, 2012

Bibracte.

The other night my VASSAL buddy Gorgoneion and I got together online for the first game of our new Lost Battles campaign.  We are playing Bibracte, Sambre and Pharsalus in series, scoring points based on the results of each battle (draw, narrow victory, clear victory, major victory, etc).  Whichever of us has the most number of points accumulated at the end of the third battle wins.  These campaign rules included in the boardgame are a nice addition to the system.

Anyway, Gorgo is taking Caesar's side, so it was me, as the Helvetii, who kicked things off.

We used the historical set ups as neither of us had played this scenario before and to reduce time online.  Even when using VOIP software (google talk), it still takes us two to three hours to get through a game at the moment.

Caesar's account of the battle can be found in his Gallic Wars which is online here.  His description begins in book 1, chapter 24 and following.  The Lost Battles scenario gives the Romans a fighting value of 70 versus the Gauls' FV of 55.  Caesar is only rated an average commander in this clash, but as the Gauls have no commander at all, commands will be at a premium for them.

Turn 1:

As we jump into Caesar's narrative, we find the Helvetii have been harassing the Roman column, so upon gaining the next hill Caesar sends his veteran legionaries to defend the approaches and orders the cavalry to hold the left and right flanks.  His newer recruits are still busy preparing a fall-back position, represented here by the camp, so they are undeployed at this stage.


Board after the first turn.

Turn 2:

The Helvetii advance their left and centre zones to engage Caesar himself and to threaten the cavalry.  Elsewhere the Gauls remain in place.  Caesar pulls back his cavalry and attacks with his veterans in the centre, and these score one hit.  He orders one veteran legionary to double move forward from the camp and prepares the rest of his undeployed troops for action. 


First blood to the Romans.

Turn 3:

The Helvetii advance on their left and press the retreating Roman cavalry.  They launch an attack in the centre but are unable to do much more than inconvenience the legionaries.  

Caesar attacks with no noticeable success in the centre, but his cavalry give the too-eager Gauls on the right a bloody nose as they close on the hill.  More men are shuffled across to reinforce his right flank, but he refuses to be drawn off the high ground on his left.  

(Caesar's central zone, being outflanked on one side, is able to make five attacks rather than the usual four, which will likely prove a significant advantage over time unless the Gauls can dispose of the Roman right quickly.)


Pressure on Caesar's right.

Turn 4: 

The Helvetii begin to make a little headway in the centre, and their assault on the left begins to gather steam as the cavalry are thrown back and the light infantry are disorganised by the assault.  Encouraged by this result, the remainder of the heavy infantry on the right charge forward into contact with Caesar's left centre. 

Caesar calmly reinforces his right with more legionaries from the camp, and they maintain their front with an effective discharge of pila from the heights.   His men continue to attack with purpose in the centre, inflicting a double hit at the cost of a spent unit of their own.


Mutual attrition takes its toll.

Turn 5:

The Gauls all-out attack against Caesar's zone and manage to score two hits on the Roman left centre, and another on the Roman right.

The Roman response however is brutal: Caesar's men attack with devastating effect all along the line, shattering two of the Gallic units in the centre and another on the right.  Gallic morale holds firm for now but it is wavering.


The Gallic line is grievously afflicted...

Turn 6:

The Helvetti are now faced with a decision: do they call off the attack and make a stand on the hill behind them, or do they risk a final charge?  A piecemeal withdrawal will expose their fellows in the line to overwhelming counter-attack, so without the commands available to pull back the entire left, everyone elects to attack once more.

As if to reassure the Gallic commander, the surge on the right is a great success, and the Romans almost buckle under the ferocity of the charge.  Three hits are taken, but despite this the line holds. The assault on the left also scores a hit, but Caesar's zone escapes unscathed due to the exhaustion of the attackers.

Taken aback by the intensity of the offensive, the Romans can do nothing but hold as missiles fall wide and swords fail to find their mark.


The Gauls press the assault with renewed vigour.

Turn 7:

A lack of commands again prevents anything fancy from the Gauls, so they just line up and charge yet again.  They appear to have given of their all though as only one hit is scored, by the cavalry on the left.  The Romans are spent in two zones but - agonisingly - none of the attacks are able to cause a shatter.

Caesar's genius now reveals itself: his remaining fresh legionaries come down off their hill and sweep the Gallic centre away.  Their irresistible charge shatters two units, and the rest run with them.  The Gauls hold elsewhere, even when another unit is shattered on the left, but the end cannot now be far off.


Caesar leads his men down off the hill to put the Gallic centre to flight.

Turn 8:

Although their situation is precarious the Helvetii manage to rouse themselves for another effort.  With the right centre they score a double hit, shattering two units of veteran legionaries;  on the left the cavalry shatter a unit of average legionaries and panic the Caesar's cavalry and light infantry.

Caesar's men score one hit in return while they reposition themselves for the final assault.


The Gauls are not done yet.  Three units are shattered, and a further two rout!

Turns 9 and 10:

The Gauls manage to inflict one more shatter on the Roman right before, but they are soon taken in the flank by Caesar himself, and a double hit shatters two units at the cost of an all-out attack.  Under this final assault the remaining Gauls break and run, leaving Caesar in possession of the field. 

The Romans have won a hard-fought clash on the final turn, but the VP count will be interesting.


Caesar's men launch the final attack.

Victory Points:

Rome: 9 x shattered, 8 x routed, 1 x withdrawn gives the Romans 90 VPs.

Helvetii: 2 x V shattered, 2 x A shattered, 1 x L and 1 x A routed, 8 x V spent is 67.  The handicap is 35, so the Gauls score 102, which is 2 points shy of a clear victory under the handicap system.  

Gorgo's final all out attack to score a double hit was the difference between a narrow and a clear victory, which just goes to show how small the margins are in Lost Battles.

So the campaign result is 4 points to the Helvetii and 3 points to Caesar which represents a good start for the Gauls.

Thoughts:

It was a fantastic game.  There was a lot of tension throughout and the advantage swung from one side to the other.  The 'Favour of the Gods' chit had a satisfyingly influential impact, and really does add to the experience.  The Gauls generally suffered for want of commands, especially when it came time to think about withdrawal, but the tactic of attacking on the left - nicely countered by the Roman cavalry pulling back - saw the Roman centre getting five attacks in per turn instead of the usual four, and that was crucial in the long run.  The attack on the left was a qualified success in the end, but the price was high, and the Gauls may have been better served by engaging both central hill zones from the outset and saving a flank attack until the reinforcing legions were committed in the centre.  Plenty to think about, but the Gauls will be reasonably happy with their four points, though they will feel they could have made more of their mid-game position than they did.

Caesar's daemon played a fine game, maximising his attacking opportunities, remaining cool under pressure and all-out attacking with a precision that had me applauding.  Judicious play pulled him back from suffering a potential blow out, and I'm very much looking forward to two more battles against such a canny opponent.  The biggest difficulty will be finding the time to meet up and play!


Related Posts Plugin for WordPress, Blogger...