Step one: buy a 100 pack of plastic screw covers at the hardware store (¥380).
Step two: divide them into two sets, drilling one hole in the first set of forty, and two holes in the second set of sixty.
Step three: cut thin wire into lengths that approximate the arrow and javelin sizes for the scale you are using.
Step four: insert these lengths into the holes and glue in place, taking care that the screw covers will sit flat.
 |
| Screw tops drilled, some with 'javelins' inserted and glued. |
Step five: take long sip of beer, and another for good measure.
 |
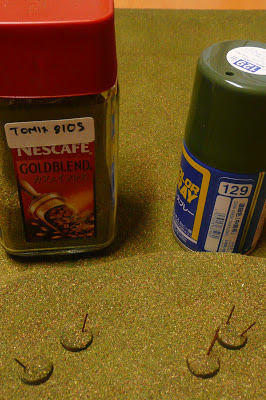
| The tools of the trade... |
Step six: spray paint all in a suitable dark green.
Step seven: paint javelins / arrows brown.
Step eight: apply flock, avoiding getting it on the javelins themselves, as far as possible.
 |
| Flock and spray paint of choice. |
Step nine: put on table as needed.
 |
| In theory... |
Step ten: have another sip of beer (it was the holiday season, after all!).
So there you have it, markers in nine easy steps - or seven if you omit the beer and the playing!
I was not sure how they'd look, but they ended up being functional, easy to handle and durable. They were easy to see without sticking out like a sore thumb, so they were about what I wanted in a marker.
 |
| Done! |
Any comments or suggestions for improvements most welcome.
quite clever, and no reason why you need to stop at only 2 arrows/disruption points.
ReplyDeleteSimple and effective, and so much better than the beads and dice I use. I think I'll need to snag this idea. Thanks for sharing!
ReplyDeleteThanks James, and please do, John. I'll be glad if it's useful!
ReplyDeleteI was so impressed during the game, I've decided to make my own variant (using Shapeways 3-d printing) - 6mm diameter Macedonian shields that will have a pre-cast hole for one or two javelins. Don&t know how they wll tun out, but they'll be cheap enough to experiment with.
ReplyDeleteWill look forward to seeing how they turn out, Luke.
ReplyDelete