Pages

Wednesday, December 28, 2016

Denmark Strait

Today saw a spot of naval action as Pat H. made the trip down to house Prufrock for a day of gaming. First up was the boardgame Flying Colors, in which Pat gave me an absolute thrashing at the Dogger Bank, 1781. He broke my line, killed my admiral, sank two of my ships and utterly demolished my poor Dutch. I think I need to work on my tactics!

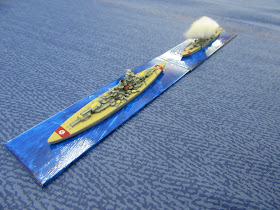
For the second game we tried out Naval Thunder, employing some newly launched vessels from out of the Navwar yards.

Prinz Eugen and Bismarck observe the enemy.

Long range shot from Bismarck immediately disabled Hood's main turret forward, which gave rise to hopes of a quick ending, but Hood was made of stern stuff today. Events soon settled into a routine: Hood and Prince of Wales would bracket Bismarck with shell; the German monster would pound Hood; her assistant Prinz Eugen would worry Prince of Wales.


Hood and Prince of Wales under fire.

As flood and engine damage slowed Hood down, she switched her fire to Prinz Eugen.

Prinz Eugen herself caused an ammunition explosion on Prince of Wales with a lucky shot.

Prince of Wales fighting fires.

Hood then returned the favour, setting Prinz Eugen temporarily ablaze.

Prinz Eugen gets a taste of her own medicine.

A the ranges close, Prince of Wales' fire on Bismarck begins to find its mark more regularly. There is a bridge hit; flooding; explosions in secondary armament. Hood abruptly turns away from the fight, but even so Bismarck is forced to switch fire from the Hood to give Prince of Wales something to think about.


Both German ships continue to fire on Hood. Finally, she sinks beneath the waves. But Prince of Wales has used this time to absolutely pound Bismarck.


Last sighting of the valiant Hood.

Prince of Wales is now on her own, but it may not matter: Bismarck is in difficulty. She is flooded, on fire, and a main gun turret is out of action.


Prince of Wales has Bismarck's range.

Bismark attempts to run, but, increasingly waterlogged, it becomes apparent that she must sink Prince of Wales or be sunk herself. Accordingly, she turns back to the fight. Meantime, Prinz Eugen, who has been attempting with some success to distract Prince of Wales, closes to torpedo range.

Bismarck survives another barrage of hits, but Prince of Wales must be close to her limit as well.

Eugen fires and awaits the results of her handiwork.

Torpedoes away...

The crew of Bismarck holds its collective breath...

And the torpedo strikes. Prince of Wales breaks in two!

The Germans have won the day, but it has been a painful fight, and there is a lot of work needed to stabilise Bismarck for the necessary run back to safety and repair. She is just ten hull points off sinking; another broadside would likely have been the end of her. Prinz Eugen is hurt but in comparatively good shape. It will be a long journey home, and they will be the hunted....


****


Flying Colors I already know and like, but I thought Naval Thunder gave a cracking game. It is fairly fast moving, and although it took a while to get through the turns, it was a first game, and the ships involved were tough old nuts to crack. I'm very keen to get more ships painted for this, and will need to figure out the rules a little better (I've already found a couple of critical things we (more likely I) did wrong, and once I've done this I'll probably do a fuller review.

It was a rush to get the ships finished in time (and the basing is still of the temporary variety), but necessity is the mother of invention, and the urgency helped me to get past my 1/3000 painters block and just get on with it.

Monday, December 26, 2016

Caesar at Munda

And now to a battle report. Munda, Caesar's last victory, was the scenario. As usual, the rules used were Lost Battles, but I did tweak the scenario slightly.

Caesar's account gives the impression that he was trying to tempt the Pompeians to come down off their hill onto the plain, while the Pompeians for their part were trying to induce Caesar to attack them in their hilltop position.

To reflect the tension over this, I would dice each turn until one side gave in and advanced. I also decided to dice for other potentially critical moves, such as the timing of cavalry charges on the wings.

Finally, I downgraded Caesar from a brilliant general to an inspirational one because he didn't seem to do anything particularly tricky at Munda except for nearly lose. The two armies were therefore very closely matched, with Caesar's just superior at a fighting value of 90 versus the 83 of Pompeius Jr. and Labienus.


Turn 1: 


Deployment, as described by Phil Sabin in Strategos II. Caesar has all-veteran legions; Gnaeus and Labienus have a mixture of average and veteran. Caesar has the edge in cavalry, but the Pompeians the edge in position.


Turn 2: 


Gnaeus adjusts the positioning of his wings, but does not advance off the heights. Bogud takes his Numidians to the far right wing. Caesar brings all the troops forward, with unrulier elements shouting at their opponents to come on down and fight.


"Come down here and fight!"

"How about you come HERE and fight!"

Turn 3: 


Gnaeus and his men remain on the hill. Caesar's also remain in place, continuing to indulge in 'banter' with the enemy.


Turn 4: 


They've had enough. Gnaeus senses the dissatisfaction in his ranks and brings his men down off the hill. The cavalry wings remain in place with one legion to reinforce the right flank and another to stay on the hill and support the left.


Caesar gleefully attacks, and a third of the Pompeian legions are spent in the first onslaught.


Turn 5: 


The Pompeians recover from the first attack and strike strongly at the Caesarian centre. Elsewhere, however, they make no progress.

Caesar hits Gnaeus' command again, putting him in a precarious position and in need of reinforcement. On the right, Bogud advances with his horse. Although the attack is against Caesar's better judgement (a 6 is rolled in answer to my 'will he or won't he?' question), he drives off the light infantry, so the great man is not unhappy.


Turn 6: 


The Spanish cavalry take the attack to Bogud, hitting the Numidians in a powerful countercharge. Disaster is avoided only by Bogud's personal intervention. Gnaeus, given the fragility of his position, pulls his command back onto the hill. Not only will it buy time and space, but it will break up the continuity of Caesar's infantry line and so prevent him from being able to easily relocate reserve legions to needy areas.

Caesar follows up, but is forced to leave one legion behind as a reserve. The fighting continues along the line.


Turn 7: 


The cavalry strikes Bogud again. Once more he rallies, but the attack on that wing is proving to be a drain on Caesarian resources. In the centre, the Pompeians push, and, catching the veterans at a bad moment, maul them badly. One unit shatters, and Caesar is obliged to find reserves for two places at once.


Turn 8: 


Inspired by the success of the centre, Gnaeus' command also falls upon the enemy with renewed vigour. Another unit is shattered in the centre before the reinforcements can move into line, and Caesar is now under genuine pressure. Bogud is again hit, but this time cannot rally his men, and they too are now in a precarious state.

The veteran legionaries of Caesar's centre-left restore calm by shattering a unit under Labienus' command. Seeing this, and knowing that the Pompeians have weakened their right to strengthen the centre, the Gallic cavalry of the left judges it an opportune moment to engage. An all-out-attack sees them clear the light infantry from the foward slopes of the hill, but it is harder going against the Spanish cavalry.


Turn 9: 


Following the loss of his lead unit (and the example of Gnaeus), Labienus also pulls his command back onto the hill. On the opposite end of the infantry line Gnaeus scores another hit against Caesar, who must commit yet another of his fast-dwindling reserves.

The Spanish cavalry on both wings now turn their position to account: a double hit on Bogud's zone sees him killed and his command destroyed; while on the right, the cavalry on the hill perform similar feats, shattering the lead Gallic unit and forcing the other to flee.

The tide has surely now turned in favour of the Pompeians.

In such a desperate situation, Caesar is heard to say that he must fight now not for glory, but for his life. The men respond, shattering one of Gnaeus' units, and another in the centre.

Bogud hit and killed.

The Gallic cavalry swept away.

Desperate times for both sides, but Caesar has lost his cavalry.


Turn 10: 


The Pompeians seize the moment, shattering two more units, in Caesar's zone and (again) in the centre. But Caesar's men are veterans, and do not run.

The cavalry comes down off the hill to engage the light infantry, and the other cavalry outflank Caesar himself.

The Caesarians strike back by shattering two units in the centre and centre-left. Suddenly fearing a rout, the Spanish cavalry skedaddle, easing the pressure on Caesar's zone somewhat.


(In normal Lost Battles the game would be up after ten turns, but this is not normal Lost Battles, so we continue.)


Turn 11: 


Troubles multiply for Caesar: three shattering hits are inflicted on his centre. His veterans are too stubborn to rout, but he can muster nothing in return.


Turn 12: 


The Spanish cavalry shatter the light infantry. The coup de grace sees the centre give way, and all, for Caesar, is darkness.


And in this manner was Caesar defeated, hunted down by his enemies, and slain.

Caesar's last battle indeed.


Sunday, December 25, 2016

In the wargaming life, is there anything better?

Is there any greater reward for a wargamer than time to oneself on Christmas eve, with the children asleep, the house quiet, work done for the year, and a chance, beer in hand, to set up a game?


Finishing the painting of an army may perhaps just pip it, but it's a nice feeling.

Compliments of the season to you all!

Thursday, December 22, 2016

Painting spree: Crusaders and Thebans

With 2016 winding down there has been a flurry of hobby room activity as I frantically try to improve my painting total for the year.

Crusaders of the Miniature Wars range from Italy:


Easy to prep and nice to paint. Spears were a little spindly, but life's too short to bother replacing them with wire (MMV, of course).

Xyston Thebans:


A bit of a mission to prep, and I had real painter's block with these. It was the shields that were the problem; I just couldn't paint a satisfactory club for love or money. In the end, I decided to mix symbols and just get them painted. A few snakes, a few goblets, a few minotaurs, some clubs that were less atrocious than others, a few plain coloured, and there they are. I'm not very happy with them but a bit of flock and a game or two and I'm sure they'll grow on me.

Saturday, December 17, 2016

Delving into the lead pile.

After work this afternoon my lovely wife told me to go hide away in the hobby room for a while and have some time to myself.

With a game approaching in a couple of weeks and realising (not for the first or likely the last time in my life) that I don't have as many phalangites painted up for it as I'd like, I pulled out a storage box or two and took to the contents with file and glue.

Naturally, that made me think of other related lead pile denizens. The Achaemenids came to mind. Would it be worth, I wondered, painting some of them up for Successor battles, as Redzedz did for Simon Miller and his upcoming Ipsos game?

Four hours later, the hobby room was strewn with bits and pieces.


Old Glory Persians (and Xyston, almost forgot!)....


Xyston phalangites....


Spartans...


... and Thebans.

It's nice to have a few more things prepped, but already I'm starting to think I won't get all of my unpainted material done in this lifetime!

Thursday, December 15, 2016

WIP

It's been some time between painting posts, but with the New Year break approaching a light has appeared at the end of the work tunnel and instead of the grim struggle to get through each day, week and month dominating one's thought, there is a daily-strengthening interior voice that goes something like 'oh, good, game day is approaching!'

To that end, I've been clearing up a few odds and ends.

I tried to clear up about a hundred Celts, but that turned out to be beating a fragile head against a plaid wall, and I thought, to paraphrase Robert Plant, 'little Gauls, I'm gonna have to put you down for a while.'

Thankfully, there were a few Miniature Wars (ex-Strategia-e-Tattica) Crusaders in one of the primed boxes to get to grips with. These will do double duty as Normans (I know, a little dubious, but I don't have any other figures that can pass for Norman foot).


Another night or two should see them finished, and the painting tally may end up being added to before the year is done after all.

Monday, December 12, 2016

'Armies of the Middle Ages' found!

Thanks to Cyrus (of Satrap Miniatures blog fame) and his recent kind comment here advising me to check out Abe Books, two essential wargaming tomes that I'd given up hope of getting my hands on (for a price I could kind of justify to my wife and kids, at least!) have been found, and are making their way to this part of the world.

The WRG books are so good that I don't know how I ever managed without them. In fact, looking at my early painting efforts, the truth is I didn't manage, and I have been slowly repainting those first figures ever since.

I don't quite have the full set yet, but as the two I still need have been reprinted, it is not the impossibility that it until recently seemed.


Now to finish off a few other things so that I can clear the painting table for business.

Tuesday, December 6, 2016

Hundred Years War books

About a year ago now I picked up a couple of armies for the Hundred Years War from Black Hat Miniatures. It's not really my area, and my usual method of sorting myself out (that is, 'consult appropriate WRG Armies and Enemies books') will not work, because finding a copy of the Armies of the Middle Ages is a bit of a tough ask.

In an effort to make some progress I decided to ask the good folks at the Society of Ancients and more good fellows on TMP for some assistance in choosing books to help a brother gearing up to paint.

After some very helpful suggestions, I've ended up plumping for the following:

The Armies of Agincourt,  The Armies of Crecy and Poitiers, French Armies of the Hundred Years War, The Armies of Medieval Burgundy - all Ospreys - and a one-volume history of the war, The Hundred Years War: The English in France, 1337-1453, that was recommended by a kind chap on TMP.

There have also been some excellent internet resources suggested, and I'll link to them now so that I don't forget, and because they might be useful for others as well. Thanks are due to Duncan Head and Anthony Clipsom for suggesting these.

Period illustrations are here ("Armour in Art" section as well as manuscripts) and on Druzhina's site here and, for example, here.

Flags are here and can be used for coats of arms on surcoats and shields.

Historical articles can be found here, and include some famous names.

The Internet Achives site has downloadable versions of Froissart, and I must particularly thank Jarrovian on TMP for bringing him to my attention.

Books to look for in future to help with the painting include Funcken's Age of Chivalry 1, the Almark Agincourt book, and Friar and Ferguson's Basic Heraldry.

For the history, Jonathan Sumption's series comes highly recommended, as do a couple of other books, The Agincourt War and The Crecy War, by Alfred H Burne.

So that gives us quite a bit to go on. The Book Depository order should be here in time for Christmas, so, all going well there will be the chance for a bit of learning to go on!


Tuesday, November 29, 2016

Truth, Lies, Sources (and Videotape).

I was looking the other day at a post on Sean Manning's Book and Sword blog about Livy's account of the battle of Magnesia, which Sean reads as a clear example of 'suppression of the truth being equivalent to spreading a falsehood'.

"Livy", he asserts, "has cut something out of his sources and tried to hide it."

Invoking Appian as the control (it being accepted that both writers read and used Polybius, whose account is no longer extant), the post goes on to enumerate the aspects Sean feels Livy deliberately omitted, with the motivation for these omissions being that Livy was a Roman writing for a Roman audience who would not want to include things that showed the Romans in a less than favourable light.

I'm not entirely convinced by the argument myself. I don't think that Appian is as reliable a control as he is asked to be, and nor do I think that the items supposedly suppressed show the Romans in a particularly bad light, but what I do find particularly interesting are the modern parallels to this situation.

Just ten days ago there was a fierce rugby match between Ireland and New Zealand. Two weeks prior to it, Ireland had beaten New Zealand for the first time ever in their 100-odd year history of playing rugby internationals. The New Zealand All Blacks do not like losing, and the rugby world geared up for an exciting rematch.

What followed was a bruising encounter. The All Blacks won the game by the most ancient of methods - ie, scoring points on attack and denying their opponents from doing the same - but they also had men yellow carded for dangerous or illegal play.

After the match, the narratives in the two countries tended to be quite different. In New Zealand newspapers the All Blacks had kept cool under pressure despite having been harshly treated by a referee who overlooked suspect Irish play while penalising every minor little nothing the All Blacks did. From the Irish perspective the All Blacks were cynical thugs who would stoop to any low behaviour to avoid losing - including targeting the head in tackles, no doubt in an attempt to maim - and who used their aura to intimidate a refereeing team that signally failed to police the game as impartially as right and justice demanded.

In short, both sides took a shared set of events and interpreted them very differently. What from one perspective was an heroic tackle that unfortunately slipped up a little high was, for the other, a blight on the game. What for one side was a score that rewarded skill and perseverance in the face of an indomitable opponent and refereeing inconsistency/incompetency was, for the other, a bitter example of referee blindness and institutional bias in favour of a higher-ranked team and a scarier looking jersey.

But in New Zealand two voices went against the prevailing attitude. One used the high penalty count and and lack of forward dominance to mount his familiar hobby horse in a tirade against the New Zealand captain and the New Zealand administrators;  the other dared to say that the All Blacks' tackling was a a disgrace, but as his last name is Reason (and rumour has it that his father is English), his column could be safely disregarded as mere trolling.

I have exaggerated a wee little bit, but the way that these voices interacted after an event just ten days ago and which is on video for all to see seems to me to be an excellent example of just how difficult it is to come to grips with key events and motivations when they are clouded by one's own stake in the result.

It is from sources akin to these for our Ireland versus All Blacks game that Polybius, Livy, Appian et al had to prepare their own histories. They had no youtube go go back to, and so had to work with a shared set of 'facts' - "We lost/won" - the writings of officials, official historians, and the folk and campaign histories that resulted.

On the whole I think the ancient historians did pretty well. Some are more Daily Mail / Guardian than others, but we've got a lot to be grateful for, and I think we need to be cautious of being too dogmatic about our assumptions of bias because in the end we can't be entirely sure what the biases are.

After all, even New Zealand has its Mark Reasons!

Thursday, November 24, 2016

Terrain Boards: Pydna scenario

To test out the look of my new terrain boards post spray paint I quickly set up the Lost Battles Pydna scenario. Both sides begin the battle surprised, so only a fraction of the armies start on table.


I think it's quite a big improvement over the unsprayed version. The colour matches my basing style quite nicely, and the whole is getting closer to how I was envisaging it would look once finished.

There's still a bit more to do, but we're getting there.


Tuesday, November 22, 2016

One Hour Wargames with the boy

The boy and I were home together on Sunday afternoon and to get him away from Minecraft we set up a quick One Hour Wargames scenario.

He picked eight stands of Vikings and I eight of Normans, and we went at it. His mission was to capture my castle by hook or by crook. He wielded the measuring stick with determined air and when given his choice of dice from the box took out a red one that happened to have 12 sides on it.

After about four turns he had crushed my Norman knights and their assorted hangers on.

As he rushed for the castle, William the Conqueror himself sallied forth uttering cries of war and threatening to hold off the boy's Vikings single-handedly. It was not to be, however. William fell, and the castle was sacked by the wolves of the sea.

The boy then went back to Minecraft!


Tuesday, November 15, 2016

More Modular Terrain

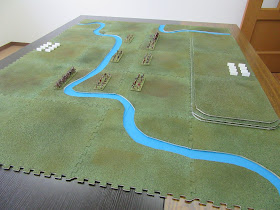
Further to my last post, I was lucky enough to scrounge a few more carpet tiles which allowed me to extend the modular terrain system to include rivers. Based on Lost Battles, I've cut out five main river terrain patterns, with some directional variation within that (two left-to-right and then two right-to-left, for example), and now have enough for all scenarios except Sellasia, but I'll probably prepare for that too, just in case.

Here are a couple of sample battlefields as laid out in Lost Battles  with a couple of sample units to show figure scale.


The Sambre

Crimissos

Chaeronea
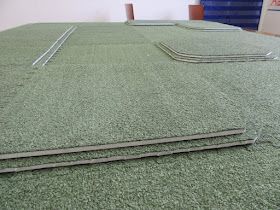
I still have to do some spray painting on these and I'm wondering whether to add another layer to some of the hill tiles to make them stand out a bit more. I'll see.

Obviously, this terrain is very stylised, but I don't mind a bit of stylisation in my games, and I think this set would also work quite nicely with other projects I have in mind when a greater emphasis on realism in the terrain might not.

Anyway, am feeling quite enthusiastic about how this has turned out. There's still some work to do and decisions to be made, but to have acceptable tables makes a huge difference, and should see a few more games played at house Prufrock in the coming months.

Sunday, November 13, 2016

Modular Terrain


For a while I've been gearing up to make a modular terrain set using interlocking carpet tiles. The difficulty has been in finding carpet tiles in the quantities needed, but after stripping the local store of another stack last weekend, I decided that I had enough to proceed.

The main impetus behind this project is Lost Battles. I'd seen the terrain that Phil Sabin and friends use for their demonstration games and decided that that was the kind of thing I'd like to go for.

With a day off today and no family activities planned, it was time to take the first step, which was to make the hill tiles.

After reserving twenty-four tiles for flat terrain (Lost Battles uses a 5 x 4 configuration, but I wanted to be able to do 6 x 4 for games with other rules), I had twenty-nine left to use for hills and other things.

A couple of hours of hacking away at them with a hobby knife resulted in thirteen tiles that can be arranged in various ways to create any of the Lost Battles scenarios.


Unfortunately, I now have to pause, because another fifteen or so tiles are needed to make the river sections.

If I can't track down any more carpet tiles I'll have to look at buying some flexible plastic rivers such as these instead, so if anyone has personal experience of such items and could recommend other manufacturers, please let me know.

Cheers all, and hope it has been a good weekend for everyone.


Wednesday, November 2, 2016

Flying Colors: Cape Ortugul scenario

The last couple of weeks have seen a re-acquaintance with play-by-email boardgaming with my old mate Andrea, whom I have gamed with on and off for about ten years now. We've never actually met in person, but after squaring off during the early Commands & Colors: Ancients online tournaments, we've kept in touch and he has always been a great fellow to play against and yarn with.

The game this time was Flying Colors by Mike Nagel and published by GMT games. It's an age of sail game and although I've had it on the shelf for quite some time I am still a novice.

I won't go into great detail (which would only expose my shameful ignorance regarding warfare of the period), but do want to say that it makes for an interesting game with plenty of difficult decisions.

The turn sequence is as follows: roll for initiative, move and fire (and suffer defensive fire), and then pass play to the other player who moves, fires, and endures defensive fire in turn. If it's a large game with more than one command on each side, players will alternate command activations until all commands have moved, and then the end of turn things are done, such as checking for morale failures, wind changes, on-board fire effects, etc.


The early stages as the English close in on the French and their ailing flagship.

Fire can be aimed at the enemy's rigging or at his hull, with the former when taken to its conclusion resulting in a dismasting, and the later in a sinking. There is also the chance to board enemy vessels and capture them (or not), but we were both too cautious to venture into that in our game.

Thankfully, there are no critical hits, but things like fire or hits on marines are factored into the firing tables.

After eight turns of fairly frenetic action we had the three English vessels dismasted, two of the French ones very badly damaged, and both admirals wounded.

Mid battle: all very messy and close-quartered.


In the end the French limped off too weak in the face of withering defensive fire to close in to land the weight of shot that would be required to damage the English ships. For their part the English, lacking masts, could not manoeuvre as needed to target and finish off the more vulnerable of the French vessels.

The French depart.

As I say, I'm no expert on this period but I thought the game was gripping and the actions quite evocative of the age of sail fiction I've read. I'm not well enough versed to enjoy this solo, but I certainly hope to play some more against Andrea or other opponents.

There is a small problem with this game PBEM in that the VASSAL module seems to have a few bugs in it, which produced misunderstandings and do-overs (to be honest, the do-overs were probably more due to my rules ignorance than the fault of the module!), but the annotated movement we ended up using reduced confusion and seemed to work OK.

The verdict? A good, solid game. Not sure about how it relates to the reality, but it plays well, gives you a bit of a thrill, and has me reaching for some Patrick O'Brien again.


Saturday, October 22, 2016

Action at Chaeronea: the battle

Last Saturday I started my little battle (preliminaries can be found here) between the armies of Philip II (as at Chaeronea 338 BC) and the Roman Republic (as at Asculum 279 BC). The rules used are Phil Sabin's excellent Lost Battles, and the game was played solo.

Note: If you want to skip to the decisive action and avoid the to-and-fro that led to it (absorbing to play but perhaps tedious to read), scroll down to turn 7.


Turn 1.

The Romans move first, pushing their three units of light infantry forward to dominate the centre zones. The legions deploy into their baseline positions and the cavalry deploy symmetrically, two units per flank. On the right they prepare to defend the exit out of the marsh zone;  on the left they plan to establish themselves on the hill before the town of Chaeronea.

The Roman infantry.


The Macedonian phalanx debouches into the V between the two rivers. Alexander and the Companions push towards the marshy ground on the left by following the course of the Cephissus. Philip takes the Agema, the Hypaspists, the Cretan archers and the mercenary infantry and moves up the Haemon.

Alexander the Youthful.


On the right the Thessalians and the light infantry move out to the flank and await heavy infantry support.

Both armies deployed. Viewed from behind the Roman left.

Before we proceed, I should perhaps just mention some of the peculiarities of the terrain in this battle. The battlefield is divided into twenty zones (5 carpet squares wide by 4 deep), and attacking along a river line reduces the available attack frontage, so the zones with arrows as shown below are choke points through which attacks are made at half the normal force.

Hills and marsh zones are also movement obstacles for horse, costing cavalry twice as much movement effort as normal.


Turn 2.

Roman light infantry attack Philip's advance guard on the Haemon River and force the Cretans to retire behind the heavy infantry. The legions proper advance into their place behind the line of Roman skirmishers. On the left the cavalry under Decius Mus ascend the hill in front of Chaeronea and halt there to await the enemy.

Roman light infantry drive off Philip's skirmishers on the Haemon.


On the right the cavalry position themselves to repel any attempt by the young Alexander to engage them across the marshy ground. Legionaries stay nearby to lend support in case it is needed. If it is not, they will reinforce the infantry line.

For the Macedonians, the phalanx moves forward to command the centre of the field, flanked on the left by Alexander and companions and on the right by Philip and his guard. Philip's attack on the advanced Roman light infantry is successful, driving them off in their turn to take refuge behind their own infantry line.

Alexander awaits developments, but on the Macedonian right the heavy infantry comes up to join the Thessalians and the skirmishers as the right prepares for an attack on the heights of Chaeronea.

Looking down the lines towards the river Haemon and the town of Chaeronea.


Turn 3.

The Romans attack from right to left. They manage three hits on the phalanx across two zones, and it would've been five if not for a timely intervention of the gods to cancel a double hit. The cavalry remained in place on both ends of the line; unwilling to leave the high ground on one flank and unwilling to give up a good defensive position on the other.

The phalanx now begins to get into its work. After driving off the enemy light infantry, weight tells and three hits are scored on the legionary units, with another cancelled by the gods. Philip also attacks, and discomforts the hastati.

Alexander remains in place on the left. On the right the Thessalians and support units move up to the base of the hill where Decius Mus waits.

So far the Romans have absorbed 5 hits to 4, but they appear to have blunted the phalanx and withstood the first shock. Another turn like this and accumulated attrition will cause the phalanx to lose much of its initial cohesion and effectiveness.

After turn 3: the light infantry have fallen back behind the main lines. In the foreground the
Thessalians and their supports prepare to assault the hill on which Chaeronea and Jake Decius
the Mus (sorry, NZ joke!) stand. 


Turn 4.

There are strong attacks all along the line by the Romans. Decius on the hill makes contact with the enemy light infantry, driving them off.  Beside him two hits are scored on Philip's zone by the principes, forcing the king to attempt a rally on the second hit, which succeeds. The legions do more damage in the centre, scoring two more hits on the centre right, leaving it with only one fresh unit and putting the phalanx there in danger of quick collapse.

The centres clash. Philip on the right of centre is using his veterans (who attack on half the
frontage of the Romans legionaries) to apply unrelenting pressure to the enemy line.

Seeing the risk to the centre left, Alexander and one unit of the Companions come off the left wing to bolster the beleaguered phalanx. On the right the Thessalians score one hit of the three or four needed to defeat Decius. Following on from this, Philip's Hypaspists land another blow on the legionaries opposing them, and the phalanx manages to hurt the centre of the Roman line a little further.

Alex to the rescue (perhaps...)!


Alexander joining the centre left risks exposes the remaining Companion unit to an attack by the Roman cavalry, but the Romans will be attacking through a choke point and the chances are good that the Companions will hold for a little while, and should give as good as they get.

Turn 5.

Four hits are scored along the line and another is rallied. The cavalry of the right advances into the marsh, committing itself to the attack now that Alexander has departed to reinforce the phalanx.

The Macedonians are under pressure right along the line, and are close to breaking in two of the three zones that are in contact.

They are not ready to give up just yet though; six hits see one legionary unit shattered and the Macedonians back on the attack. There is an agonising decision for Alexander: does he pull back to save the phalanx from losing units on the next turn, or does he stand in place, fight it out, and trust that Philip will win on the right? He elects to stand for one more turn and see how the battle develops.

Looking from behind the Roman right as the Companions and equites finally meet.

In the centre zones the situation is very tense: Philip's zone has two units fresh, but the Romans only one. In the centre, the Macedonians have two units fresh, the Romans none. In Alexander's zone the Macedonians have one unit fresh (Alexander's Companion guard) and the Romans two, but with a fresh reserve available to bring up into the line.

Turn 6.

The cavalry on the Roman right break through immediately.  A double hit shatters the Companions, with an appeal to the gods failing to prevent the Roman triumph (the same dice are attained on the re-roll!).

The equites see off the Companions - twice (the gods refused to assist the Macedonians!).

The Macedonians are in terrible trouble, and Alexander, now outflanked, no longer has the option to pull back to preserve his troops. He must stand where he is.

On the other flank the story is similar: two more hits shatter a heavy infantry unit and have the Thessalians in danger of rout. They hold on, but the gods are clearly with Rome.

If the legions can just do their bit too...

But the final hammer blow is not struck. Mercifully for Alexander, the legions cannot score a hit on his zone, and in the centre zone the legionaries elect to withdraw to buy time and a delay the almost certain loss of more units to the still powerful central Macedonian phalanx.

The Macedonians respond by attacking again on the right. Just as all seems lost the Thessalians score a double hit with a magnificent charge. Decius Mus rallies one of his units, but dies in the attempt to rally another.

The Thessalian attack scores a double hit. Decius rallies the first, but falls attempting to rally the second.

The subsequent morale test clears the zone, and the Macedonians are keeping themselves in the battle.

On the centre left (where, if you remember, things have been are progressing rapidly), Alexander takes upon himself the responsibility of breaking the legions before they break him. It's now or never.

Going into the lead position with his Companions he hopes to score a double hit and force a rout. Instead he scores just one hit. It is not enough to cause a shatter, and the Romans still have a fresh unit to bring up in support.

The Macedonians in the centre follow up the Roman withdrawal, but leave behind a unit to swing left to bolster the phalanx there.

The battlefield at the conclusion of turn 6. Note the the Roman centre has bowed back
and the Macedonians are arrowing forward after following up.

Turn 7.

At this most crucial of moments noble Sulpicius inspires his men to deliver a mighty blow. They score two hits on Alexander's zone, shattering one unit of phalangites and forcing Alexander's Companions to fall back behind the infantry. The Romans score no hits elsewhere, but the cavalry on the right turns to face the Alexander's zone, which they will be able to attack from the flank on the following turn.

The equites turn in upon Alexander's flank. Their next activation could well decide the battlel!


But now the Macedonians have a turn ih which to assert themselves.

The right wing moves into position to isolate the Roman left centre.

Attacks in the centre shatter one unit and rout another.

The phalanx grinds on!


Philip makes one successful attack which also carries off the Roman and Latin light infantry in rout.

Philip spurs his men to success.

And the following Hypaspists, urged on again by their king, cause another shatter.

And again!

In the morale test subsequent the zone routs (modifiers for spent, surrounded, and cumulative casualties cannot, it seems, be defied forever). The Romans are rocked by the timing of this setback, but the rest of the army will keep up the fight.

Philip moves into the vacant zone, which gives a further negative morale modifier to the Romans. From now on they will need the maximum roll every time they are forced to test morale.

The key zone is cleared; a further -1 to Roman morale.

Thanks to this spectacular turnaround, Alexander has the unforeseen luxury of five attacks to score a hit and force a morale failure on the zone opposite him. The Macedonians also hold the Favour of the Gods token, so they can call for a re-roll on a failed combat roll if desired.

First attack: a hit.

Success! But Sulpicius refuses to despair of the Republic.


Sulpicius bravely attempts a rally, but fails. One unit is shattered. The Romans - with trepidation - throw for morale... and score the maximum! The legionaries hold on - just - but the equites flee, and their chance to charge Alexander's open flank vanishes with them.

Attack 2... a miss.
Attack 3... a miss.
Attack 4... a miss.
Attack 5 (and last)... a hit!

Sulpicius attempts a rally, and succeeds, the hit is cancelled. Alexander looks on in disbelief - the the gods don't allow re-rolls on successful rallies. The Romans get through the turn.

At this point I took a break to catch my breath and to reflect upon what a great thing miniature wargaming is when you get a battle with as many twists and turns as this one.

Turn 8.

When I return, the Romans, having survived the previous crisis thanks to the heroism of Sulpicius, get one last chance to strike at the Macedonians before the inevitable collapse.

It begins well: they roll a 6 for commands, giving them in effect three combat bonuses to employ.

The two units of legionaries in the center attack first, causing one hit on the phalangites but no shatter.

Sulpicius attacks, and rolls a ten, shattering another unit of phalangites

Alexander has three choices as a result of the shatter. Normally he would consider a rally attempt, but with the Macedonian win so close, it is better to be conservative, for if he should die in the rally, the good work of the last turn to gain morale superiority would be undone. The second option is to use Favour of the Gods to call for a re-roll, but with 6 units in the zone to absorb the hits it seems better to take the loss and keep the re-roll as insurance against lousy attacking dice next turn.

So Alexander elects to accept the hit. A phalangite unit is removed, and the morale die is rolled.

The result is a 1.

With this last shatter taking the Macedonians to a 'cumulative loss' morale modifier, and with Alexander's unit spent, there is a sudden realization that Alexander is not doing too well. The spent and veteran statuses of his Companions cancel themselves out. With the negative for cumulative losses,  Alexander's Companions buck; if they bolt, he must flee with them, and the whole zone will follow.

Have the Romans won? For a moment it appears so, but a second glance at the board shows that the Romans are now outnumbered in units by 2-1, which gives the Macedonians a +1 to their morale, and they hold steady.

The Roman have given their best, but it is not quite enough.

On the Macedonian turn the phalanx is unstoppable, and the Roman army, as bold as it has been, must accept defeat.


****


Well, what a thrilling game. The terrain made for some really interesting tactical problems, and the match up between two rising powers and two competing heavy infantry systems was thoroughly engaging.

Solo game though it was, I was originally marginally supporting the Macedonians, but as the battle wore on the gutsy fight put up by the Romans had me internally cheering their successes. I actually thought they had won on the eighth turn - miraculously given the situation - but the 'outnumbered by two units to one' modifier kept Alexander and friends on the field.

Decius and Sulpicius both managing to rally hits at crucial times was a great thing to see, and the way that the Favour of the Gods token influenced results at key moments makes Lost Battles - always an interesting solo experience - even better.

So, a deserved win to Macedon. They rallied back after being in all sorts of trouble and made this into a most memorable game.

It was a great tonic for me personally, as well. After a long time with very little play, not much inspiration, and 'aggravation bleed' around ultimately peripheral things, this was another timely reminder of why miniature wargaming is a hobby worth investing time and effort in.